Replacement and connection of batteries (radiators) of heating
The comfort and cosiness of apartments in the cold season directly depends on the quality of heating. And if the work of the boiler room can be influenced indirectly, then it is possible to ensure high-quality heat transfer in the apartment on your own. Replacing heating batteries with new appliances and connecting heating batteries with your own hands will help to increase the comfort in the apartment during the heating season. Performing this type of work will require certain knowledge and installation skills. But those who can handle the tool and strive to do everything on their own will be able to do their own replacement of heating batteries.
Content
- Types of heating radiators
- Connection diagram for heating batteries
- Ways to connect heating radiators
- Connecting heating batteries – step by step instructions
This type of work, such as replacing heating batteries in an apartment, is a tough necessity in old houses. This is especially true if the battery life is quite long, and they were installed when building a house. As for new buildings, the replacement heating radiators will be justified if they are not satisfied with their characteristics or appearance.
Types of heating radiators
Today on the market are various types of radiators, they are also radiators. Batteries differ among themselves in operational characteristics, appearance and material of which they are made. When choosing, you should be guided by the following characteristics: service life, heat transfer capacity, internal pressure.
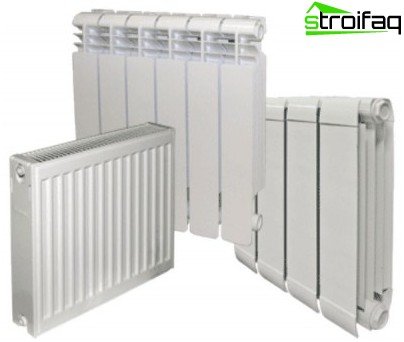
Types of heating batteries: panel, sectional
Cast Iron Radiators heating is a kind of classic. Batteries from this material can be found absolutely everywhere. They have the longest life, up to 35 years. But the heat transfer of such radiators is quite low. Operating pressure of cast-iron radiators 8-9 atm. The aesthetic appearance of such radiators is far from perfect, so they have to be hidden behind special panels.
Steel radiators have a shorter service life (up to 20 years) than cast iron. Compared to cast-iron, the heat transfer power of steel radiators is higher, the cost compared to aluminum is lower, and the operating pressure is 7–9 atm. Appearance and design allow you to install them openly. Steel heating radiators have a balanced price-performance-performance ratio.
Aluminum radiators have the greatest heat transfer. Their service life is 20-25 years. The working pressure of aluminum radiators reaches 18 atm. Aesthetically pleasing design. Another advantage of these radiators is their low weight and ease of installation..
Bimetal radiators Due to the external aluminum construction they have enhanced heat dissipation. And a service life of 20-25 years is achieved through the use of high-quality steel for internal construction. Working pressure can reach 35 atm. In addition to steel-aluminum, there are copper-aluminum radiators. They have the greatest heat transfer among all radiators. Due to the use of copper for internal structures, the service life of bimetallic radiators can be 35 years or more. Working pressure is up to 16 atm. Aesthetically pleasing design.
Connection diagram for heating batteries
To perform the connection, you need a connection diagram for heating radiators. It should indicate the method of connecting the radiator, measuring and stop valves, as well as the pipe wiring system.
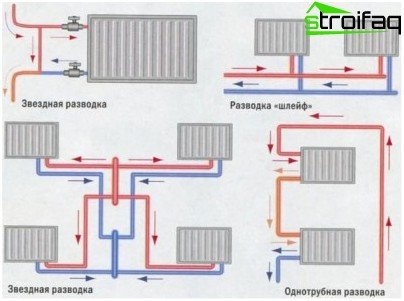
Connection diagram for radiators (batteries) for heating
There are two systems: one-pipe and two-pipe. Most apartment buildings have a single pipe system. Water is supplied in it from top to bottom along the riser. A significant drawback of such a system is the inability to control the temperature in the batteries, as well as the replacement or repair of the batteries themselves. But this can be corrected by installing additional structural elements – bypass, control and shutoff valves.
In a two-pipe system, hot water flows through one pipe, and cooled water returns through another. For each of these systems, heating radiators can be connected in various ways..
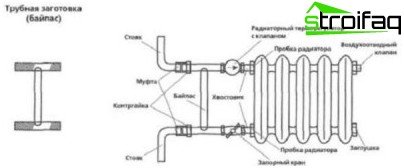
Location and installation method of the bypass
Important! A bypass is a jumper pipe between two pipes extending from a radiator in a single pipe system. Its diameter should be less than the diameter of the pipes to which it is connected..
Ways to connect heating radiators
Despite the presence of two systems, there are only three ways to connect the radiators themselves: one-way lateral connection, diagonal connection, bottom connection.
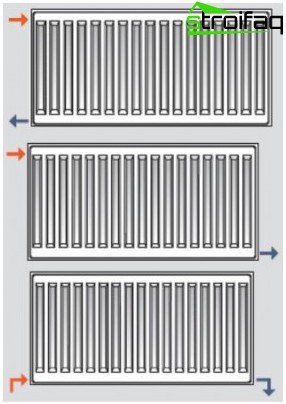
Ways to connect heating batteries
- In a lateral one-way connection, hot water is supplied to the upper branch pipe of the battery, and the cooled one leaves the lower one. This method allows to achieve the greatest heat transfer. If we interchange the connection of hot and cooled water, then we lose about 7% of the power.
- For large radiators, it is necessary to apply diagonal connection method. Here, the supply of hot water occurs at the top on one side, and the exit of the cooled occurs at the bottom on the other side. This connection method allows you to warm the battery along its entire length. If you supply hot water from below, you can lose 10% of the power.
- In case the heating system passes through the floor, use bottom connection method batteries. Here, the supply and exit of water occurs from below, but from different sides. Unfortunately, this method of connection in comparison with the side loses 10% of heat transfer.
Connecting heating batteries – step by step instructions
Connecting and replacing the heating battery with your own hands is carried out during the period when there is no water in the heating system. It is very difficult and expensive to change batteries in the winter. If you had to do this in winter, you will have to call the appropriate services, which will shut off the water supply and merge its residues. Only then can you proceed directly to the replacement.
For work, torque wrenches, special radiator wrenches, conventional wrenches, a hammer drill and drills will be required. The materials will require the radiators themselves, measuring and shutoff valves, brackets for attaching the radiators, if the house has a single pipe system, a bypass, a special valve for venting air, ordinary and straight tees, nipples, corners, couplings, threaded pipes are required.
- When the water is shut off, remove the old batteries. Using the keys, unscrew the threaded connections. It may be necessary to use force, since the metal has the property of “boiling”. If the connection is not amenable, you will have to cut the pipe with a grinder and make a new thread.
- After that, remove the old radiators and mounts under them.
- We mark the installation location of the new mount, drill holes and put the brackets. We install new batteries on them.
- To get the best heat dissipation, we put the battery at a slight angle relative to the wall and place it at a height of 10-12 cm from the floor, 10 cm from the windowsill, 5 cm from the wall.
- Now you can connect the batteries to the common system, according to the selected connection method. If necessary, increase the length of the pipes and fix them to the wall.
Important! All threaded connections should be tightened with torque wrenches. This is necessary to avoid thread breakage and leakage, as the entire system is under pressure..
Once the new radiators are installed, you can let the water in and enjoy the heat. The main thing here is that all connections are tight, there are no leaks anywhere. Otherwise, everything will have to be redone again, and this is unnecessary labor.


