Fireplaces, Russian and Dutch stoves again confidently return to modern country houses, for many centuries adorning the homes of ordinary people, magnificent palaces of the nobility and warming them with lively heat. The furnace in the house has long served as a symbol of the hearth and well-being of the family, it has been built for centuries, decorated with tiles and this tradition is still alive. Ceramic tiles for stoves and fireplaces, in addition to the decorative function, also solve several practical problems: due to the absence of cracks, the heat transfer of the stove increases, toxic combustion products do not penetrate the room through the ceramic lining of the stove, and it is much easier to clean smooth tile from dust than rough stucco. The only thing to keep in mind is that only a heat-resistant facing tile for stoves is suitable for finishing a fireplace stove, and a clay-based solution is the binder, the strength of which under the influence of high temperatures only increases with time.
Content
- Types of ceramic tiles for stoves
- Durable colorful terracotta
- The luxury and beauty of majolica
- Heat resisting brick tile
- Porcelain tile – innovative cladding
- Tiles – unique design
Types of ceramic tiles for stoves
Given that a stove or fireplace is an object that heats up to very high temperatures, the materials for their decoration must comply with the following operational characteristics:
- high temperature resistance;
- strength;
- high resistance to mechanical stress;
- thickness not less than 6-8 mm;
- low pore structure.
Only a few traditional and modern types of building ceramics – terracotta, majolica, clinker tiles for stoves, tiles and porcelain tiles that differ from each other in design and way of laying, fully correspond to the listed properties. Depending on the purpose of the room, one or another tile for stoves can be selected for decoration: if the thermotechnical characteristics of the tile are most important when finishing the stove for the bath, then the fireplace or stove in the living room still needs to match the style of the interior. Let’s consider all ceramic options for facing furnaces.
Durable colorful terracotta
This is one of the oldest types of ceramics, which is unglazed products with a highly porous structure of clay of a certain grade, which are first pressed and then fired. Terracotta was widely used in the architecture of Ancient Greece, Rome, Asia and Russia for the manufacture of tiles, decorative elements, tiles and tiles for facing foci and stoves. Characteristic differences of the material are high strength and bright enough red-brown, terracotta, color.
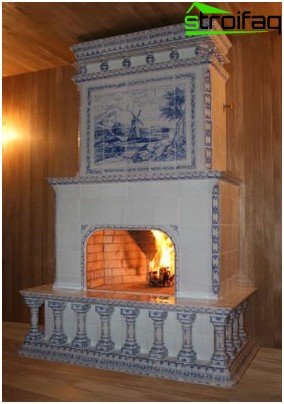
Majolica – antique glazed tile for facing stoves
The luxury and beauty of majolica
In fact, it is improved, glazed, terracotta. The name was given to it by the Spanish island of Mayorsky, from where merchants brought tiles, utensils and decorative items painted with tin-lead glaze. Later, the art of painting ceramics from the Mediterranean came to Europe and Russia..
Majolica products were painted manually by talented artists, and facing the stove with ceramic tiles of this kind was considered a luxury, accessible only to very wealthy homeowners.
Heat resisting brick tile
This variety of building ceramics was created as a more technological alternative to facing bricks, traditionally used for decorating stoves and fireplaces in Holland, Germany and other countries of Northern Europe. Clinker is made from a mixture of several types of clay, to which chamotte and mineral dyes are added, pressed, and then fired at high temperatures. The result is a durable heat-resistant lining material with a low porous structure 9-12 mm thick, featuring a wide range of shades of natural clay from white and beige to bright terracotta and chocolate brown.
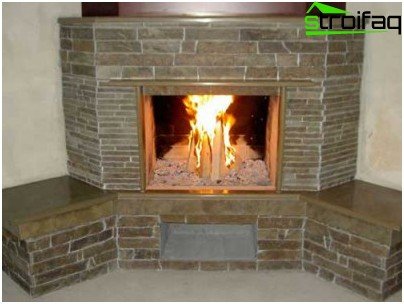
Clinker tiles for furnaces are distinguished by a wide range of shades of natural clay from white and beige to bright terracotta and chocolate brown
Porcelain tile – innovative cladding
The most modern type of decoration ceramics, created in Italy in the mid-80s of the past century. It is produced by pressing at high pressure and temperature a mixture of several grades of clay, quartz sand with the addition of the finest fractions of granite and marble chips, salts and oxides of various metals as dyes. Due to the monolithic non-porous structure, resistance to low and very high temperatures, as well as a wide range of colors, textures and textures, this type of building ceramics is widely used in the decoration of exteriors and interiors of buildings. In particular, the facing of the stove with porcelain stoneware tiles is not only inferior to the traditional types of tiles in thermotechnical characteristics, but, thanks to its diverse design, can successfully imitate majolica, terracotta, clinker, granite, marble and other natural materials.
Tiles – unique design
This is a unique piece of ceramic decoration material, decorated with a glazed pattern, originally created for facing stoves and used in this role in ancient Babylon.
Tiles, like other traditional types of facing ceramics, are made from certain grades of clay with subsequent firing, but they differ in the shape of a box, due to which its heat-saving characteristics are significantly increased, and the heat transferred from the stove to tiles is considered the most environmentally friendly.
How to tile a stove
When choosing a ceramic tile for decorating a fireplace or stove, be sure to pay attention to whether there are special notches on its wrong side that provide stronger adhesion to the binder. Some manufacturers also produce tiles designed for furnishing furnaces with a groove-comb locking system, which allows laying it without visible seams at the joints.
Metal mesh cladding
Before facing the stove with tiles, it is necessary to prepare its surface and masonry seams. If necessary, the old paint is removed from the surface of the stove and cleaned of dust and dirt with a metal brush, and masonry seams are embroidered to a depth of about 10 mm.
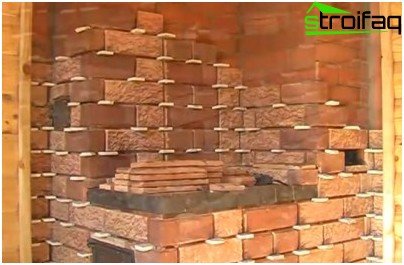
For durability of facing before laying tiles, the furnace surface is reinforced with a mesh or aluminum corners.
For the strength of future masonry, the furnace is fitted with a metal wire mesh with a mesh size of not more than 150×150 mm. The grid is fastened to the brickwork with 100 mm nails, evenly driving them into the joints between the bricks or using self-tapping screws, having previously drilled holes d = 4-5 mm for them in the brick.
Then, a layer of cement mortar of grade no lower than M400, sand and clay, prepared in the ratio of 1 part of cement, 0.2 parts of sand and 3 parts of clay, is applied to the stove covered with wire mesh. The clay variety is not critical in this case..
When the layer of cement-clay plaster is completely dry, you can start laying tiles. The laying of the first row of tiles begins from the bottom, regularly checking the horizontal with a level or comparing it with the markings previously applied using a horizontal cord. Cement-clay mortar, prepared in the same ratio as for plaster, is applied directly to the underside of the tile, evenly distributed with a notched trowel, pressed to the surface of the tile with your hands, slightly tapping with a rubber hammer.
First, lay out all the whole tiles of each row and only at the end they are cut using a glass cutter or a tile cutting machine. To ensure the same width of the joints along the entire surface between the tiles, restrictive crosses are installed – two horizontal and vertical sides of each tile. In this case, the seams are filled with a solution of approximately half for a decorative effect. To ensure that the plane of the tiled surface is perfect, the position of each newly laid tile is checked with a wooden strip.
After laying is completed, a drip and dirt from the binder solution are removed from the ceramic surface with a dry, clean cloth. After 3 days, grout the joints; after another day, the stove can already be used.
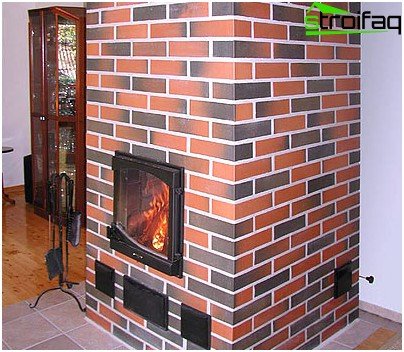
Three days after the completion of the tiling, grouting is performed and another day you can heat the furnace.
Using aluminum corners
Instead of wire mesh, special aluminum strips with holes can be used as reinforcement to ensure the strength of masonry. The aluminum reinforcing strips are even installed before the stove is tiled, at the construction stage or in vertical joints of masonry previously embroidered to a depth of about 10 mm. Then, corners are bolted to these strips – a tee profile made of aluminum, and between them they are laid on a cement-clay mortar a ceramic tile in the same sequence as when facing a grid.
A binder solution is applied to the reverse side of the tile and with the help of the efforts of the hand and corrective tapping with a rubber mallet, the tile adheres tightly to the brickwork. The horizontal with this method of laying is controlled by angles, and the vertical should be constantly checked with a rail.
Tiling the stove
Facing stoves with tiles has long been equated with art, and the masters who own it have enjoyed special respect. Compared to a conventional stove, a tile-lined stove is not only very beautiful, but its heat transfer is much higher: each square meter of the area of a tiled stove gives 0.25-0.3 kW more heat to the space than any other heating device.
The main feature of the process of masonry tiled stoves is that first they install the tiles, and then they are attached to the brick body of the stove. Tiles can be flat, cornice, angular, but all of them are a ceramic box with an elegant glazed front surface and an open mounting box with a wrong – rump.
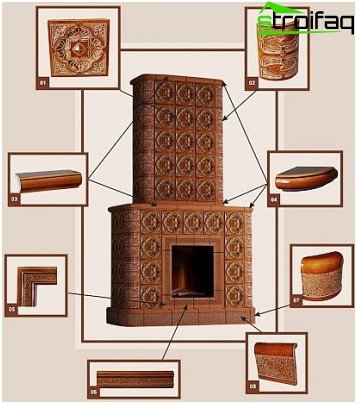
Tiles can be flat, cornice, angular, but all of them are a ceramic box with an elegant glazed front surface and an open mounting box with a wrong – rump.
Unlike other facing tiles, tiling the stove is done simultaneously with its laying, in several stages, it is very time-consuming and only professionals who know all the techniques of ancient art should trust this work.
Preliminary preparation of tiles
Since tiles are piece non-standard products, before starting work, they must be sorted by color, laying glazed or cracked tiles towards the side of the marriage. The lower rows are laid out with darker tiles, and rejected, but suitable, can be laid in inconspicuous places.
Then tiled tiles are customized to size, chopping and grinding the edges of the sides. Usually the first reference sample is processed, the dimensions of which are then adjusted to the rest. Carefully, with the help of a sharp steel strip, the trailing edge is cut, and then the glazed front edge. Particularly carefully grind the horizontal edges: when laying, the glaze of two adjacent tiles should not be in contact. Immediately before laying, the tiles are soaked in water for better adhesion to the clay binder..
The order of masonry tiled stove
The laying of the tiled stove begins with the laying of the first row of tiles, to which the bricks of the furnace body are then attached. At first, it is recommended to lay the wall of tiles dry without mortar, check their vertical and horizontal position, disassemble and, leaving the first row, start laying on the binder solution from the corners.
Each subsequent row of products is stacked in the following order..
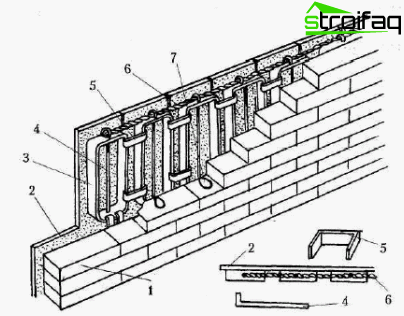
The scheme of facing with tiles simultaneously with the implementation of brickwork 1 – bricklaying 2 – tiles; 3 – rump; 4 – pin; 5 – bracket; 6 – wire for knitting rows; 7 – fixing loops
The tile rump is half filled with clay solution and river pebbles are pressed firmly into it. A layer of masonry mortar is applied on top of the filler flush with the sides and bricks are pressed to the tile.
When the height of the brickwork reaches the level of the tiled row, the tiles are pulled together with wire, passing it through the bends of the mounting crutches. Crutches should then be besieged, and the ends of the wire lead to brickwork. The vertical rows of the rump of tiles are fixed with steel brackets, making sure that they snap into place.
The thickness of the seam between two horizontal rows of tiles should be at least 3 mm: when the brickwork shrinks, the tiled “chain mail” will settle simultaneously with it.
After completing the installation of tiles and masonry, all seams are thoroughly cleaned with an awl, washed from the remnants of the solution, the tiled surface is dried and dried. Then, gypsum dough is applied to the seams, and after 10 minutes, its excess is removed with a clean, dry cloth.
After masonry and cladding is completed, the tiled stove should dry for about 2-3 weeks and only then can a fire be lit in it.
Whatever type of facing ceramics you choose, finishing the stove with tiles will bring warmth, beauty, comfort to your home and create an atmosphere of inviolability of the hearth in it..


