Do-it-yourself water-heated floor
Imagine comfortable bathing in a heated house on a cold winter evening. Everything seems to be fine, but after the end of this relaxing procedure, a person puts his feet on a cold tile and “falls from heaven to earth.” Yes, now the pleasant sensations fade into the background, you need to wear warm socks and slippers. In addition, a similar situation applies not only to the floor of the bathroom, but also to the kitchen, bedroom and other rooms. Even in a warm room, you can often notice that the body seems to be feeling fine, but the legs are freezing. Water floor heating solves this problem in the best way, therefore this publication is dedicated to it..
Content
- Warm floor – increased comfort
- Why feet are always cold?
- Advantages of a warm water floor
- Convenience of additional heating
- Saving is an important argument
- Freedom of design and architecture
- The construction of the “good of civilization”
- The main components of the water floor
- Mats – heat insulating material
- How to make a concrete water floor heating
- The first stage is the collector group
- The second stage – surface preparation
- The third stage – pipe laying
- The fourth stage – pouring screed
- Fifth Stage – Finish
Warm floor – increased comfort
Even 15 years ago, water warm floors caused surprise and bewilderment in people. It’s just that a person couldn’t imagine in a wonderful dream that in the winter season you can walk barefoot on the floor with pleasure, and children can frolic and play on the floor, while parents are completely calm – the child will not catch a cold. Then the thinking was completely different, people carefully carpeted the floors and walked in slippers or woolen socks.
Today, this remnant of the past can be forgotten and “look in the eyes” of progress and new technologies. Plus, any person can install in their monastery a warm water floor with their own hands and enjoy its benefits to the fullest.
Why feet are always cold?
What is heat? This is a form of energy, necessary not only for human life, but also for a full existence. The reason for freezing the legs of a person who is comfortably located in a chair is the improper distribution of this energy in a room that is heated, for example, by traditional radiators. If we recall the lessons of school physics, then we can say that air flows during heat exposure circulate according to this principle: the warm air stream heats up from the radiators and rises to the ceiling, then partially cools and moves to the floor. This is the point that the air was heated to a temperature of +26 degrees, and went down already with a mark of +18. Such a distribution does not quite correspond to the physiological needs of a person.
The heating elements of the warm floor create the “comfort zone” at the surface: + 22-24 ° C, and at the level of the head this very air is a little cooler, about +18. Such a temperature distribution is ideal for a person, therefore, a warm water floor receives extremely positive feedback, because it is a wonderful feeling, comfort and a modern attitude to life.
Advantages of a warm water floor
This system has a lot of positive aspects, I would like to note the most significant.
Convenience of additional heating
It is great that in our time, the radiator is not the only source of heating. For example, the heating season has already ended or has not yet begun, and on the street, respectively, and indoors, it is cold. What is left to do? Only dress warmer, head wrapped in a blanket and forbid children from playing on the floor. Warm water floors cope with this problem perfectly, a person decides whether the heat in the house should be cool.

Warm floor – comfort and coziness
Such an independent heating system creates a favorable microclimate in the room, much better than heating with convective appliances. The heating temperature in each room is regulated as desired, so there will be no cold and excessively overheated zones in the house.
Another plus in the direction of the warm water floor is the temperature regime of daytime and nighttime, that is, using modern sensors, the temperature is maintained automatically. And limited air circulation reduces the amount of dust rising up.
Saving is an important argument
To ensure the ideal temperature in the house, apartment, office, the warm water floor has no analogues and competitors. The main element in the system is pipes that fit inside the structure. The heated water circulating in the system distributes heat evenly, which means there are no superheated and slightly heated sections, which cannot be said about the radiator heating system. Energy is saved by creating optimal temperature indicators, and even it can be reduced by a couple of degrees and feel great.
Freedom of design and architecture
The completely hidden underfloor heating system and the absence of visible heating elements on the surface opens up enormous opportunities for acceptable interior decoration (in the sense of furniture arrangement) so that there is more free space. And also pleasing to the eye are windows without a burdensome heavy radiator. Stone and ceramic floors can be safely planned, because they will not be cold and unpleasant to the touch..
The construction of the “good of civilization”
The device of the warm water floor is a kind of layered structure, which is also called the “floor cake”:
– base – wooden draft floor or concrete slab;
– a waterproofing layer (it can sometimes be supplemented by a damping tape around the entire perimeter of the room);
– a heat-insulating layer that prevents the penetration of heat from the system pipes into the concrete base. And also it reflects heat upward towards the floor;
– pipe system;
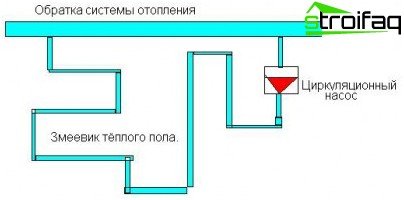
Scheme of a warm water floor
– bearing layer. This can be a concrete screed (in most cases) or a dry screed made of moisture resistant gypsum fiber sheets;
– finish layer.
Important: the thickness of the structure as a whole varies between 70-150 mm. And it depends on the diameter of the pipes, the thickness of the insulation layer and the power of the screed itself.
According to the constructive device, underfloor heating underfloor heating can be performed in three versions:
- Concrete When installing this type of floor, polypropylene or metal-plastic pipes are immersed with a cement-sand screed. It is she who performs the role of the heat distributor.
- Wooden systems – aluminum heat-reflecting plates and pipes with a heat carrier are placed either in the chipboard plates or between the racks.
- Polystyrene. This system involves laying water (non-metallic) pipes on polystyrene plates.
The main components of the water floor
- The scheme of a water heated floor looks like this: A pipeline is the most important element of the system, a coolant moves along it, it heats the walls of pipes that give off their heat to the surrounding surface. As a rule, most often pipe for underfloor heating metal-polymer, i.e. metal-plastic, is used. Although it should be noted that in recent years PEX pipes made of cross-linked polyethylene have become popular.
- Damper tape. It is not used in all cases, but its use is mandatory for installing a warm floor with a concrete screed. This is a tape made of foam (thickness 1-2 cm), which is glued around the perimeter of the room. When the floor is heated, the concrete screed expands, the main task of the damper tape is to ensure the integrity of the coating (tile, screed, marble) by compression, and also it does not allow the appearance of cracks.
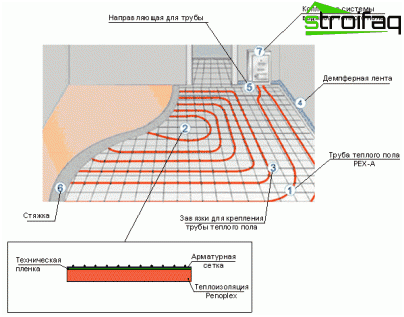
The device of a warm water floor
- A heat-reflecting coating is necessary so that thermal energy heats exclusively the external surface of the floor. Basically, this coating is used together with a reinforced mesh designed for fastening pipes.
- The plasticizer eliminates the formation of cracks in the screed. It is added to concrete; as a result, the properties of concrete change; it acquires stable indicators of temperature changes..
- The collector is responsible for connecting the underfloor heating to the heating system itself. Adjustment, as well as uniform distribution of coolant – collector functions.
- Manifold cabinet – collector location.
Mats – heat insulating material
As already mentioned, heat-insulating material should be laid on a concrete base. Usually in modern construction mats are used for a water heated floor made of polystyrene, and for even greater efficiency, a foil version can be used. This is an excellent solution, since the foil has the property of reflecting infrared radiation towards the floor surface (working), thereby it prevents excessive heating of the substrate.
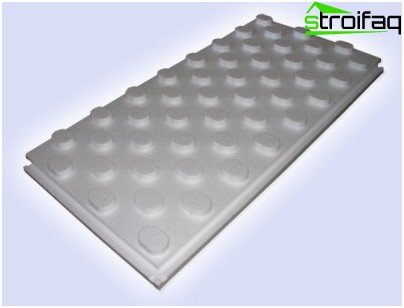
Polystyrene mats
Ideally, you can use mats with clips, which are special equipment for underfloor heating. The benefits are enormous: ease of installation and a significant reduction in work time. The truth is that mats have a drawback – a high price.
Important: such plates are made of very dense polystyrene with high mechanical strength. This means that the mats will retain their shape and size for a long time..
Thermal insulation mats are laminated and in a film coating, that is, not laminated.
How to make a concrete water floor heating
This option is the most common, but before you make a warm water floor, you need to pay attention to an important point: the room for placing all layers of the “pie” must have a margin in height.
Important: if you do not take into account the final flooring, the reserve should be 85 mm.
Creating a warm water floor with your own hands is a rather difficult task, but still feasible. To do this, you first need to draw up a project and calculate the warm water floor (here you need the value of the room area, its dimensions).
It should also be noted that laying water floor is more rational in private homes, rather than in apartments. The fact is, the connection of pipes to the central heating is prohibited.
The first stage is the collector group
It may sound a little strange, but the installation of a warm water floor begins with the walls. At this stage, you need to choose a place closer to the center of the room. This is a cabinet for collectors, it can be bought on the construction market. This cabinet is most often installed in close proximity to the floor surface. For this work, you will need a hammer, a chisel and physical labor.
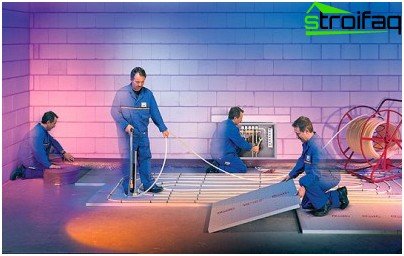
Laying a warm water floor: installing heat-insulating material, installing a collector assembly and a pipeline
After installing the manifold cabinet, a supply and return pipe is started there. The first is engaged in the supply of coolant, it contains hot water inside, which comes from the boiler. And the second performs opposite functions: it collects water that has passed through the heating system and has given part of the energy to the screed. This water is sent again to the boiler, it is heated there and again ends up in the supply pipe. The circulation pump provides a continuous flow of water.
But back to the locker. On each pipe, shut-off valves must be installed. What are they needed for? It’s simple, if suddenly there is a need to remove the room from the heat supply system (repair or cost savings), then the rest of the house will not be affected and will continue to function. Then you will only need to close these valves and all.
Important: the plastic pipe and the metal valve are connected by a compression fitting.
Then the manifold is connected to the valve. Since by and large it is a piece of pipe with several branches, a logical question arises: what is connected at the output? In the first case, you can use a plug, but it is better to place a splitter, on the one hand – a drain valve, on the other – an air vent. When the cabinet is assembled, you can switch to the warm floor.
The second stage – surface preparation
The floor is cleaned of debris and the horizontal surface is evaluated. Of course, we are not talking about perfect evenness, but the difference in a few centimeters will have to be aligned.
Important: ignoring this advice, you can end up with uneven floor heating.
A waterproofing film is laid out on a flat floor. This is to prevent moisture absorption..
Further along the perimeter of the room, the so-called damping tape is glued on the walls. By its design, it resembles adhesive tape, which means that there will be no problems with gluing. Typically, the height of the tape is 10-15 cm, the layer of screed and thermal insulation is overlapped. After finishing work, excess tape is cut off.
Laying insulation is the next step. Since heat loss through the floor can be 20%, it is advisable not to save on a heat insulator, it will pay for itself in the near future. As a heater, you can use extruded polystyrene foam, mineral wool, technical cork or specially made mats (they have already been mentioned).
The third stage – pipe laying
Pipe fastening can be done in several ways. For example, a reinforcing mesh can be applied to a heat-insulating layer and a pipe can be attached with a wire. And also on sale there are all kinds of devices, clips and fastening tapes that facilitate this process.
Important: if using the wire fastening method, a small clearance is required. If the pipe is tightly tightened, then after some time it may succumb to deformation..
The recommended value of the length of the laid contour is 50-60 m. If it is not possible to invest in this distance, you need to create a new contour.
Important: in this situation, you must purchase a dual-circuit collector.
There are different ways to lay pipes to compensate for heat loss..
Snake laying
This is a pipe laying in the form of a snake. The highest temperature is at the beginning of the pipe, for this reason it is best to start laying from the side of walls and windows facing the outside of the house. This method is suitable for rooms with medium and small area..
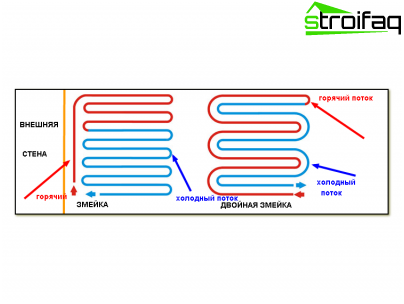
The snake piping the water floor is laid in small and medium-sized rooms
Spiral styling
Its essence is as follows: the supply and return pipes are placed in parallel, the cooling of the pipes is compensated by heating the neighboring pipe. Such installation is often used in places with increased heat consumption and in rooms with a large area..
Important: you need to purchase only high-quality pipes, because the floor is mounted for many years.
If in the future there are thoughts on the use of non-freezing fluids, it is better to install polypropylene pipes, they are more resistant to aggressive environments.
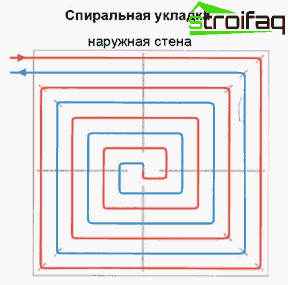
The spiral laying method is used for arranging large rooms, rooms with heavy traffic
The fourth stage – pouring screed
After the installation is completed, it is necessary to carry out test work, if everything is fine, then you can safely fill the floor (minimum height 3 cm, maximum 7 cm).
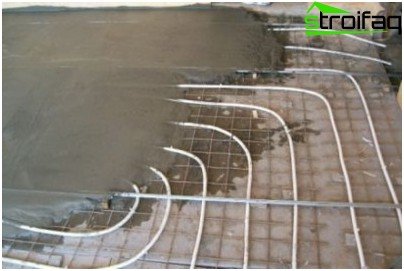
Pouring concrete screed over a warm water floor
As for the sand-cement screed, you can buy a special mixture for underfloor heating, there is a choice here, would there be money.
Fifth Stage – Finish
At this stage, the best option is to lay ceramic tiles, since it has a large thermal conductivity. If it involves the use of a laminate, then only those models that are combined with warm floors.
If natural materials will be used, for example, parquet and parquet, it is better to turn to professionals for help, since accurate calculations are important here.
A properly laid warm water floor will delight the inhabitants of the house for more than one year and give warmth and comfort, and the touch of bare feet on the floor will be pleasant.


