Installation heating radiators – not such a simple task as it might seem at first glance, suggesting the presence of both theoretical knowledge and practical experience, because the slightest inaccuracy can lead to problems during operation. If you haven’t had to deal with this type of work before, step-by-step instructions and videos will be invaluable..
Content
- A bit of theory to know
- Types of heating systems
- Radiator installation diagrams
- DIY radiator installation
- Battery Installation Rules
A bit of theory to know
As already mentioned, high-quality installation of heating radiators is impossible without theoretical knowledge. First of all, you need to have an idea of heating systems and battery wiring methods.
Types of heating systems
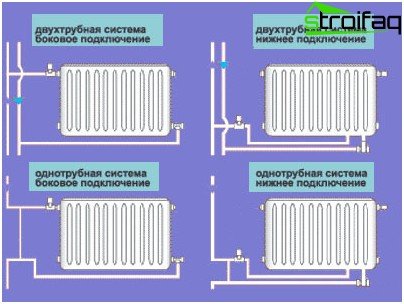
To date, two heating systems have been widely used: one-pipe and two-pipe.
1. One-pipe heating system. Hot water supplied to the building flows down the heating devices. This system is implemented in almost every standard apartment. The disadvantage is the inability to adjust the temperature without installing additional structural components. Moreover, with such an organization, the water on the lower floors will be much colder than on the upper.
2. Two-pipe heating system. In this case, hot water circulates through one pipe, and the return (cooled) through another. This heating system is used in cottages and private homes. The main advantage is the constant temperature of the heating devices and the ability to regulate the temperature regime.
Types of heating systems
Radiator installation diagrams
The installation diagram for heating radiators is a way of wiring batteries or, quite simply, a method of connecting devices to a centralized network. The most common schemes:
1. Lateral connection – the most popular, as it helps to achieve maximum heat transfer.
The inlet pipe is connected to the upper pipe, and the discharge pipe to the lower. When connected the other way around (liquid flow from below), the power decreases.
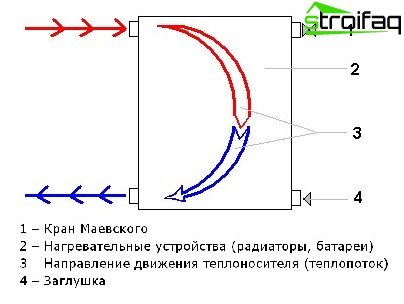
Lateral connection type: arrangement of structural components, coolant movement pattern
2. The diagonal connection is optimal for long radiators. This method will allow you to warm up the battery evenly. The supply pipe is connected to the upper nozzle on one side, and the outlet to the lower – on the opposite.
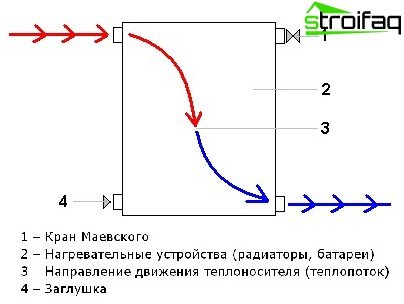
The diagonal connection diagram is characterized by minimal heat loss – the best option
It is important! Battery power when supplying coolant from below is reduced by 10%.
3. Bottom connection. This type of wiring is used if the heating system is hidden in the floor. Compared to lateral heat transfer with this method, the efficiency will be reduced by 5-15%.
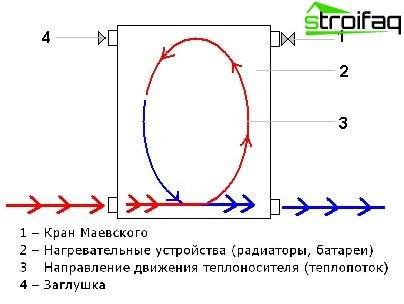
The lower connection diagram or “Leningradka” is used in cases where the heating pipe is placed in the lower floor area, it is characterized by the highest values of heat loss
DIY radiator installation
The heating radiator must be installed strictly horizontally or with a slight slope towards the pipe. What is it for? At the end of the heating season (after draining the water), it is imperative that the battery is dry. With a minimum slope towards the pipe, the radiator will merge completely.
It is important! Batteries are placed at a height of 8 cm from the windowsill, 10 cm from the floor and 5 cm from the wall.
Installation of heating batteries involves, first of all, processing the wall, which needs to be leveled and plastered, i.e. prepare for the finish. During the installation of aluminum and bimetallic radiators, it should be borne in mind that these heating devices must be in the package until the completion of the whole complex of works and a check for operability. A vent valve is installed on each radiator..
It is important! When tightening the valve, the forces should not exceed 12 kg. Professionals advise using a torque wrench for control, which allows you to tighten the valve with a specific clamp.
Before fixing, the radiator plugs must be screwed into the radiators, gaskets and plugs, and thermostatic valves installed. Remember, when installing plugs and adapters, it is impossible to clean the surfaces in contact with the gaskets. Otherwise, the docking of the elements will not be completely tight, which will inevitably lead to leakage..
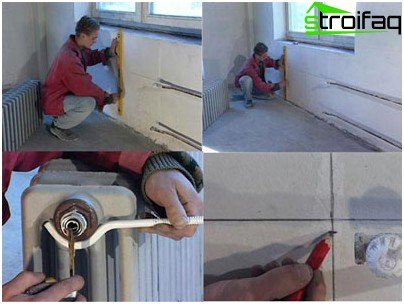
Battery installation: marking and installing radiator brackets
The brackets on which the batteries are installed are fixed on the wall with dowels. The method is allowed when the fasteners are cemented in previously prepared technological holes. Hang the radiator on the brackets so that the hooks are between the sections.
Then the lower edges of the battery collectors will fit into the brackets correctly. Using the level, check the position of the heater, and we can say that the installation of radiators do-it-yourself heating completed. It remains only to connect the battery to the pipes of the riser and seal the seams with tow or sealant.
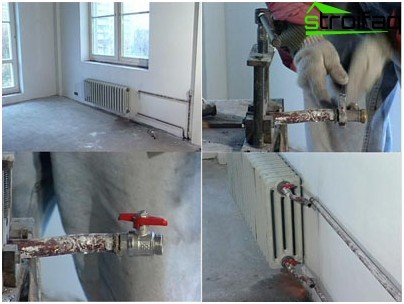
Do-it-yourself radiator installation: installing valves and connecting the device to the network.
Battery Installation Rules
Installing heating batteries with your own hands is difficult in that you need to take into account the many nuances on which the quality of work will depend.
- purchase torque wrenches. Many heating system connections require strict compliance with dynamometric standards. Due to the fact that the water in the heating system is under pressure, insufficiently tight connection, as well as excessive constriction, will lead to leaks. Torque tools will avoid this;
- when installing the battery, you need to shut off the water and pump it out of the system using a pump; think about draining the water: there are always areas where it is impossible to block the water, so put liquid containers in the installation area;
- select the wiring diagram and details in advance. The type and number of parts depend not only on the wiring diagram, but also on the type of radiator;
It is important! Many, guided by the list, get ball valves with an American, but this part is exclusively for specialists, in which it is very difficult to achieve tightness. You can replace them with radiator valves.
- single-pipe heating system requires a bypass – a workaround for the flow of coolant. Otherwise, when the valve is closed, the riser heating system will be paralyzed;
- to prevent heat loss, you can build a “cake” of foil and insulation material. The heat insulator will reduce the degree of heat penetration through the wall to the street, and the foil will reflect the desired heat into the room;
- between the radiator pipes we need jumpers that must be located in front of the taps, i.e. so that when the taps are turned off, water passes through the jumpers, and then goes to the riser. Failure to follow this simple rule will turn off the heating of all lower floors..


