How to put a tile in the bathroom
How to put tile in the bathroom – This question is of interest to many people who decide to bring novelty and modernity to this room by making normal repairs. Undoubtedly, this is an excellent facing material with durability, good strength, and resistance to temperature extremes. He is also outwardly attractive and extremely easy to care for. Therefore, step-by-step technologies will be described in the article so that everything works out qualitatively.
Content
- We collect tools and materials
- We will carry out preparatory work
- Tile base preparation
- Marking is the guarantee of aesthetics
- Layout selection, basic rules
Laying tiles on the walls
We collect tools and materials
The process of laying tiles is really simple, it does not need specialized knowledge, enough patience and the desire to do everything yourself. This will save money, which is better spent on more expensive tiles and plumbing. Of course, tile laying in the bathroom begins with the definition of design and the choice of tiles – plain tiles, mosaics, arrangement of drawings.

Set of necessary tools
Then you need to determine the quadrature: for this, the area of the walls, floor is calculated, 5% is added for the battle and trim. But this is not all, the following materials will be needed:
- a sufficient amount of tile glue;
- liquid waterproofing (in case the walls are not moisture resistant);
- grout for joints;
- crosses;
- rag, sponge.
Do not forget about the tools:
- pencil;
- roulette and level;
- notched and rubber spatula;
- metallic profile;
- drill (a set of victorious drills, a whisk nozzle);
- grinder and tile cutter;
- bucket, mallet.
We will carry out preparatory work
Tile base preparation
Laying tiles in the bathroom is impossible without carrying out “dirty” work. Initially, all furniture and plumbing is dismantled and removed from the bathroom. This is done in order to preserve values and to obtain operational space, because it is much more convenient to work this way. You also need to beat off the old tile from the walls and floor, trying not to damage the base.
Important: this process should be carried out carefully so as not to aggravate the subsequent alignment of surfaces.
The next important step is direct alignment. This is due to the fact that the ideal styling result is determined by the evenness of the base. The walls are checked by the rule for the presence of “littered” corners and pits. The detected defects are carefully repaired: cement mortar is used for significant pits, and starting putty is used for small ones.
Important: it is advisable to apply small furrows on the walls, such a trick will provide better laying of tiles.
As for the floor, it is necessary to use a cement-sand screed to level out significant irregularities (more than 2.5 cm). Before you start laying tiles, you need to perform waterproofing, that is, coat the surface with a special solution.
Well, the final stage – garbage removal and cleaning.
Marking is the guarantee of aesthetics
“Beating” the first row is also an important process, during which you need to bring the level throughout the room. Using the water level, “zero” is fixed in each corner, and then the number of tiles for horizontal and vertical rows is calculated. After analyzing the calculations, it becomes clear where to start laying the tiles, and in what angle the “cropped” row will be.
Proper marking makes it possible to decide on the planning of the decor: how often, in what order the tile with the pattern will be placed. There can be many options, for example, the chess order belongs to the classical one, or in the horizontal row the decor is set at regular intervals.
If the calculations have already been made, then you need to start beating the first row (the first one is only in the literal sense). From the floor, at a distance equal to the height of the tile, a metal profile is mounted (you can also use a wooden bar – the main thing is that it is perfectly flat). Such a backup will make it possible to clearly establish the level of the first row, and also will not allow the tile to “slide” until the solution hardens. After installation, you can already proceed to the direct masonry.
As for glue, it is only necessary to use a specialized tiled one and strictly observe the proportions when cooking. The glue should have a good consistency: not thick, but not too thin.
Layout selection, basic rules
The tile can be joined among themselves on the basis of three basic options:
- straight seam – butt to butt;
- in a run-up – masonry;
- at an angle, diagonally, a rhombus – exclusively when laying a square tile.
Each docking has advantages and disadvantages. For example, if we talk about a straight seam, then it is strict, presentable, but boring.
The brickwork is rustic, but very comfortable to use. The rhombus can be called more interesting, it hides the disproportion of the walls. And if you want something exclusive and individual, then it is quite possible to create your own design by applying various combinations, drawings and keys.
Laying tiles on the walls
How to lay a tile in the bathroom on the walls? Laying should start from the corner, a little glue is applied with a spatula to the surface of the wall, the mass is leveled and the adhesive is applied to the tile with a second spatula.
Important: it is advisable to use a spatula with teeth, with its help stripes form on the back of the tile.
When the first tile is installed, you need to press it lightly and check whether it is flat. Also, do not forget about the plastic spacers, they are installed from below and from the side of the wall – so you can not worry about the evenness of the gaps.
Important: cross-shaped plastic spacers are installed between the tiles.
First, 3-4 rows are laid up around the circumference of the room, while the level is constantly checked for evenness. The masonry process continues in a similar way, the main rule is not to overdo it with the amount of glue and do not forget about the same struts. In addition to everything, you need to remember the decor elements (if any), clearly control the laying of tiles, avoiding the “dropping” of the corners.
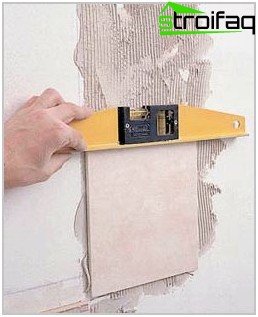
Check the horizontal level regularly
If tile cutting is needed, then a tile cutter will help. The use of other tools is undesirable, since they give uneven edges, defects. The best option is to purchase your own tile cutter, not necessarily professional: small and relatively inexpensive is quite suitable.
How is the cutting process carried out? The cut line is pre-marked, the tile is cut along the front side. It is necessary to quickly move a couple of times along the tile, then gently hit the tile cutter with a knife on the tile and everything, two halves are ready.
One of the significant problems is cutting tiles with round holes (water outlet, sockets, switches). There is also a special device in this matter that greatly simplifies the process. “Ballerina” – a drill with a nozzle, which has the shape of a compass, they cut all the necessary holes. The second option is the “crown”, cutting with such a drill is simpler, but its cost is large. Therefore, if the tool will not be used frequently, then its purchase is unprofitable. And one more inconvenience: the “crown” must be selected for each hole, and the “ballerina” can be cut out any diameters.
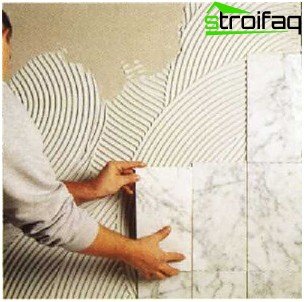
Laying tiles in the bathroom is justified by the most suitable material properties for the arrangement of this room
Before gluing tiles in the bathroom, you need to think through all the points. For example, this concerns the doorway: you need to calculate where it is better to start laying and find out what the slope will be made of, choosing a bar for the color of the tile.
You should also analyze the laying in terms of cutting tiles. It is very undesirable that at the end of the row there remains a small piece of tile (less than 2.5 cm), it will be difficult to cut, and the view will be ugly. In this case, it is better to start the row from the middle, then you will need to cut the tile at the beginning of the row and at the end.
How to glue tiles on the floor
You need to start with the fact that the floor tiles should be different from the tiles laid on the wall. Some people mistakenly believe that there are no fundamental differences, but this is a profound error. Firstly, the floor tiles slip less, and this is a very important parameter in the operating conditions of the bathroom. Secondly, it can withstand a large power load..
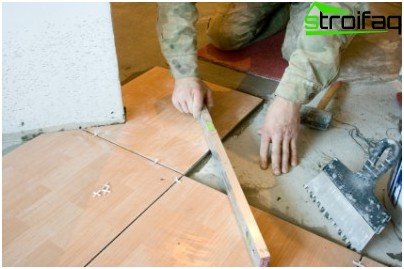
The horizontal laying of floor tiles must be constantly checked by applying a level or a simple bar to several elements at the same time
It should also be noted that the floor tiles are divided into classes: the first type is the least durable, designed for installation in bathrooms, the fourth class is the most durable, it is used in public institutions, and there the intensity of operation is extremely high.
Step-by-step instruction:
- if the surface is leveled, waterproofing is carried out, you can start laying tiles;
- mortar preparation: the best option is a dry mortar, which includes plasticizers. The mixture is diluted with water (in strict proportions) and thoroughly mixed with a construction mixer;
- the technology of laying tiles on the floor is not much different from the technology of wall cladding. Installation begins from the farthest corner from the door. A layer of glue is applied to the surface, tiles are laid on the floor. Cut pieces are located along the walls;
- it is necessary to ensure that the tile is at the same level. As for the rubber mallet, it is used for shrinkage: lightly tapping, it is necessary to “precipitate” the tile to a certain level;
- since there can be water taps and plumbing outlets on the floor, the lining is delayed because you will have to tinker with such obstacles;
- you can’t walk on the floor until it is completely dry; subsequently, such actions can be the root cause of peeling tiles.
Grouting technology
The front part of the tile should be wiped off from the glue immediately, because after hardening this process will become long and extremely unpleasant. The final touch at the end of the installation is grouting. It can be bought in a specialized store, while it comes in different colors and tones..
Important: you need to take care of the harmonious combination of tile and grout, choose the right color.
For quality grouting, you need to know some of the nuances that guarantee a good result. If small gaps were left when laying the wall tiles, it is necessary to use a grout without sand. Conversely, grout with sand is usually used for floor tiles, where the seams are wider.
It is advisable to start grouting no earlier than one day after the end of the tile laying. The fact is that it is through the seams that the moisture of the glue evaporates, that is, if this moment is ignored, the glue will not be able to dry normally.
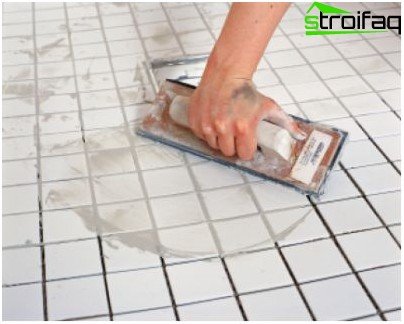
Grouting with a rubber spatula is distributed over the surface; after the material dries, all excess surface is removed with a rag
For extra grip and elasticity, a latex solution can be added to the grout. Just do not have to go about the uninformed people who offer to save and dilute latex milk in half with water. The additive should only be used at the concentration recommended by the manufacturer. Such savings only reduce the effect. True, this additive will give difficulties in the final cleaning, but as a result, the durability of the coating will increase.
So, the grout is mixed with the additive and mixed. Then the mixture should be left alone for a while (several minutes). It’s very important not to cook a lot of the mixture, only the amount that is needed to work on a particular site, for example, for one wall.
With the help of a rubber smoothing trowel is distributed on the surface. At the same time, it must be kept at an angle, moving in the diagonal direction – this way the seams are filled much better. Then you should make sure that all the seams are qualitatively filled with the mixture. By the time the wall grout is finished, the work start site will be ready for further cleaning..
Important: reading the instructions for use will never be redundant.
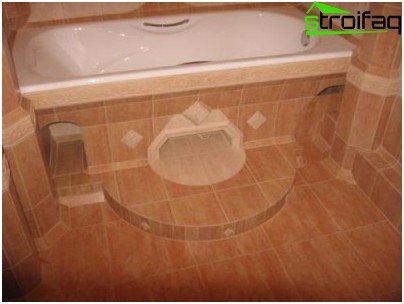
The device of a beautiful floor in the bathroom is quite within the power of a diligent beginner finisher
Cleaning the tiles, though boring, is easy. To do this, prepare a bucket of warm water and a sponge. The sponge is wrung out and it completely wipes off the walls: it must be kept at an angle of 45 degrees to the seams and never wiped in a parallel direction. This method allows you to save grout in the seams. After washing, a coating remains, which can be removed by wiping the surface with, for example, an old T-shirt.
After 21 days, it is recommended to treat the seams with sealant, the sealant is filled and the places around the cut holes.
Basically, a large amount of time is spent on preliminary preparation and the start of laying. During the process, the necessary dexterity appears, work accelerates. It is quite possible to lay the tiles on the walls and on the floor in two weeks. If this, of course, is not done by a professional tiler. But then it will be nice to look at your work, and money will be saved.


