Sex on the lags
On how well prepared the foundation for the future floor depends on the duration of the operation and the rough and finish coat. A lot of new technologies have appeared on the modern construction market, characterized by huge advantages, giving a lot of opportunities for translating the most intricate design ideas. But so far, the old, time-tested, method in which floor lags are used is very popular. In this article we will consider what logs are, why they are so good and how to lay a wooden floor on them correctly.
Content
- Everything you need about lags
- The device lag over the floors
- The distance between the logs of the floor
- Some tips for proper styling
- Promising adjustable lags
Everything you need about lags
Logs are wooden or polymer bars of various shapes and sizes, located under the final coating. The main advantages of using this method:
- increase of heat and noise insulation properties;
- more even distribution of load on the base;
- leveling the surface under the finishing layer;
- the formation of a ventilated underground that allows you to arrange communication networks in your space;
- high strength (floors on the logs can withstand up to five tons per square meter);
- ease of installation;
- relative cheapness of the project.
Logs can be laid both on an earthen base and on wooden or reinforced concrete floors of buildings.

Logs are carefully dried wooden blocks that serve as the basis for a fine floor covering.
The device lag over the floors
Wooden floors
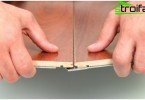
If the floors are wooden, then most often their beams do not differ in excellent evenness, and when laying the log directly on them it is very difficult to achieve a flat horizontal surface. In this case, the lags should be attached to the sides of the beams.
The main advantage of this method is that you do not need to use pads to adjust the height of the lag. Fastening is carried out with the help of incomplete screws, while their length should be no less than 2.5 times longer than the log width and at least 6 mm in diameter.
Tip: in order to avoid splitting the tree before fastening, it is recommended to drill a hole 2.5 mm smaller in diameter than the screw diameter in the log and beam.
If the beams are located at a great distance from each other, then it is necessary to lay the second syllable lag perpendicular to the first, but at a closer distance. Another way to fix this is to use thicker finishes for finish..
Concrete slabs
When laying logs on concrete floors, you need to take into account that in such a situation the whole floor structure will look a little different:
- When flooring concrete, it is necessary to take care of waterproofing, otherwise the floors will constantly damp.
- Next is the heat and sound insulation layers.
- Then you should definitely make a dry or cement screed.
- And only after that lags are laid, on which the finishing coating spreads.
For lags, do not take boards shorter than two meters. If the selected length is still not enough, then the parts are joined together end to end.
Important: when connecting the lag to each other, it is necessary to ensure that the joints in adjacent rows are displaced by at least half a meter relative to each other.
Logs are laid on the floor screed. If this is not possible, then the surface of the base must have at least waterproofing.

Before laying logs, concrete floors must be waterproofed so that the tree does not draw moisture
But lag is categorically not recommended for soft insulation; in this case they will float, which will lead to a gradual destruction of the finish. If heat and noise insulation allows laying with canvases of a certain width, then the lags on the base are located so that the insulating material is located strictly between them.
Tip: if it is not possible to place the logs under the width of the roll insulation, then you should choose a distance between the logs so that the scraps can fill the last cells with minimal waste material.
Laying lags on an earthen base
If the floor on the logs is located directly on the ground, then first you need to remove the entire turf, scatter gravel on the surface of about 50 mm, compact it carefully and fill it with a five-centimeter layer of lean concrete. Then we proceed as with a concrete base, that is, we put waterproofing, insulation and screed.
Tip: when flooring on an earthen base, the insulation layer and screed can be replaced with polystyrene concrete.
A little higher we touched on such a thing as “the distance between the lags.” I think many will be interested in how to correctly calculate this value, because in order to achieve the optimal load distribution, the logs must be laid at the most equal distance from each other. Usually the distance between them varies in the range of 350-400 cm.
The distance between the logs of the floor
Suppose that the room in which the lag for the floor is installed has a length of 8.5 meters. The door is in one of the short walls, and the window opposite it is in the far wall. Logs will be located perpendicular to the long side, and the finishing board is a right angle to the logs. This is done so that the finish is parallel to the light rays entering the room from the window..
Let the width of the bars we prepared for logs be 0.09 m. Usually, the first and last logs are necessarily 30 mm away from the walls. Take the number of lags for y, then their total width will be 0.09 * y. The average distance between the lags is 0.375 m and such distances will be y-1, then the total distance between all the bars will be 0.375 * (y-1). Knowing the recommended distance to the walls, 0.03 * 5 = 0.15 we get the equation:
0.15 + 0.375 (y-1) + 0.09y = 8.5,
deciding which we determine that we need 18.96 lag. Since their number must be an integer, round to the nearest value. That is, for this room we need 19 lag. Now we find the sum of all the distances between the lags:
8.5- (19 * 0.09) -0.06 = 6.73,
and since such distances are 19-1 = 18, we get the exact width between the lags
6.73 / 18 = 0.374, not 0.375, as we first suggested.
Some tips for proper styling
- The surface on which you plan to lay the floor on the logs must be thoroughly cleaned and well primed.
- All wooden parts must be dried and treated with an antiseptic, such as bitumen.
- Soundproofing can be made of slag or sand, as well as fiberboard.
- Logs should be installed along the window, with a gap between them and the walls of not more than 30-40 mm.
- After laying, the surface plane of the lag is checked against the rule (long level) located across the beams. If there are no gaps between it and the beams, then the installation is done correctly. If they do exist, then you can level the surface by removing or, conversely, adding sand under the lag.
After laying, the surface of the log is checked by the rule (long level)
Promising adjustable lags
New technologies have touched upon such an old method as the installation of the floor in lags. Ready-made threaded holes have already been made in modern beams, adding reliability to the joints.

Changing the height of the adjustable lags is carried out by rotating special bolts
In addition, such lags can be adjusted by rotating special bolts that allow you to quickly and effortlessly change their height. After adjustment, the excess part of the bolts is simply cut off.
Laying the wooden floor on the logs
As experience shows, wood is an almost ideal material for flooring..
A correctly laid wooden floor has a long term of use, it is beautiful, environmentally friendly and does not require complicated maintenance. Consider the main advantages of such a basis:
- ease of leveling the floor surface;
- increased thermal insulation properties;
- quick and easy installation;
- profitability;
- good sound insulation;
- possibility of arrangement of communication facilities under it.
If you use coniferous wood when laying the floor, the result will be not only a beautiful and durable coating, but also a wonderful wellness microclimate in the house. so,
What will be needed for laying a wooden floor on the logs
- hammer drill;
- ax;
- level;
- saw or jigsaw;
- nail hammer;
- drill and screwdriver;
- wrench 13-14;
- lags 50x50mm;
- floor board;
- insulation;
- hardware (anchor bolts 10mm, self-tapping screws – 35, 50, 75mm, nails – 50 and 70 mm).
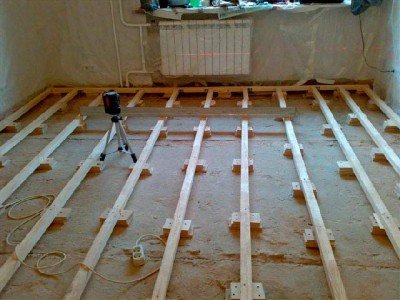
Logs are laid at a predetermined distance from each other on soundproofing material. When laying, it is necessary to apply a level, achieving evenness of the surface. Logs are attached to the concrete base with anchor bolts, to all others – with dowels.
Tip: calculate the length of the anchor bolt by adding 6 cm to the height of the log.
How to lay thermal insulation
In the gaps formed by adjacent lags, thermal insulation is laid, for example, polystyrene foam, isospan or basalt fiber. It is more convenient to use a roll insulation. Expanded clay can also be used as a heat insulating layer..

On top of the waterproofing between the logs, a heater is laid
Flooring
The device of the wooden floor in the logs starts from the corner of the room. We place the first row of boards with a tongue to the wall, leaving a small gap between the wall and the boards up to 10 mm, necessary to compensate for the deformation of the tree as a result of environmental changes.
The next row fits approximately two lags relative to the previous one. A tight fit of the boards to each other is achieved by lightly tapping with a hammer on a piece of wood attached to the end of the adjoining board.

The boards are stacked so that each successive row is offset by approximately two logs
By attaching the boards along the walls, it is allowed to place the screws on top, since their heads are still masked by the skirting board, but in all the next rows the coating should be fixed only to the bottom wall of the groove, driving the screw caps inside the board.
After laying all the boards, you can proceed to close the expansion joints using the baseboard. In addition, this will protect the walls from pollution..
The secrets of proper board installation
- The flooring of wooden floors can only be started after complete leveling of the log.
- Boards are attached to each lag without exception.
- The size of the boards should be selected so that the joints are in the middle of the lag and are perpendicular to the long side of the board.
- So that the boards do not crack, the holes for the fasteners must be drilled in advance. For a self-tapping screw we use a thin drill, and for its head – a thicker one.
- Instead of a plinth to mask the gaps between the walls and the floor, you can place a fillet – special profiled slats.
- Holes for pipes must be drilled with a diameter of 8-10 mm larger than the diameter of the pipe.
Tip: for greater reliability, it is better to tighten the boards together with building brackets with a stapler before nailing the boards.
How to level the floor in old houses
The base of the floor in old houses almost never differs in smoothness and evenness. The differences in its height can reach 20 cm and it is very difficult to adjust such a surface. And the use of concrete screed is not always permissible, since not all beams in old housing can withstand a large load. This is where the use of adjustable lags will help. Consider in detail the process of installing them:
- Bolts are screwed into special holes in the logs, with at least five holes for every two meters of beams.
- We lay out the lags, taking into account the pre-calculated distance between them.
- In the ceilings, holes for the dowel-nails are drilled, be sure to bring the drill to the holes for the stud bolts.
- We level the lags and hammer the dowel-nails, cut off the protruding parts of the bolt racks.
- We lay the wooden floor on the logs, that is, the finish coating.
Fine finish
But laying the floor on the logs is far from the end of the floor device. Next, you need to get rid of roughness and high-altitude drops. To do this, it is convenient to use a small grinding or looping machine. We begin to cycle with large emery paper, which quickly removes all irregularities, and then polishes the surface with a fine-grained sandpaper.
Next, we proceed to protect the floor in order to increase its durability and durability. For the floor, there are three main types of coatings:
- oil impregnation;
- parquet lacquer;
- wax mastic.
How to get rid of a creak
To begin with, it is necessary to determine the places where the floor is staggering and greatly bending. Now here it is necessary to remove the shattered nails and screw the screws in their place. Using old nails, you can easily determine the location of the logs under the finishing base, it is these places that should be strengthened with additional self-tapping screws so that the hat completely fits into the tree. After eliminating the squeak, all these places are putty and the floor covering is completely renewed..
We hope that our article will help you determine the type of floor and cope with flooring on your own..