We do the bulk floor with our own hands
To make a bulk floor with your own hands according to the forces and unprofessional builders. Technology is not as complex as it might initially seem. After all, the material used in its construction (for living quarters it is, as a rule, polyurethane) is elastic, it is quite easy to fit. This seamless finish polymer coating is applied on a cement-sand screed or concrete base, sometimes on ceramic tiles or wooden floors..
Content
- Tool kit and materials
- Foundation Preparation Technologies
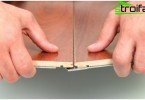
- Preparing a wooden base
- We prepare a concrete rough floor
- Preparation of ceramic cladding
As already mentioned, suitable for home flooded floors from polyurethane. They are safe for health, durable, wear-resistant, moreover, they are light and elegant, warm, shiny and have a variety of colors. Experts recommend making a coating 1.5 mm thick. A layer thinner than 1.5 mm is impractical, such a surface is easy to deform, and thicker is uneconomical.
Tool kit and materials
You will need:
- containers (buckets) of at least 20 liters for mixing the solution;
- kneading drill (with nozzle) at least 300 rpm;
- wide spatula for leveling the mortar;
- squeegee with an adjustable gap, necessary for laying the solution;
- needle roller with a 14 mm needle;
- polyethylene film;
- paintbrushes (special shoes);
- solvent for removing polyurethane solution from tools;
- solutions for filling cracks;
- hydrometer and sclerometer;
- level.
Foundation Preparation Technologies
Absolutely any surface that will serve as the basis for the self-leveling floor must be smooth to prevent material from draining. The degree of its evenness can be checked with a two-meter rail-level (deviations are not allowed > 4 mm).
Also, to obtain a smooth surface, it is important to observe a certain humidity and temperature regime of the room:
- room temperature is not < 15 degrees but not > 25 degrees (the exact information is indicated in the technical documentation attached to the dry mix);
- humidity is allowed no more than 80% .

The base under the poured floor must be perfectly even, so that in the future it would be possible to apply a quality mortar
Preparing a wooden base
The three main components of the process of applying a polyurethane coating – “self-leveling floors – technology – with your own hands” are quite difficult to correctly combine when pouring it on a wooden floor.
It is better to entrust this to a professional or to exclude a wooden base in general. If you are not afraid of difficulties, then follow the instructions below:
1. Make sure that the wood floor is completely dry (humidity is not > ten%).
2. Remove the baseboard. After completion of work you will install new.
3. Clean the floor from old paint, glue, varnish with a scraper, putty knife, metal brush, grinder.
4. Open the cracks and sand the floor with sandpaper. This will contribute to better grip..
5. Remove dust with a vacuum cleaner, degrease the floor (you can use cleaning powder).
6. Seal the cracks with mortar. And best of all – level the screed.
Important! A too thin layer of polymer flooring applied to a wooden base can crack quickly.

Bulk floor in an interior
We prepare a concrete rough floor
This is the most optimal version of the base for bulk floors. Sequencing:
1. The concrete base must last 28 days (if it is new).
2. Check the humidity of the concrete screed (not > 4%). Approximate calculation technology: take a meter-long sheet of plastic film and fix it with tape on the surface of the base and leave for 24 hours. If in a day moisture drops form on the inner surface of this film, and a wet spot appears on concrete, then it has not dried out enough. Another more accurate way is to measure with a carbide hygrometer (moisture meter).
3. Check the compressive strength (not < 20 MPa), as well as tensile strength (should be 1.5 MPa). Sclerometers are used for these purposes..
4. Release the previous base from the previous coating (of course, if any).
5. Remove any glue, paint, mastic, all oil stains from concrete.
6. Clean the surface of dust, seal cracks, chips, bumps with a building resin solution, and small gaps and cracks with the adhesive solution. Remove small irregularities with a mosaic grinder. You can also apply a one-piece screed with leveling mixes.
7. Check leveling using level.

A high-quality concrete base under the bulk floor can extend its life for several tens of years
Preparation of ceramic cladding
1. Check the fastening of the tiles, remove the poorly held tiles and putty in the voids formed.
2. Degrease the tiling with an organic solvent
Primer of the basis of a bulk floor
The primer is the second and very important stage of the entire technological process. A primer is necessary to improve the adhesion (adhesion) of the poured floor to its base, to prevent the formation of air cavities and to improve the spreading of the floor.
Porous and dry surfaces are primed in several passes until all pores are completely closed. If the base is highly porous, then it is advisable to use highly viscous primers for it. The room temperature during the base coat must be constant or decreasing, otherwise the formation of bubbles is inevitable.
The primer is applied with a wide brush or roller. When the first coat dries, apply the next. Dust should not be allowed to settle on the primed base, so you need to start filling the floor in about a day.

High-quality primer helps to ensure that the self-leveling floor is evenly distributed on the base and looks spectacular
Prepare a solution for pouring
1. In the proportions that are indicated in the manufacturer’s instructions, it is necessary to pour water into the container, and then pour the dry mixture there. 2. Using an electric drill with a nozzle, the solution is mixed for 10 minutes with short interruptions until a single mass is obtained. 3. Run a flow test.
Spreadability test
1. Take a light plastic ring 4-5 cm high and 5 cm in diameter. A canister cover with a shaving foam with a cut bottom.
2. Install the cover on a flat, smooth surface (preferably on glass).
3. Pour the finished solution into this cap.
4. The lid will rise and the solution will spread over the glass..
5. If the diameter of the solution in the spreading state is 16-18 cm, then its consistency is optimal. If the parameters are not optimal, you can add a dry mixture to the solution or add water to the solution.
Important! An overdose of water in the solution can cause delamination and cracking, delayed drying and decrease the strength of the underfloor.

Weighting the mortar
Do-it-yourself bulk floor!
Start work from the wall farthest from the entrance. It is necessary to fill the floor of one room without any interruptions in work, otherwise height differences will form.
1. Pour the prepared mortar onto the floor screed so that the strips are parallel to the wall. To ensure that the solution is evenly distributed and the layer thickness is maintained, use a wide spatula. Adjust the squeegee with a layer thickness (3 – 5 mm).
2. Roll the mortar floor with a needle roller to distribute it even better on the surface. Remove any air bubbles that enter the solution..
3. Pour out the next portion of the solution, smooth and roll it. Continue until you fill the entire floor..
4. At the end of the work, you can cover the floor with foil or film, which will prevent dust from entering and uneven solidification.
5. On top of the bulk floor, you can apply a special polyurethane varnish, which will give the coating a special shine, and also improve its quality.
6. As decorative elements, you can use small pieces of thin-sheet polymer, applied to the newly poured floor. Then they and the entire floor should be covered with clear polyurethane varnish..
Important! The prepared mixture must be used within 60 minutes, and the time between application of the first and subsequent portions of the finished solution can be no more than 10 minutes.
Walking on the polyurethane bulk floor is permissible in a day, although it will be suitable for full operation only after 5 days. The underfloor heating system can be connected in a week.

Application and distribution of bulk floor on the surface of the base
Security measures
- Dry mixes of the bulk floor when mixed with water always give an alkaline reaction, so direct contact with the skin will cause a burn.
- It is necessary to put it in special goggles with the use of gloves. In addition, the solution has a pungent odor, as a result of which it is necessary to knead and fill it in a respirator.
- The workplace must be well ventilated..
Hand-made decorative floors
All decorative bulk floors are made according to the same principles as usual with the addition of small elements. There are a lot of species. They are:
1. With quartz sand, when using a crumb of small diameter or quartz sand, a beautiful pattern is created on the coating.
2. Textured. There are rough and smooth, glossy and matte.
3. Floors with chips. A special decoration effect is obtained by applying colored particles (“chips”), consisting of a variety of pieces of acrylic paint. They are able to give the floor depth, similarity with natural granite or marble.
4. Original ornaments that are created from multi-colored mixtures.
5. Flooded floors with photo and art image are also quite common.

Decorative bulk floor
If you approach the implementation of all technologies competently, then the bulk floor can be qualitatively made by yourself. It is important to strictly observe the installation technology and operating conditions of the bulk floor.