How to make a concrete floor screed with your own hands
The answer to the question: “How to make a concrete floor screed with your own hands?” Already more than one decay does not lose its relevance. For obscure reasons, there has been a tradition in the Russian construction industry for more than a dozen years, according to which, when building a house, a floor slab is leveled on only one side. Namely, the one where it serves as the ceiling of the lower apartment.
Content
- Preparing for wet alignment
- We select the necessary tools
- Preparing the surface for screed
- We set the level as it should
- Beacon Installation Process
- We prepare cement mortar
As a rule, no one is engaged in proper and high-quality finishing of the party serving as the floor. And as a result, such a surface is always uneven, with cavities and places protruding reinforcement, and in some places there are level differences with a difference of 5-10 cm. Naturally, in order to make a good high-quality coating over such a floor surface, you need to work hard and first all you need is a concrete screed.
Preparing for wet alignment
Immediately make a reservation that the performance of such work will require the performer to possess two basic skills:
- The ability to prepare a working mixture.
- The ability to arrange beacons to perform further screed.
We select the necessary tools
It is no secret that today there is a mechanized version of the screed, but for its construction, special equipment and extensive practical experience are required.
In the vast majority of cases, the owner of the living space is engaged in the implementation of such work, so the first thing he needs to do is prepare the necessary tools and materials.

Tools used for the production of concrete screed
So, a concrete floor screed should be performed using the following tools:
- Ruler level.
- Hydro level, which can easily be built from improvised means. This will require half-liter plastic bottles and a flexible hose. In this case, the principle of communicating vessels is applied..
- Knife.
- Roulette.
- Putty knife.
- Master OK.
- Primer or waterproofing roller.
- Drill.
- Drill head for mixture preparation.
- A special container where the solution will be prepared (30 liters).
Preparing the surface for screed
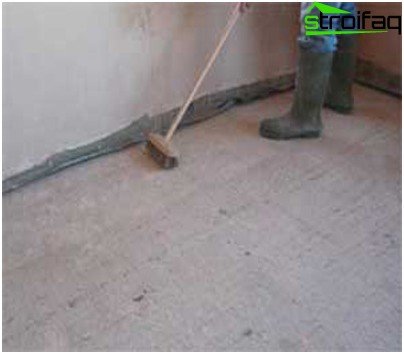
Preparing the surface for concrete screed
Do-it-yourself concrete floor screed involves preliminary surface preparation. To do this, you can use an industrial vacuum cleaner, or you can clean it manually, in a word, all the small debris and dust must be removed. Then, existing cracks and holes are repaired with a usual cement mortar. At the joints of the floor and the wall, a damper tape is laid, which should protrude about 3-5 cm above the surface of the screed. This manipulation will help to prevent liquid from flowing onto the ceiling of the neighboring apartment, and also will protect against cracks after the screed is completely ready.
In addition, a high-quality cement screed is impossible without waterproofing. For this, a special composition is involved: penetrating insulation, bitumen or alkyd insulation. Such materials are produced under the trademarks Knauf, IVSIL, Litokom, Penetrol, etc. In extreme cases, it is possible to lay polyethylene on the bottom of the future screed, and if this is not a solid canvas, then adjacent pieces should overlap each other by 20 30 cm.
We set the level as it should
Before making a concrete screed, you need to find the highest point and set the level. The highest point will become a reference point by which the thickness of the screed will be determined and beacons will be set. And the choice of material from which it will actually be performed, as well as its quantity, directly depends on the thickness of the screed. Therefore, this is a very troublesome crucial moment, on which it depends on how high-quality cement screed will be produced in principle.
A basic level is laid around the perimeter of the entire room, and then an initial mark is placed at a distance of about 1 meter from the level of the floor slab. And then you need a ruler level with which to draw a line around the perimeter of the entire room. In addition, you can use the hydraulic level or a more modern laser level. This is how the base level installation is done.
When measuring the distance from the base level to the floor surface, the highest point is found. For example, a line is laid at a distance of 1 meter from the floor. If you measure the distance from the previously selected level line to the floor surface, it may turn out that at some points this distance is 1 meter, and at some 97 centimeters. Both points must be signed. A point with a minimum distance from the floor to the level line will be the highest point. Then it is necessary to move down the zero level in order to correctly navigate the level of the floor itself.
It will not be superfluous to determine the highest point in the center of the room. To do this, the thread is stretched across the entire width of the room, and then you need to walk along its entire length. If it turns out that the highest point is located just in the center of the room, then a new zero level is carried out. And above the highest point, he should stand 3 centimeters, so that subsequently a cement-sand screed could be freely produced. In other words, the minimum screed thickness should be 30 millimeters anywhere on the surface..
Beacon Installation Process
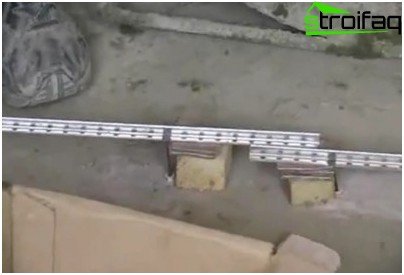
Impeccably installed lighthouses are the key to success in screed installation
No less responsible is the process of installing beacons. At its core, a guide system is installed that is set to zero. As the most beacons are taken T-shaped guides, specially designed to perform such types of work or U-shaped profile.
It is worth emphasizing that cement floor screed with your own hands is a “wet” process. For this reason, it is unacceptable to use pieces of cardboard, fiberboard, wood or other material that is not resistant to moisture for linings under lighthouses. The fact is that the use of such materials can subsequently lead to the destruction of the screed in the places of installation of beacons. Ideally, plastic or metal plates should be used. Do not use lumber as guides.
All guides are installed parallel to each other. The distance between the extreme guides and the wall is 20 centimeters, and neighboring beacons should be located at a distance less than the length of the rule by 30-40 centimeters. Guides are laid on the cement heaps in parallel, and a long ruler-level is superimposed on them and the guides are aligned exactly on it.
In the same way, profiles are set according to the level using self-tapping screws. But for this it is necessary to pre-drill holes and drive plugs into the slab. In the same case, when fixing beacons with cement mixture is preferred, the beginning of the screed should be postponed until the guides are strengthened.
We prepare cement mortar
Cement mortar for screed is prepared independently, while the ratio of 1: 3 is observed, where 1 part of cement accounts for 3 parts of sand. Although at the moment the modern market is replete with ready-made mixtures, which are prepared in accordance with the instructions attached to them. In any case, the dry mix is first thoroughly mixed with a trowel or spatula..
Then, water is poured into the container for the preparation of the solution, and the dry mixture is gradually introduced to it. In this case, with the help of a special nozzle and a drill, constant stirring is performed until a homogeneous mass of the required consistency is formed in the container. As people say: “It should be like thick sour cream.” And in the case of self-made cement-sand mortar, its readiness is checked as follows: a lump of the finished mixture is compressed in the fist: if it does not spread and does not break, then everything is in order.
The use of plain river sand that has not been pre-treated is unacceptable.
If there is free cash, you can add a plasticizer to the mixture, which will minimize the appearance of cracks. As you know, a plasticizer is a substance that gives a solution fluidity, elasticity and plasticity..
DIY screed
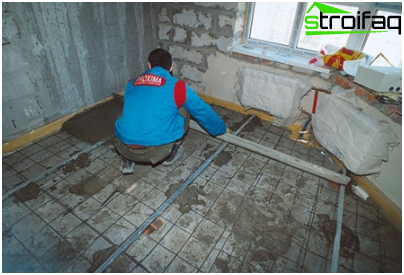
The sand-cement mixture is aligned with the rule, it rests on the guides and moves along them
- The cement-sand screed at the initial stage is always laid from the angle opposite the exit from the room.
- The superimposed mortar is trimmed with a trowel and then pulled together by the rule to the exit.
- Alignment is carried out strictly according to beacons, and at the same time it is necessary to ensure the evenness of the floor surface specified at their location.
- The technique of contraction is based on small oval movements as a rule. We can say that the alignment is fundamentally similar to the process of grouting walls.
Concrete screed exposure
As a rule, the drying period of the screed lasts about 3 weeks. At the same time, it is very important to moisten the screed regularly with a roller, and then cover it with film. Such conditions will allow the screed to grip well and avoid cracks in the future..
Attention! It is important to ensure that there are no drafts in the room!
Final Stage – Finishing Layer
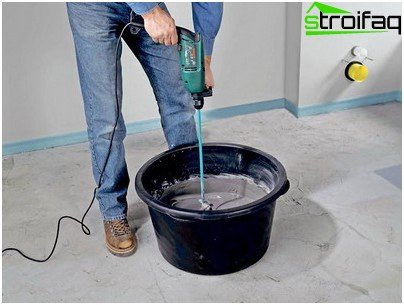
The preparation of the solution for the finish layer, as for all screed layers, must be carried out strictly according to the instructions attached to the material
The need for a finishing screed arises when it is supposed to finish the floor with flexible floor coverings, for example, carpet or all your favorite linoleum. Such a screed is made using the bulk floor technology, for this there are also special ready-made mixtures of famous manufacturers – Bergauf, IVSIL, Knauf, Prospectors, etc..
It is self-leveling floor mixes that are used in preparing the surface for laying ceramic tiles. Also on sale are materials designed for screed, the thickness of which does not exceed 5 centimeters. They are characterized by the presence of special reinforcing microfibers, which means that a process such as screed reinforcement can be skipped. It is on the correct choice of material for the finishing screed that determines its cost.
To perform this kind of work, you must first evenly grout the cement-concrete screed. Then, according to the manufacturer’s instructions, a self-leveling mixture is diluted and poured onto the floor. And so that the created surface is perfectly smooth, it is possible to use a roller or spatula in problem areas. In principle, everything – in a day you can safely walk on this floor. It is also important when drying, it is important to maintain a certain microclimate in the room. Particular care must be taken to avoid drafts.


