
How to level the floor
Before finishing the floor, it is necessary to level it, for which they arrange a screed. In this case, the performance of the floor covering laid on top of it depends on the quality of the screed. If mistakes are made during the execution of the work, they will certainly complicate the installation of linoleum, laminate or carpet, and will reduce the operating time of floor coverings. However, there is nothing beyond the complexity of the screed, therefore, if you wish and if you have free time, home craftsmen who have no experience in finishing can level the floor with their own hands.
Content
- Floor screed, classification
- The device of a cement-sand screed
- How to level concrete floor: video
Floor screed, classification
1. Monolithic screed, which is divided into several subspecies:
- cement-sand;
- gypsum;
- self-leveling mixtures (bulk floor).
2. Dry (prefabricated) screed made of building boards.
The device of a cement-sand screed
1. This method is chosen if the floor level difference in the room exceeds 5 cm. To determine this value, find the zero level of the room using the building water level. Using this tool at a height of about one and a half meters from the floor, points on the wall are measured, which are connected in a single line. Then measure the distance from this line to the floor in several places. The smallest distance will serve as the maximum possible floor height. At the bottom of the wall, several points are marked, which are also connected in one line, which will play the role of the virtual edge of the screed. In this case, remember that the minimum thickness of the cement-sand screed is three centimeters, and the maximum is 7 cm.
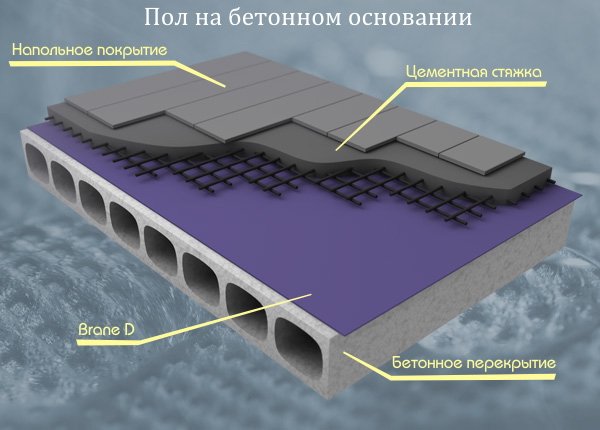
Leveling the floor: screed
2. Next, they begin to prepare the surface of the concrete floor base. The surface is thoroughly swept out, and dust is removed with a vacuum cleaner. Next, the base is primed, poured with a waterproofing solution. After this, the priming procedure is repeated again. This will allow for better adhesion of the screed to the floor base..
3. The next step is to set up beacons that will make the floor perfectly level. Lighthouses (T-shaped metal guides) are attached to the concrete base with adjustable screws or simply put on a thick cement-sand mortar lined with slides. Instead of mortar, you can use Rotband – high-quality gypsum plaster, manufactured by the German company KNAUF. Lighthouses must be leveled with a building level and a stretched cord in height. The first guide is placed at a distance of 20 cm from the corner. The following guides are placed parallel to the first, while maintaining a distance between them that is 40 cm less than the length of the rule.

Beacon Installation
4. The material may be a mixture of sand and cement M-300 or ready-made dry mixes intended for floor screeding. When adding water, the proportion indicated by the manufacturer on the packaging of the mixture should be adhered to. When mixing the screed, a construction mixer is used, in the absence of which they are dispensed with a special nozzle worn on the drill. The solution is stirred until the consistency of a thick dough, while there should not be lumps in it. The prepared mixture should slightly diffuse on a flat surface, but not spread. A solution is prepared for the entire area of the room at once and is used for a maximum of one and a half hours.
5. A portion of the kneaded solution is poured between two beacons, after which, using the rule, they are leveled along the beacons, moving it towards yourself. Start from the far corner of the room, gradually moving towards the doors. Do-it-yourself floor screed is best done with an assistant. At the same time, one person will level the mixture, and the second – stir the next portion of the solution. In the process of pouring screeds, professional builders often recommend “piercing” freshly laid sand-cement mortar with a thin metal rod. This will avoid the formation of air voids in the thickness of the concrete screed.

Rule Alignment
6. It takes several days to dry the screed, after which it will be possible to walk on it. However, complete drying occurs only after 2-3 weeks. So that the screed does not become cracked, it is necessary to cover it with plastic wrap at this time. Instead of covering the film, you can evenly wet the screed twice a day.

Monolithic screed
7. You can check the quality of the floor screed by several signs:
- color should be gray and uniform throughout the room;
- an even screed, when checked by the rule, forms a gap not exceeding two millimeters;
- the horizontal deviation should not exceed 0.2%, for a visual representation of this value we can give an example: in a four-meter room, the deviation can be no more than 8 mm.
- the same sound made when tapping the screed with a wooden block.
8. On the finished screed you can lay the selected flooring.
Leveling mixtures – bulk floors
In the case of a small difference in floor levels of not more than 3 cm, leveling mixtures for the floor are used, which are divided into two types. Some are able to spread on the surface of the base on their own, so they are called self-leveling mixtures. Another type of mixture requires the intervention of a person who, using a spatula, smears it manually on the floor.
Self-leveling mixtures intended for finishing floors are also called bulk floors, floor levelers, self-leveling mixtures, etc. The main purpose of these mixtures is to prepare floors made of various building materials (concrete, wood, gypsum) for finishing with floor coverings, such as :
- linoleum;
- carpet;
- PVC materials;
- bung;
- ceramic tile.
Self-leveling dry mixtures are made on a cement basis containing special modifying additives that increase the ductility and fluidity of the closed solution. In some formulations, fibrous reinforcing agents are present that inhibit the development of microcracks. Bulk floors after drying form a fairly dense and durable layer. However, they are not provided for operation without flooring, since an unprotected surface can “dust”, absorb moisture, oils, etc..
For sale are thin-layer self-leveling mixtures, which are intended for finishing. You can also buy special mixtures suitable for rough leveling the base, which has significant irregularities. These mixtures are applied in a layer whose thickness can reach up to 30-40 mm. At the same time, a foam tape is laid around the perimeter of the room, which relieves the stress created by the bulk floor. Since these mixtures have reduced fluidity, it is not possible to obtain a perfectly smooth surface. Therefore, a thin layer finish is usually applied on top..
Self-leveling flooring
1. Work begins with the preparation of the foundation, which should be dry and durable. In the room where the floor will be filled, it is necessary to exclude the appearance of drafts and air draft. Requirements are also made for floor temperature, which should not be lower than 5-10 degrees Celsius. The base is cleaned of various kinds of contaminants that can reduce adhesion. Weak and peeling areas of the old coating are removed. All cracks and holes through which the mixture may leak are sealed. The dust is removed with a vacuum cleaner, sweeping the surface is not enough.
2. Next, the treated base is treated with a primer, otherwise called a primer, which is applied in a thin layer with a brush, roller or spray. The use of a primer is necessary, as it increases the ability to set the leveling compound with the base of the floor. Also, the primer prevents the formation of bubbles, limiting the adsorption of water from the closed mixture during its solidification. It is advisable to choose those primers that are recommended by the manufacturer of the leveling mixture.
3. The next step is to start preparing the mixture. This operation is carried out in strict accordance with the instructions, not allowing any initiative. For intensive stirring, an electric drill with a nozzle is used, which makes it possible to achieve uniformity of mass, devoid of lumps and clots. The mixture is prepared in portions, since its qualities are maintained for 10-20 minutes. The exact time is indicated on the factory packaging..

Leveling mixes
4. Immediately after preparation, the leveling mixture is applied to the floor in the form of strips, the width of which reaches 30-50 cm. The solution is spread over the base surface with a wide steel spatula, put on a bar. It is not worth delaying when pouring, because you can not allow drying of the edge of the strip applied earlier. It is advisable to fill the floor in the room in one go. If its area is large, then the filling is carried out in strips, while professionals with the skill to work with bulk floors can achieve a perfectly flat floor surface. Many companies involved device of bulk floors, have special pumping equipment that allows applying self-leveling mixtures with greater productivity.
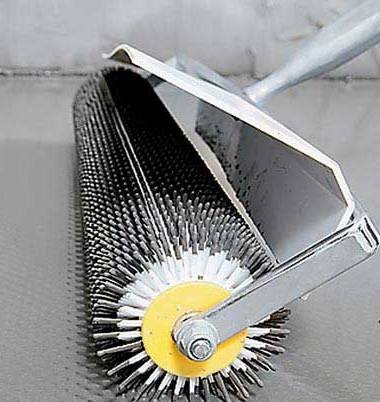
Leveling the bulk floor: needle roller
Important! Do not change the layer thickness of the bulk floor recommended by the manufacturer of the leveling mixture. Since this can lead to a decrease in the performance of the screed.
5. The drying time and complete solidification of the bulk field depends on:
- from the thickness of the applied layer;
- from the temperature in the room;
- moisture level.
Usually they begin to walk on the surface of the bulk floor after 6-12 hours, and a full load is possible only after three days. Before sticking the finish floor, control the moisture leveling layer. The result obtained is compared with the moisture level of the material selected for finishing, acceptable by the manufacturer..
GVL – dry “clean” alignment
Dry floor screed involves the use of gypsum fiber sheets (GVL) to level the floor, which are laid on a layer of expanded clay with heat-insulating properties. Instead of expanded clay, you can use another bulk building material having similar qualities.
When choosing this technology, floor leveling is faster and cleaner, but its quality is inferior to a monolithic concrete screed.
Dry screed device: progress
1. A waterproofing material is laid on the cleaned surface of the base, which can be a regular plastic film, the thickness of which is 50 microns. Lay film strips with an overlap reaching 10-20 cm, while making a ten-centimeter overlap on the walls. Also along the perimeter of the room lay an edge tape made of porous material. Position the tape so that it is between the film and the expanded clay layer poured a little later.
2. Lighthouses in this technology are not provided, but some people who perform dry screeding with their own hands use them. This makes it easier for them to evenly fill expanded clay and makes it easier to move along its layer. For lighthouses, U-shaped metal profiles are selected, which are laid with the base down, aligned and fixed. The void in the profile is covered with expanded clay.
3. Expanded clay is scattered, leveled in accordance with the beacons.

Dry screed
4. Then proceed to laying gypsum sheets, which have edges along which they are combined and fastened with special conical self-tapping screws. Additionally, PVA glue is also applied to the edges. This provides a reliable coupling of sheets between themselves, turning into a single flat floor. So for sheets stacked from the wall, this edge is cut to provide a double layer of material. When laying sheets, you can’t move them along the expanded clay layer, so you should try, despite their decent weight, to put them immediately in the right place.
5. At the final stage, priming the joints of the GVL sheets and the fastening points of the screws is carried out. Subsequently, the entire surface of the dry screed is primed. Excess plastic film and edge tape are carefully trimmed to the level of the screed.
Important! Unlike concrete screed, work can be carried out in several steps, which is very convenient when doing the work yourself.
Now you have learned several ways to properly level the floor in the room, so you can choose the most suitable option. The main thing is not to rush and follow the technology of each operation, then the result will be brilliant. If you think that you can’t cope with the amount of work on your own, then invite professionals.


