
Rules for laying laminate flooring
Tired of old flooring? Want new floors without much hassle, but with a chic result? The ideal option in this case is a laminate flooring. The technology of laying the laminate is simple and convenient, and anyone can do such floors. It is only necessary to strictly follow the rules, which allow you to get a durable and beautiful floor.
Content
- Preparing a rough surface
- Preparing the laminate for laying
- Choose and lay the backing
- Artist Tools
- Laying laminate: technology arrangement of the old wooden floor
Preparing a rough surface
The most important thing in preparing the floor for laying the laminate is to level and strengthen the surface. And since we are going to lay a laminate floor on top of the parquet, we’ll talk about it.
Old parquet must be checked for strength. All broken or cracked parquet floors are either replaced with new ones or removed, and we putty the notches remaining in their place. We fix those parquet floors that are poorly fixed or creak (we glue or put on putty).
Level the parquet surface (it is best to cycle the floor). The height differences of the leveled floor should be about 2-3 mm per meter. All cracks are sure to putty. As a result, we should get a solid flat surface.
All that’s left is to remove all the garbage and dust. Our old parquet floor must be clean and dry. In order for the subfloor to serve longer as a base, it should be impregnated with a water-repellent primer and dried. The humidity of the wooden base under the laminate should not be more than 10%.

Laying laminate – do it yourself
Preparing the laminate for laying
It is time to prepare the laminate itself. By the way, it will take enough time, so at least 3 days should be allocated for this stage.
In any case, you need to start back in the store, where you will purchase laminated flooring. Ensure that all material is visually intact. Do not take laminate in damaged packaging, even if it is just slightly wrinkled. It is possible that under such a dent, the laminated panel was chipped or cracked along it. You understand that from the defective material and the floor will turn out the same.
After the purchase, we keep the unopened packaging with the laminate in the room where the new floor will be laid, about 2 days. Packages are placed horizontally on the floor, face up. The temperature in the room should be normal for your apartment, but not lower than 18 ° C, and humidity too, but not higher than 75% (best of 50-65%). If the temperature and humidity indicators in the room do not differ too much from the same outside (on the way from the store), then the laminate can be acclimatized to 36 hours, if the difference is large (severe frost or heat), then it is better not to rush. During this “downtime”, the laminate will get used to the new conditions and the possibility of its strong deformation during the formation of the floor covering will be minimized.
We remove the packaging before the very beginning of the installation and completely check the boards for integrity and color matching. If you make a complaint to the seller after installation, the defective laminate will not be accepted back from you.

Laminate Flooring – Required Materials
Choose and lay the backing
Before you start laying the laminate, you need to lay the substrate. The choice of substrate depends on many factors – from the humidity of the room where the laminate floor will be, from the load on the floors (the minimum floor load in the bedroom, the maximum in the corridor), and finally, on your financial capabilities. Therefore, you have to make a choice yourself. Just remember that the substrate absorbs the load on the laminate, allowing you to reduce the deformation of the laminate itself. Of course, different types of substrates have other useful properties, such as noise absorption, insulation, protection against moisture, mold and fungi.
In any case, the substrate you have already selected and bought. Now you need to lay it down – the flooring is made joint by joint and fixed with tape. In the case of a polystyrene substrate, adhesive tape made of aluminum staniol is needed. By the way, if you have a simple cork substrate, it should be primed with a water-repellent composition and dried.
When laying a laminate on a wooden rough floor, a vapor insulator (a plastic film that is placed under the substrate) is not needed.
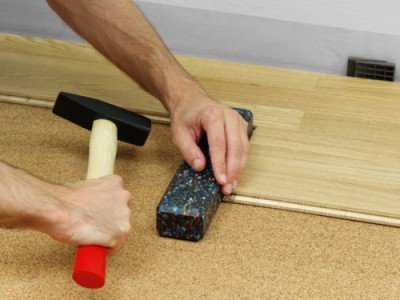
Hammer and boss – knock down the laminate when laying
Artist Tools
- wood jigsaw (preferably electric)
- a hammer (about a pound)
- boss (tamping block, you can wooden, but preferably plastic)
- metal square
- tape measure (not less than 7.5 m)
- construction pencil
- restrictive wedges (self-made or purchased)
- drill or punch – for drilling holes (for pipes or other architectural ledges)
- metal bracket (device for tamping the last panels)

Metal bracket – knock out the last panel
Laminate Laying: Technology
So we come to the last stage of our repair. Immediately it is worth clarifying that laying the laminate on the parquet is no different from conventional laying, because all the necessary preparations have already been made. So let’s move on to specific actions..
In a medium-sized room (if the longest wall is no more than 8 meters), the laminate is laid perpendicular to the windows so that light falls along the long side of the lamella. However, if you have already dealt with laying laminate, you can try more complex configurations – for example, diagonal laying.
Another important point when laying the laminate will be the mandatory observance of the indents from the walls. The size of the gap depends on the size of the room (1.5 mm per meter of laminate), most often the distance is about 10 mm. These gaps are then easily hidden by the baseboard. If you do not do such intervals, then when the temperature changes, the expanded “floating” floor may warp.

Laying the laminate – installation procedure
Boards are stacked in rows. Each row is formed by lamellas connected by end faces. After connecting a new board (we put the crest of each subsequent lamella into the groove of the previous one at a slight angle (25-30 °) and lower it down, latching the lock), we lightly knock it to the already installed ones. A fully assembled row in the same way (comb in the groove) is connected to the previous one. Remember that the panels of the next row should be offset relative to the panels of the previous one by at least 40 cm, a chess (or brick) laying should be obtained. In most cases, such a laying turns out by itself, when the next one begins with the sawing of the last board.
That’s all. If during work you will follow these rules, you will get a wonderful laminate floor, which for a long time will delight you with its smoothness. Good luck!


