
How to lay tile
Laying tiles is not easy, painstaking work, requiring great scrupulousness and high accuracy. This work is quite expensive: about the same as the tile itself. But if you are used to doing many houseworks with your own hands, you are a patient and assiduous person, then why don’t you learn how to lay the tiles correctly – the installation instructions will help you gain knowledge in this area. In addition to the pleasure of the result, this will help you maintain a valuable family budget. But remember that this matter must be taken with all seriousness, because any inaccuracy made at the beginning of the process will affect subsequently, worsening the result of all the work.
Content
- How to choose a tile
- Tile laying methods
- Necessary materials and tools
- How to prepare the surface
- Tile Laying Instructions
- Laying tiles on the wall
- Laying tiles on the floor
- Methods and types of cutting
- Grouting according to the rules
How to choose a tile
When buying a tile, do not forget to purchase about 10% more than the calculated amount. Firstly, the tile is a brittle material, some part of it may break during operation. Secondly, when laying the tiles will have to be cut, and inevitably part of it will go to waste (especially with the method of laying with a diagonal). Well, and thirdly, in the future it may be necessary to replace a certain number of tiles and you will have in stock a tile of the same quality and color.
When choosing a tile, it does not matter which one – an inexpensive domestic tile or an exquisite representative of the import collection, it is necessary to make sure that the front surfaces are even and the corners are straight. The first parameter is checked by laying two tiles facing each other. A snug fit is a sign of good quality. The corners of the tile will be straight if its diagonals are equal.
For saunas, pools and bathrooms, it is advisable to purchase tiles with anti-slip properties, for open rooms – frost-resistant. The pictograms on the packages will help you make the right choice. The floor tile is depicted as a foot on a black background, and if the foot is painted on a shaded background, this is a tile with increased wear resistance. Frost resistance is indicated by snowflakes..

Pictograms on the packaging will help you make the right choice of tiles
Regardless of the special qualities, the first grade tile has a red package, the second grade is blue, and the third is green.
It’s important to know! When laying, it is recommended to use tiles from different packages so that the surface color is more uniform.
Tile laying methods
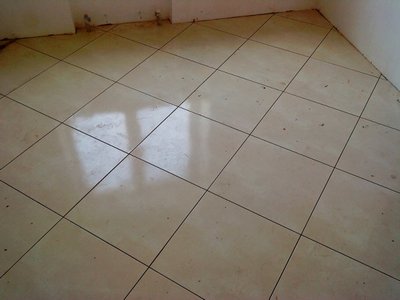
Facing “straight row” – The most popular, classic way of laying. It is distinguished by simplicity and accessibility: tiles are laid out elementarily one after another, forming vertical and horizontal rows.
Tile laying in a “straight row” is the easiest and most affordable way to lay
Facing “diagonal” – the most time-consuming and complex way, requiring professional skills, but the result of the work looks original. Diagonal-laid tiles expand the room visually.
Laying with a diagonal is a laborious and difficult way of laying
Facing “in a run” It resembles brickwork: each higher row of tiles is shifted horizontally by half of the tile, so its middle is exactly above the seam between the tiles of the lower row.
The “run-up” lining resembles brickwork
Facing method “honeycombs” involves the use of hexagonal tiles. Most often it is intended for finishing the floor, but there are also series for wall cladding.
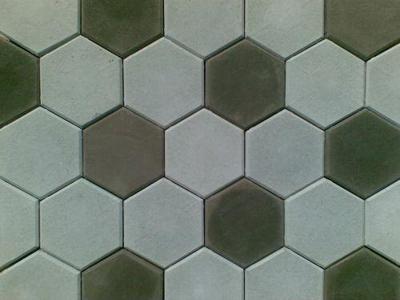
Facing the honeycomb: elements with six faces are used
Modular styling – the most original modern way, in which a set of tiles of different shapes and sizes is required in order to compose a variety of patterns and patterns. Many manufacturers offer off-the-shelf models. But you can make a drawing and choose the tiles yourself.

Modular tile laying – the most original modern way of facing
Having received information about the tile itself and how it is laid, we will consider in detail how to lay the tile correctly.
Necessary materials and tools
For laying tiles, the following materials will be needed:
- tile;
- tile adhesive;
- special distance wedges and crosses (to form the right seams);
- grout for joints,
and also need such a tool:
- construction mixer;
- building level (and preferably two – one short and the other long);
- notched trowel (with a comb tooth height of 8-12 cm);
- rubber spatula;
- rubber mallet for pressing tiles to the wall;
- a small Bulgarian with an even circle of diamond;
- tile cutter;
- ballerina with carbide tip (for drilling round holes).
How to prepare the surface
Tiles must be laid on a prepared, level surface. It can be a wall leveled with drywall or plastered, the floor with an even screed. There is no need to consider the option with an uneven floor or walls, since in this case the work is much more complicated: it is very difficult to achieve an even surface of the tile coating. In addition, this will lead to a large overspending of expensive glue..
The verticality of the wall can be checked using the level. If the differences exceed 0.5 millimeters per meter, it is necessary to level the wall with plaster.

Check the wall level for vertical and horizontal
The horizontal surface of the floor is also checked by the level and find out whether it needs to be leveled. You should check the angles between the walls using a square: they should be equal to 90 degrees.

Before laying the tile, the wall is primed twice
Before starting work, the surface must be cleaned of dust and primed twice with a deeply penetrating primer.
Tile Laying Instructions
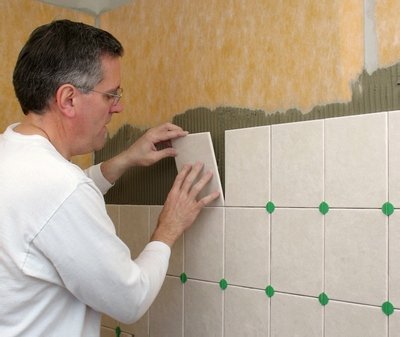
Laying tiles on the wall
Why do I need to start laying tiles from the walls? The fact is that if you start from the floor, then in the process of subsequent work, the tile is very dirty, construction debris can get into the joints. It is possible that materials or heavy tools may fall on the floor, which can lead to cracking of the tile.
So, the walls are flat, primed, proceed to laying tiles:
- We retreat from the surface of the screed to the distance that we obtain by summing the thickness of the floor tiles, the adhesive layer and the deformation gap. For convenience, it is best to use a rail of the desired thickness: it will prevent tiles from sliding down, in other words, it will keep the indentation of the entire row of tiles from the floor at the same distance.
- Knead the glue: pour two liters of water into the bucket, gradually add the glue mixture (according to the manufacturer’s instructions), mix the solution with a mixer. The consistency of the adhesive should be such that the solution is plastic, but not liquid. We give it five minutes to ripen, mix again and that’s it – the glue is ready.
- We take the tile in our hands, determine in which direction we will place it. We look at the back of the tile – most manufacturers draw an arrow there. All tiled arrows should be turned in one direction..
- On the back side of the tile, apply glue with the even side of the notched trowel, then remove the excess glue with its toothed.

To apply glue, use a notched trowel
We keep the spatula perpendicular to the surface of the tile so that the ridges are the same height.
- We install the tile in place, pressing it against the wall and pressing it carefully by tapping on the surface with a rubber mallet.

Tap the tile with a rubber mallet to better fit the base
In the same way, we install neighboring tiles, not forgetting to control with the help of the level their position relative to the horizontal, vertical, and also so that the whole tile is in the same plane.
- If there are slight deviations from the plane, we can correct them by pressing several tiles simultaneously against the wall using a long level. We insert remote plastic crosses between the tiles. If some tiles are uneven, we use wedges and set it in such a way that it cannot affect the subsequent.

We make the adjustment of the location of the tiles for several minutes, until the glue has time to grasp
The location of the tile can be adjusted if necessary for several minutes after gluing, until the glue has time to grasp.
- Similarly, we lay the remaining rows, not forgetting to insert crosses at the intersection of the seams. This is done so that the seams form straight lines and do not move.


Laying tiles on the floor
The tiles are laid on the floor almost the same as on the walls:
- Before laying the tile, the floor is covered with a primer for better adhesion. It is advisable to mark the surface in such a way that in visible places the seams are parallel to the walls, and the oblique section is hidden in hard-to-reach places or under furniture. Tiles are laid on the floor from the far corner of the room to the door.
- To determine how many whole rows there will be, we lay the tile dry first.
- We put the tile, starting from the center, according to the marked markings. As if with a floor tile, we “dive” under the cut of a previously laid wall tile (then we left for this the distance between the screed and the wall tile). Therefore, along the entire perimeter you get an even seam, for which the use of the baseboard is optional.
- We put glue on the tile, level it with a notched trowel, apply it to the floor and tap it with a rubber mallet so that it fits snugly to the base and so that the glue better fills all the voids.
- We control horizontal laying using the building level, applying it for accuracy in two directions.
- To make the seams between the tiles look the same, insert distance crosses.
To make the seams between the tiles look the same, insert distance crosses
Between floor tiles usually make a greater distance than between wall (crosses come in different sizes).
- If necessary, cut the tile with a tile cutter.
- Do not forget to remove the remote crosses before the glue hardens..

Important to remember! The joints between the tiles must be cleaned of glue immediately, since after it dries it is much more difficult to do.

We control the horizontal laying using the building level
Methods and types of cutting
When laying a tile, it is almost never possible to do without cutting it. Smooth cutting can be done with a tile cutter. The tiles are marked, laid on the bed, drawn with a hard alloy roller, then broken into two parts with a special foot. Sometimes it is necessary to perform complex formings: L-shaped, U-shaped, or cut a window in a tile.
Such a cut is done using a grinder with a diamond circle. It is better to cut tiles with a grinder on the street, since the process is accompanied by a large noise effect and significant dust emission.
In addition to the usual cutting, it is often necessary to cut round holes in the tile for sockets, pipes, and various plumbing. In such cases, a ballerina is used – an adjustable cutting tool with hard alloy soldering, which is attached to the drill and cuts holes of the desired diameter in the tile during rotation. Cutting work must be done very carefully, carefully measuring all sizes so as not to spoil the expensive tile.
However, even with the most accurate cutting, the resulting cut will not be able to compare with the factory one, therefore it must be hidden. In the corners, the patch is hidden under the even edge of the adjacent tile of the adjacent wall, and it is also possible under a special corner. In other places, it is advisable to hide the cut under the platbands and other accessories.
Grouting according to the rules
Not earlier than a day after laying the tiles, you can start grouting tile joints. They are pre-cleaned of glue and dust, the tiles are washed. The grout mixture is diluted with water as well as glue, but in a smaller amount (to save material). These mixtures should have such properties as resistance to cracks and to atmospheric factors, environmental friendliness, ease of use.
Advice! Before grouting, it is recommended to wipe the joints with a damp cloth to ensure better adhesion of the mixture to the joints.
To ensure the quality of the grout, when preparing the solution, it is necessary to strictly adhere to the proportion of water specified by the manufacturer. The instructions also indicate the maximum permissible layer thickness. The finished mixture is rubbed into the seams using a rubber spatula.

Grouting – finishing tile
Excess grout mixture is removed from the surface of the tile with a damp sponge, light diagonal and longitudinal movements relative to the joints.

Excess grout is removed with a damp sponge.
Neatly worn seams will hide the existing small defects in tile laying, but carelessly wiped seams – on the contrary, will reduce all your efforts to zero. Therefore, grouting is no less important than laying tiles.
Having finished work, there is no need to rush with the operation of the finished premises: let at least three days pass, and only after that it will be possible to walk on the finished floor.

The floor is ready, but you can walk on it only 3 days after laying the tile
Compliance with this requirement will allow the floor surface to remain perfectly flat for many years..
Tile video tutorial
For clarity and better assimilation of the material, you can watch the video tutorial on laying tiles.
By and large, the whole process of laying tiles is a complex and painstaking work, requiring complete dedication and a responsible attitude to each stage of this work. But it’s nice to wash the tiles well and enjoy the work done after laying, then bring furniture, install plumbing and use the results of your hard work.


