How to make a suspended ceiling light
To create a beautiful suspended ceiling for the interior is only half the battle, but to make it refined and emphasize beauty, it is necessary to equip competent lighting. Today, to make such lighting is not particularly difficult. All the necessary materials can be easily bought in stores, and for the realization of what was planned, you will need skills in using the tool and accuracy when performing work. About how to make the ceiling lighting, what is needed for this, just this article will be.
Content
- Applicable backlight types
- Installation of lighting
- Wiring process
- Marking drywall sheets
- Making holes for fixtures
- Setting the backlight: technology
Applicable backlight types
One of the unique features of suspended ceilings is the zoning of the room, and in combination with various lighting groups it is possible to achieve an amazing effect. When planning to equip a suspended ceiling with illumination, it is necessary to consider at the stage of creating a design project how many lighting groups there will be, their types and options. Lighting a suspended ceiling is usually divided into three main groups:
- general lighting;
- target lighting;
- lighting for mood.
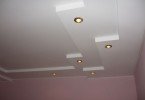
For general lighting use a central chandelier, several lamps or niches with built-in lamps. The main task of this group of lighting devices is to maximize the illumination of the room in the dark.
The objective of the target lighting is the functional zoning of the room by creating in individual zones of its illumination of varying intensity and color gamut. This can be achieved using lamps mounted in niches of the suspended ceiling and united in separate groups.
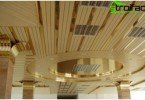
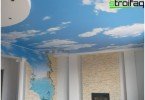
The ceiling lighting with LED lights looks practical and beautiful.
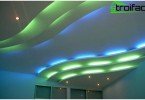
Lighting for mood is created according to the principle of targeted lighting, with the difference that lighting devices combined into different groups can create a festive, intimate or working environment depending on the situation.
Decorative ceiling lighting with LED strips is now very popular
To illuminate a false ceiling, various types of lighting devices are used. It can be mounted spotlights, pendant lights or lighting strips. Incandescent lamps, fluorescent lamps or LEDs are used as light sources. Today, ceiling lighting is gaining more and more popularity. led strip. The main advantages of LED lighting are durability and low energy consumption.
Installation of lighting
Placement of groups of lighting devices for various purposes begins at the stage of creating the design project of the suspended ceiling. The places of installation of lighting devices are marked, and a wiring diagram is created indicating the amount of materials used, their specifications and power consumption. Having a ready-made project in hand, you can safely proceed to the installation of lighting.
Wiring process
After completing the installation of the frame of the suspended ceiling, you can begin to lay the wiring for lighting. Depending on the capabilities and wishes, the wiring can be laid in two ways. The first involves the installation of a cable channel, the second allows you to lay the wires in the corrugation directly through the entire frame structure. The advantage of the first method is accurate placement and further ease of connection. The second option will significantly save on the total wiring length.
To lay the wiring through the cable channels, you must do the following:
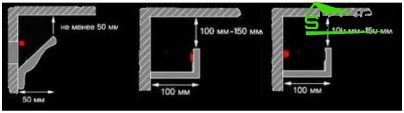
- the cable channel itself will be between the ceiling and the false ceiling structure and will be attached to the wall. An exception is the cable channel for the chandelier, it will be attached to the ceiling. We drill holes for fastening the cable channel around the perimeter of the room, starting from the installation location of the switches;
- Now we drive into the holes of the dowel and fasten the cable channel itself;
- in conclusion, we lay the wiring to each lighting device. We try to make a wire margin of 10 – 15 cm for the convenience of connecting fixtures.
The wiring in the corrugation is carried out as follows:
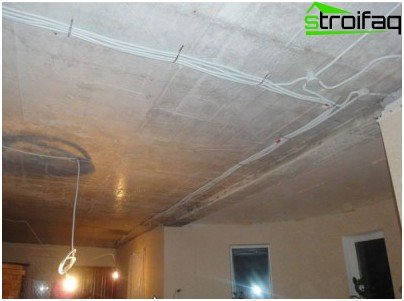
The electrical wiring to the lighting fixtures of the ceiling must be connected in the corrugation
- under the corrugation, holes are drilled in the ceiling, after which special fastening clips are inserted inside each of them;
- for each lighting group we take a separate corrugation and put it inside the wire;
- the size of a piece of corrugation is taken based on the distance to the lamp. So the whole bunch of wires from the switch to the connection point is in one corrugation. We try to take the length of the wire with a margin of 10 – 15 cm for ease of connection;
- we fix the corrugation in the clips that were previously installed.
A combined wiring option is possible using corrugations and cable channels. In this case, the main wiring is laid through the cable channels, and the wiring for the fixtures in the center of the suspended ceiling is laid in the corrugation.
Marking drywall sheets
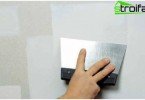
Now that you have created the skeleton of the suspended ceiling and wiring has been laid inside, you can begin to apply the marking on the drywall sheets with the exact location of the frame profile and the installation locations of the lighting fixtures. To do this, you will have to take a tape measure, a pencil and transfer the exact dimensions and location of the frame profiles to the drywall sheets. Having received the exact layout of the frame, mark the installation location of the fixtures. After that, you can install the sheets in place.
Making holes for fixtures
Completely sheathing the frame with sheets of drywall, we check with the design project for the exact location of the lamps and, if necessary, correct the markup. After making sure that everything is in order, we drill holes. The diameter of the holes, respectively, and the diameter of the saw, we choose based on the fixtures that we are going to install.
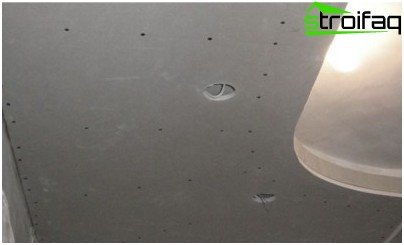
Cut holes in drywall sheets for spotlights
The holes themselves are made using a special nozzle on the drill – a hole saw. Protective goggles must be worn during drilling, otherwise gypsum dust will get into the eyes. It will take very little time to drill, the main thing is to do everything carefully so as not to damage the drywall.
Setting the backlight: technology
Having prepared the places for lighting devices, we proceed to their installation. As noted earlier, to illuminate the ceiling, you can use spotlights, LED strip or a classic chandelier, as well as a combination of these lighting fixtures.
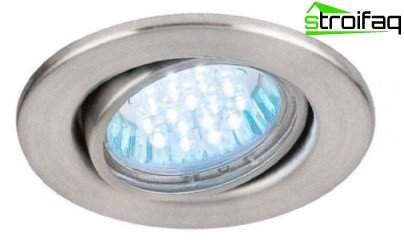
We begin the installation of lighting with spotlights, for this you need to do the following:
- pull the wires out of the drilled holes and strip their ends. To clean the ends we use nippers;
- on the ends of the wiring we put on the connecting terminal to which we connect the wires of the spotlight. To do this, use a Phillips screwdriver;
- if the lamp is with a halogen bulb, then before putting it back in place, we first install the bulb. Installation is carried out very carefully, taking care not to touch the light bulb with your hands. There is no such problem for LED lights. They are usually sold in their entirety, and after connecting the lamp can be immediately put in place;
- installation of a spotlight is a very simple matter. Just insert it into the hole and press it firmly to the surface. Thanks to its spacer plates, the lamp is firmly fixed enough.
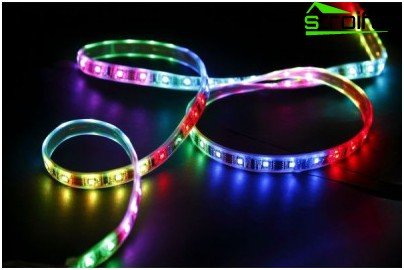
Side in a false ceiling for LED-tape
Installing an LED strip is an even easier task. The tape is attached to the ceiling surface thanks to the adhesive base, and the network connection is made using a special connector. It should be noted that the LED strip is not intended to create the main lighting. It is best used to create mood lighting. Therefore, it is recommended to hide the tape in specially designated niches or cover it with borders.
At the final stage of the installation, we connect the backlight to the power grid, after which everything has been de-energized. And after successful completion, you can turn on and enjoy the beauty of the suspended ceiling.
All connection work can be easily done alone, the main thing is to be attentive and careful when working with electricity.