How to align the ceiling with your own hands
Starting the overhaul of the living space, it is impossible to ignore the ceiling decoration, which is preceded by a number of preparatory work, in particular, the alignment of its surface. When wondering how to level the ceiling, you need to know that there are several methods of leveling: using drywall – the “dry” method and using plaster – the “wet” method.
Content
- Preparing the ceiling surface for leveling
- Removing old material
- Elimination of mold and fungi
“Wet” method of leveling the ceiling using plaster
It is worth noting that the most widely used technology for leveling the surface of the ceiling using plaster. Gypsum boards, as a rule, are used in cases where there are large differences in height on the ceiling. Thus, in addition to your own preferences, you will have to be guided by common sense and the recommendations of specialists. The difference in joints on the ceiling surface exceeding 5 cm is a powerful argument for leveling using drywall boards. Experts do not advise in such cases to choose plaster as a leveling material, since its thick layer can lead to a dangerous situation when there is a risk of a plaster layer falling. Undoubtedly, it is quite dangerous for life and health, especially for children.
The “dry” method – leveling the ceiling using drywall
Another nuance that is worth paying attention to is the height of the ceiling. If it is not large enough, it must be taken into account that the plasterboard leveling structure “steals” a few more precious centimeters. Putty will save these centimeters.
Preparing the ceiling surface for leveling
It is worth noting that ceiling putty delivers much less trouble in new buildings, where there is only the surface of the plates. However, houses and apartments in which the ceiling surface has been repeatedly putty, painted and pasted are incomparably larger. In this case, starting a repair, you will have to worry about bringing the ceiling to its original form, that is, wash off all layers of previously applied materials.
Removing old material
The process of removing an existing layer of plaster can be somewhat facilitated by following a series of recommendations. Firstly, to remove the previously applied plaster layer, it is necessary to use a fairly sharp spatula, which should be sharpened periodically during operation. Those who like to work, holding the spatula with both hands, need to choose a product with a long handle. This will create some convenience..

Secondly, to facilitate the removal of plaster from the ceiling, it is enough to soak it with plain water. This is done using a sponge moistened with water or a spray bottle. If the ceiling is covered with water-based paint, then iodine solution can be used to remove it. So, for 8 liters of water, one small bubble of iodine is enough. To remove water-dispersion paint, special washings will be needed, otherwise, patience and a good spatula. When using a special composition that is applied with a roller and left for about 30 minutes, the old paint is easily removed with a spatula.
After cleaning the surface of the ceiling from the old plaster, you can proceed to its removal at the joints of the plates. For this, the pickaxe, hammer and sharp spatula are most often used. It is worth noting that it is not necessary to knock out the entire seam, it is enough to remove only the plaster that can be chipped without much difficulty.
Elimination of mold and fungi
Among the preparatory work is the disposal of the ceiling from mold or other fungi. Most often they occur in those rooms where there is an increased degree of humidity. If you ignore the existing mold, it will certainly appear on the new ceiling, which will spoil not only its appearance, but also the mood when contemplating dark spots. Removal of the fungus is also necessary due to the fact that it has a negative effect on human health.

If mold and fungus are not removed before applying the leveling layer, they will “sprout” in the new material and spoil the coating
After the cleaning of the joints and cracks is completed, the ceiling is completely treated with a primer, which is designed to improve the adhesion (degree of adhesion) of concrete ceiling tiles and putty. For priming flat surfaces, as a rule, a roller is used, and for hard-to-reach spots – a brush of the required size.
Ceiling Leveling Technology
At the end of the preparatory work, you can begin to seal the largest gaps. For these purposes, use a putty designed specifically for rough work, and tow. A feature of the putty for roughing is its increased density and granularity compared to similar material for finishing work.
Elimination of cracks and cracks
The tow is thoroughly soaked with a putty solution, and then cracks and cracks are caulked to it. To prevent the formation of new cracks and increase the size of existing ones, reinforce the joints of the plates with a mesh. Putty should be applied to the edges of the plates, into which the mesh will be pressed. Experts recommend pressing the mesh into the solution until it is approximately in the center of the solidifying mixture..

Tow for repairing cracks on the ceiling surface
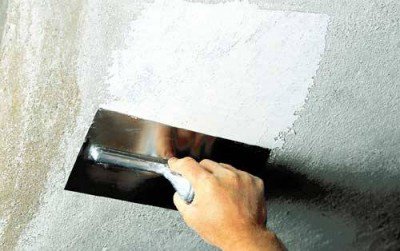
First coat of putty
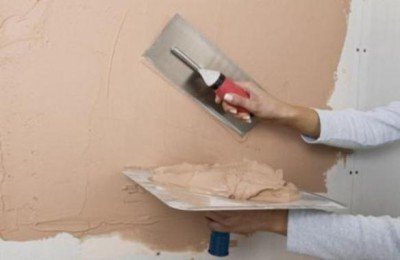
When performing continuous filling of the flat surface of ceiling tiles, the first layer of mortar is usually applied using a wide spatula. The plaster is applied “on itself”, and the thickness of the applied layer should not exceed 2 cm. After that, using the rule – a special construction tool – the surface of the layer is leveled with zigzag movements.
If it is necessary to obtain a sufficiently thick layer of plaster, it is recommended to “comb” the first applied layer while it is still soft. “Comb” the plaster with a special plaster comb. After complete hardening of the first layer, for which it takes 2-3 days, the next layer of solution is applied.
“Combing” the first layer of plaster
It is worth noting that the time required to dry the applied solution varies depending on the degree of humidity in the room. It is obvious that in a sufficiently warm and dry room, the plaster hardens faster than in a room with high humidity. Carrying out repair work most often contributes to an increase in humidity, so it is better to give time with a margin to dry the plaster. It is not recommended to reduce humidity artificially, for example, open windows and ventilate the room.
Application of subsequent layers of solution
After applying the next layers of mortar with a spatula, it is recommended to turn the building rule over and set it with the straight edge “towards you”. With this arrangement, better alignment of the ceiling surface is provided. As a result, the first layer of plaster is the thickest layer. He pressed tightly against the ceiling and “combed”. Subsequent layers were thinner. Thus, this stage can be called rough alignment of the ceiling.
In the case when preparing the ceiling surface for painting or subsequent wallpapering, after applying a layer of plaster on a concrete slab, after 10 minutes, moisten it with water and wipe with a felt grater. This measure will allow you to even out traces and indentations left after working with a spatula. Then you should wait for the moment when the surface of the applied layer of plaster dries, and then additionally smooth it with a metal grater. Only after that you can proceed to sticker wallpaper or painting. In addition, a special leveling plaster can be used at this stage to level the ceiling surface..
Laying reinforcing fiberglass
In the presence of rather problematic ceilings, “decorated” with cracks, fiberglass is used. With its help, reinforcement is carried out, both of the entire area of the ceiling, and of its individual parts.

Fiberglass is used to reinforce the ceiling with a large number of cracks.
Experts note that reinforcing the surface of the ceiling with fiberglass will not hurt if it is even and does not have chips and cracks. For reinforcing, the fiberglass cloth is cut into tapes, with which the last layer of the leveling plaster or putty is strengthened.
The final stage – finishing putty
After gluing the surface of the ceiling with fiberglass or applying a layer of plaster, it is necessary to allow the ceiling to dry. Then, using a spatula, traces of the rule are carefully removed from the surface, after which you can start sanding the ceiling with sandpaper or a special grater with a sanding mesh.
Immediately before applying the layers of the finishing putty, thoroughly clean the surface of the ceiling of the dust that has formed after grinding. As a rule, a vacuum cleaner with a soft brush, dry or wet brush is used for this. However, it is worth considering that after using a wet brush, you must let the ceiling dry.

Putting finishing putty on the ceiling
After that, using a long spatula, you can begin to apply several layers of finishing putty. Each previous layer should also dry completely..
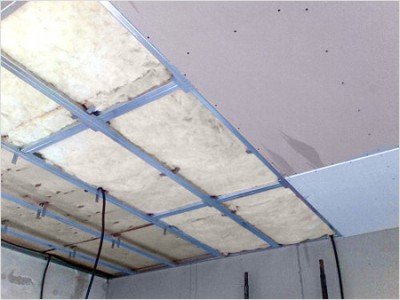
Plasterboard ceiling alignment
Solving the question of how to align the ceiling with your own hands, you can opt for the “dry” method, which involves the installation of a drywall construction that hides defects on the ceiling surface.
This type of work is performed at sufficiently large differences in height on the ceiling. In addition, the installation of gypsum plasterboard ceiling can significantly reduce the financial and time costs for leveling its surface. After mounting the entire structure, you can immediately get a flat surface that is free from flaws and ready for wallpapering.

Ceiling alignment: drywall construction
So, the ceiling made of drywall boards is a structure of metal profiles and drywall. The frame of the desired size is assembled from metal profiles, to which the sheets of drywall will be attached.
In general, the installation of such a design is a sequential implementation of the following types of work:
- Marking the position of the future plasterboard ceiling.
- Marking the points at which the suspensions holding the entire structure will be fastened.
- Mounted frame made of metal profiles.
- In the design of the finished frame, all the necessary communications are mounted, in particular, wiring.
- Drywall sheets are prepared for the installation process. So, they are given the necessary shape, and the necessary dimensions are determined. Excess clipped.
- Drywall is mounted to the mounted frame.
It is worth noting that the plasterboard ceiling can be mounted in any room. Currently, in the market of building and finishing materials, you can find sheets of drywall, characterized by good moisture resistance and resistance to many external influences..
Other ways to level the ceilings
An attractive and even ceiling surface can be obtained with the help of suspended and suspended ceilings..
False ceilings – clean, fast and beautiful
According to the installation method, this type of ceiling is extremely similar to the installation of plasterboard ceilings. Also, suspensions are attached to the concrete slab of the ceiling, designed to fix the frame of metal profiles. Then, decorative panels are installed that can be made of various materials: metal, mineral fiber, chipboard.

False ceiling – an alternative to leveling the ceiling with putty
As a rule, the choice of panels from one or another material depends on a number of criteria:
- Soundproofing qualities of the material.
- Air permeability.
- Moisture resistance.
When choosing false ceilings, one should take into account the fact that they “steal” up to 20 cm of ceiling height.
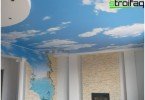
Stretch ceilings – competitor suspended
A good, but expensive opportunity to get a flat ceiling in a living room is the installation of suspended ceilings. This is a modern solution, the installation of which requires the intervention of specialists.

Ceiling alignment: stretch ceiling
The fact is that a special baguette frame is fastened around the perimeter of the ceiling, into which a canvas made of polyvinyl chloride (PVC) is set – preheated with a heat gun. Subsequently, the canvas cools and stretches, becoming strong and elastic. It is worth noting the fact that today it is possible to order a stretch ceiling of any desired color.
Thus, there are several ways to level the surface of the ceiling in a living room. The choice of this or that method depends on your own preferences, the availability of funds, the dimensions of the living space and a number of other factors. It does not matter which leveling method was chosen, the main thing is to approach the implementation of repair work carefully and with due attention. In this case, the result will be high-quality and practical, and the ceiling will last for a long period of time..