Ceiling Putty
Puttying the ceiling is not very difficult to perform, but it is a more difficult task than filling the walls. This is primarily due to the position of this surface. After reviewing the information on how to putty on the ceiling, you can confidently proceed with the independent implementation of this type of finishing work.
Content
- Starting preparation for a successful finish
- Ceiling Putty Materials
- Tools required by the contractor
- Soil – optimization of adhesion
Starting preparation for a successful finish
It is necessary to carefully clean the working surface of the ceiling from peeling finishing material and whitewash. Using a spatula, remove the layer of old putty, you can also use a small hammer, chipping off excess layers with light and accurate strokes..
Important! It is imperative to observe safety precautions and carry out preparatory work only with goggles in order to avoid dust and small particles of finishing materials getting into the eyes.
Particular attention should be paid to the presence on the surface of the ceiling of large and sharp level drops. To check, you can use a flat rail, which should be attached to the plane. Using the starting putty, it is necessary to level the recesses located on the surface, even if they do not exceed one centimeter. If on the ceiling there are small ledges with a size of less than 0.5 centimeters, then they will be easily aligned. Assessing the evenness of the ceiling surface is important to get a good end result..
Ceiling Putty Materials
- Starting putty – consumption will be approximately 3 kg per square meter of surface;
- Finishing putty – consumption reaches 1 kg per square meter;
- Deep penetration primer.
Tools required by the contractor

Ceiling Putty Tools
- Several spatulas of various widths;
- Electric construction mixer for the preparation of putty mortar;
- Roller and brush for applying soil;
- Capacity for diluting putty mortar;
- Abrasive mesh or sandpaper;
- Portable lamp to illuminate the surface of the ceiling;
- Bandage nylon mesh designed for gluing the ceiling, covered with multiple cracks;
- Bandage tape to strengthen single cracks.
Soil – optimization of adhesion
First you need to process the ceiling with a deep penetration primer. Details of material consumption are provided on the packaging. The primer solution is applied to the ceiling with a roller or brush – mowls. To treat the surface with a primer, you can use a spray gun. The main disadvantages of this method are significant cost overruns and uneven application.
It is important! When applying a primer using a spray gun, a respirator must be used to protect the respiratory system.
This stage allows to achieve good adhesion of the putty to the ceiling surface. When conducting this type of work, it should be noted that the primer is very difficult to wash. In practice, it is removed from the hands every half hour, and from the face – after ten minutes. The solution that has got on the walls, windows must be washed off after completion of the priming work.
Ceiling Putty Rules
For the quality of finishing work, it is important to understand how to properly putty the ceiling. To do this, consider phasing the entire process..
After the primer has dried, the ceiling is putty first layer. To obtain a mixture, you need to pour the powder into a bucket or other container filled with water for a third. Putty should be a thin layer to cover the surface of the water. With a construction mixer, the mixture is mixed to a state of homogeneous mass. With a narrow spatula, take the putty from the bucket and shift it to a wide spatula..

The putty mixture is applied to the large spatula using a small analogue.
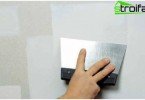
Then we apply it to the ceiling with wide and even movements..
Important to remember! The sharp angle between the putty knife and the ceiling surface must be observed, if the rule is not followed, the filler layer may fall off.
The most important task when applying the first layer is to achieve an even horizontal plane, which facilitates the implementation of the second layer and favorably affects the quality of all work. Putty should start from the junction of the ceiling with the wall, and not from the middle of the surface, gradually covering the entire working plane.

Puttying the ceiling begins from the place of joining of the upper floor with the wall
After the first layer has completely dried, you can begin to apply the second layer of putty, before removing the influx with a wide spatula.
At this stage, small indentations and irregularities that arise after the first layer are completed are filled. In the absence of large irregularities, you can limit yourself to a single putty.

The difficulty of applying putty on the ceiling lies in the location of the work surface
Next, sand the surface of the ceiling using sandpaper or an abrasive mesh. It is better to do the work in circular motions so that there are fewer stripes and scratches. Using a lamp with a lamp mounted next to the surface of the ceiling will allow you to better see bumps and places that require more attention when sanding. At this stage, the use of a respirator is mandatory. Alternatively, you can use a special grinding machine with a dust bag in the kit. But such a method is not always available..

Sanding the ceiling with a grinder
Before applying the putty, it is better to re-primed the primed surface to remove the dust that has appeared. The finish layer is applied in a thin layer. After drying, it needs to be slightly corrected with sandpaper with the finest grain.
Important! The final layer of putty must be applied parallel to the rays of the sun falling from the window. This method allows you to hide all the irregularities and errors of the ceiling.
The finish layer provides a perfectly even and smooth surface, completely ready for further finishing work. When preparing the ceiling for wallpapering, finishing putty is not required..
It should be noted that the puttying of the ceiling with your own hands does not cause special difficulties in its implementation, but requires accuracy and care. Compliance with the above recommendations will make it possible to putty the surface efficiently and competently, without the help of professional specialists.