How to paint a drywall ceiling
Mounting plasterboard ceilings allows you to achieve a perfectly flat surface without any special effort. Designers come up with new sketches of multi-level ceilings, which are embodied in the life of plasterboard masters. However, without a high-quality finish, it is impossible to achieve sophistication of the interior. The beauty of painting the ceiling depends on compliance with the technology of its implementation. Therefore, before painting with your own hands, you need to learn how to paint drywall correctly so as not to waste time and material resources.
Content
- Materials and tools for work
- Stain preparation
- How to paint a plasterboard ceiling: progress
Materials and tools for work
Before painting the ceiling, prepare all the necessary tools and materials. So, we need:
Painting materials
- Putty. Professionals advise the use of finishing putty, which allows you to get a perfectly smooth surface after grinding.
- Serpyanka for reinforcing seams.
- Deep penetrating acrylic primers.
- Water based paint. It makes it easy to achieve even and uniform staining. It is odorless. When choosing, it is worthwhile to carefully study the instructions, which indicate the type of room for use.
- Kohler is used if there is a desire to add a little color to the interior.
Necessary tools
- A roller mounted on a long hilt. The choice of roller should be approached very seriously, because the quality of painting depends on the qualities of this tool. The roller should be new, it is better if it is fur or velor. In no case do not choose a foam roller, since when working with it, many bubbles form on the surface to be painted..

Choosing a roller for painting the ceiling: drywall is painted with a fur or velor roller
- Plastic paint tray suitable for the width of the selected roller. This device allows you to easily squeeze out excess paint..
- A brush that will help to paint the surface of the ceiling in hard-to-reach places where the roller is inconvenient to use.
- Metal spatulas.
Since painting the ceiling from drywall is associated with splashes, it is better to wear those clothes that can then be thrown away without regret.
Mandatory hat designed to protect hair from water-based paint.
Stain preparation
If you want the paint to lie flat on the ceiling surface, then do not be lazy to complete the whole range of preparatory work.
1. Putty the joints between the plasterboard sheets using putty, while using a special reinforcing tape called a sickle.

Puttying joints using a serpentine net will ensure the solidity of the surface, reduce paint consumption
2. Do not disregard the hats of self-tapping screws, which should not stick out above the surface of the sheet. This can easily be checked by simply running a metal spatula on the ceiling. If the spatula “does not stumble”, then everything is smooth. Otherwise, you will have to screw the screws with a screwdriver. All places of fastening of drywall to the profile frame are also putty.
3. Then proceed to puttying the entire surface of the ceiling. They begin work from an angle, moving in the direction of the opposite wall, while trying to apply a thin layer of putty (2 mm) with a wide metal spatula. Give a day to dry the first layer. Then put a repeated layer of putty.
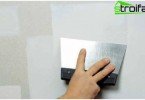
4. A well-dried surface is sanded with a fine emery grater, which is driven along the ceiling in circular motions. The smoothness of the ceiling surface depends on this procedure..
5. Fine dust deposited on the ceiling is removed with a slightly dampened cloth. The floor and windows are covered with film before starting work.
6. The preparatory stage is completed by priming, after which the drywall painting is much faster and more economical.
How to paint a plasterboard ceiling: progress
1. Open the container with water-based paint and thoroughly mix the contents using a special nozzle worn on a drill. If the manufacturer allows adding a little water in the instructions, then this can be done. Although professionals advise against using water.
2. Along the perimeter of the room in places where the ceiling adjoins the walls, they are painted over with a brush, while the movements should be jerky. This will avoid the appearance of strips that will be visible after the ceiling is dried. Carefully paint over corners.

Ceiling painting tools
3. Next, a roller is used, which is dipped in paint and rolled along the ribbed surface of the bath. This allows you to evenly distribute the paint and remove its excess from the roller. The first coat of paint is applied parallel to the window..
4. After the first layer has dried, they begin to apply the second, while the roller is directed from the window to the door. This cross-layer arrangement allows for a uniform, uniform coating..
After such a lesson there should be no more questions. So it’s time to take action. Buy all materials and tools, put on work clothes and go. Perfectly painted ceiling will become a decoration of the house, repairs in which you can do it yourself.