Entering any room, the first thing that somehow comes into view is the ceiling. The general perception of the interior and the impression that it produces depend on its design and appearance. For this reason, designers are trying to pay special attention to the ceiling. Thanks to the development of technologies in construction and the advent of drywall constructions, the possibilities for creating unique suspended ceilings have become almost unlimited. Today, the abundance and availability of building materials allows you to create a suspended ceiling with your own hands without any problems, the main thing is to be able to use the tool and know how to make a suspended ceiling. Despite the ease of installation, it is not possible to do it alone, so invite a couple more helpers.
Content
- False Ceiling Installation
- Preparatory work: stages
- Prepare the floor surface
- Design project and ceiling scheme
False Ceiling Installation
The basic arrangement of a false ceiling
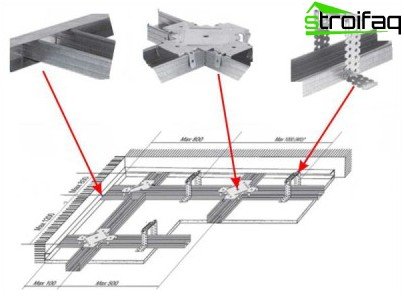
The design of suspended ceilings is a single-level or multi-level metal frame attached to the ceiling and walls of the room, which is sheathed with sheets of drywall with mounted lighting fixtures.
To create the frame, galvanized metal profiles PP 60/27 and PPN 28/27 (imported analogue of CD and UD), parts of which are interconnected by metal screws and special single-level (crabs) or two-level connectors, are used. To fasten the frame to the ceiling, direct or spring suspensions are used, fixed to the ceiling with anchors or dowels.
Gypsum plasterboard (GKL) with a thickness of 9.5 mm, a width of 600 or 1200 mm and a length of 1500 – 2500 mm is used to sheathe the metal frame. Fixing GKL to the metal frame is carried out with self-tapping screws for drywall. Recommendations for choosing GCR of just such parameters are due to the optimal combination of strength and weight of the suspended ceiling. Subject to technology, the total weight of 1 m2 of the structure will be about 13 kg.
Preparatory work: stages
As with any other construction work, before you make a suspended ceiling, you will have to do some preparation. This will concern the surface of the old ceiling, the creation of a design project and a suspension scheme, the calculation of the necessary materials.
Prepare the floor surface

The surface of the ceiling must be carefully prepared: remove the old finish, repair
Although the suspended ceiling will hide the surface of the ceiling, a number of preparatory work will have to be done. This will facilitate the installation of the ceiling and ensure reliable fastening of the entire structure. We start by removing the old finish, which is completely removed before the putty or plaster, and if there were none, then to the ceiling. Then carefully check the surface for cracks, partially or completely exfoliated putty or plaster.
If everything is in order, then you can primer and putty the surface, and then proceed with further work. Otherwise, it will be necessary to carry out more thorough repairs, possibly even re-plastering the ceiling. Ideally, you should get a solid and even surface to which the metal frame will be attached.
Design project and ceiling scheme
The creation of a false ceiling begins from the moment of development of its design project. Today, thanks to various architectural programs, the creation of such a project takes very little time. These programs allow you to consider and choose the most attractive future suspended ceiling in volume and color.
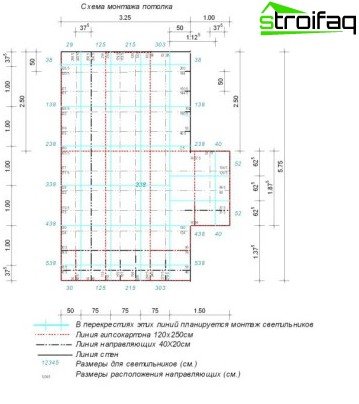
In addition, computer programs will allow you to create and print a false ceiling diagram with all the necessary materials and their quantity. But those who are used to doing everything the old fashioned way – on paper, will have to work a little more. Creating a scheme and calculating materials manually is as follows:
- the first thing that is necessary for calculations is to measure the room and calculate the perimeter. For example, we have a room measuring 3×5 m. P = (3 + 5) * 2 = 16 m. This will also be the length of the guide profile PPN 28/27. The size of the room is scaled to paper;
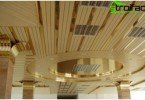
Suspended ceiling example
Important! When measuring the room, you can find that the opposite walls have different lengths. In this case, we take the highest value for calculations.
- The next step is to calculate the wireframe profile. The supporting frame will be from the PP 60/27 profile, which is attached to the ceiling with a pitch of 600 mm. For ease of installation, the length of one profile strip will be equal to the width of the room. The number of planks is calculated as follows 3000/600 = 8.3 and rounded to the nearest whole number. To evenly distribute the slats, we place the first and last at a distance of 100 mm from the walls, and all the rest with a step of 600 mm. This step was not chosen by chance. The fact is that the gypsum board has a standard width of 600 mm and 1200 mm, and for reliable fastening it is necessary that the edges of the sheets lie on the profile. The placement of the profile strips is marked on the diagram;
- Now you need to calculate the number of suspensions. All suspensions are attached to the ceiling in increments of 600 mm. All strips of the frame profile will require (3000/600) * 8 = 40 suspensions. We fix the first and last suspension at a distance of 300 mm from the wall, and all the others with a pitch of 600 mm. On the diagram, the place of their attachment is marked with crosses;
Important! Direct suspensions can be used in two cases. The first – when the height of the suspended ceiling does not exceed 120 mm, the second – when the surface of the ceiling is absolutely flat. Otherwise, it is recommended to use spring suspensions and constantly monitor the horizon using a level.
- to give rigidity to the design of the suspended ceiling, you will need to additionally install jumpers from the PP 60/27 profile. Jumpers themselves are installed between the main supporting strips with a pitch of 600 mm. For their fixation, a special connector is used – a crab. The calculation of the number of connectors is carried out as follows ((3000/600) -1) * 8 = 32 pcs. Why exactly 32 pcs. And not 40. The fact is that the first line of jumpers is installed at a distance of 600 mm from the wall, the second is 1200 mm, the third is 1800, the fourth is 2400. The fifth row is the wall itself. Now we mark on the diagram the place of attachment of the crabs and, connecting them with a solid line, we get the location of the jumpers.
Important! There are two types of connectors: single-level (crab) and two-level. The difference in the method of attachment and in the height of the final structure. So, the crab allows you to place all the strips of the profile on the same level, and the total height of the profile with gypsum plaster will be 27 + 9.5 = 36.5 mm The height of the profile and the GCR with a two-level connector will be 27 + 27 + 9.5 = 63.5 mm. In addition, the profile consumption in the second case will be greater. But which way to choose, decide directly to the master.
It remains to calculate the required number of sheets of drywall. Here everything is extremely simple, knowing the area of the room 5 * 3 = 15 m2, and the area of one sheet, for example 2.5 * 1.2 = 3 m2, we get 15/3 = 5 sheets. Now we calculate the number of screws. This must be done based on the following data:
- for fastening to the ceiling and walls, dowels and self-tapping screws 6×60 are used, the pitch for fastening to the walls is 300 mm, for the ceiling 600 mm;
- for fixing the profile and suspensions, the profile and crabs, a self-tapping screw LN 9, LN 11 is required. For the profile and suspension, 2 screws are needed, for the crab and profile 4 screws;
- MN 30 self-tapping screws are used for fixing gypsum plaster. 250 mm pitch between self-tapping screws.
In the end, it remains to put on the circuit the location of the lighting fixtures and calculate the required amount of wiring.
How to make a false ceiling yourself
On how to install a suspended ceiling with a list of various installation options, you can write a small scientific report. In the framework of this article, we will consider the simplest installation option, which you can do on your own without having the professional skills of a builder.
Work with marker and tape measure
Installation of suspended ceilings begins with the marking of the surface of the ceiling. If the surface of the floor is flat, take a tape measure and a marker. We measure the height of the future suspended ceiling without taking into account the drywall sheet. Over the entire length on each wall we put 3 – 4 marks, then we take the masking thread and connect the marks in one line. This line will be a guideline for the guide profile PPN 28/27.
Now we mark the ceiling for the main profile of the software 60/27 and suspensions. We retreat from the walls the necessary distance, put a few marks and beat off the line with a masking thread. We repeat the procedure for all other trims of the supporting profile with a pitch of 600 mm. On the marked lines for the frame profile, we designate places for direct suspensions, as shown in the diagram.
Mounting the ceiling frame
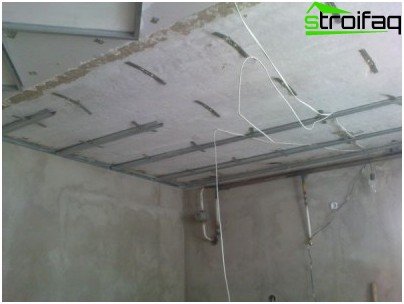
We fix the profiles to the walls and ceiling, forming a frame for plasterboard sheets
Having finished with the basic markup, we proceed to the installation of profiles. We start with the guide profile PPN 28/27 around the perimeter of the room. We take a puncher or drill in our hands and drill holes for the dowel 6×60 along the previously drawn line. We drill the same holes on the profile. For reliable fastening, drill the first and last holes 100 mm from the wall, all subsequent 300 mm from the wall. Drive the dowels into the holes obtained and fasten the PPN profile into place.
Important! During the installation of the suspended ceiling, you will have to screw a lot of various self-tapping screws and screws, so use a screwdriver. This will greatly accelerate and facilitate all work..
The next step is to fix the suspensions. To do this, take the suspension and apply it to the mark on the ceiling. It should be located strictly in the middle of the line and at right angles to it. We mark a place for the dowel and drill a hole. Then we drive in the expansion bolt shield and we fasten the suspension. Repeat the whole procedure for 40 suspensions.
Important! The suspension can be fixed with 1 or 2 dowels, it depends on how reliable the structure you want to get.
Now we fix the main frame. To do this, bend the antennae of the suspensions down so that a profile freely enters between them. We start the profile inwards and at the required height we fix on the sides with metal screws.

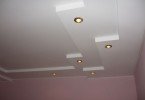
Example: what a multilevel suspended ceiling frame might look like
Having fixed all the profile strips, we take a tape measure and mark the places of attachment of the crabs. Then we wind them on top of the profile with the antennae down and firmly press down to snap inside. Having done this, we proceed to cutting the jumpers from the PP 60/27 profile. To do this, use a grinder or scissors for metal and cut the whole profile into pieces. We take the size on the basis that the jumper will fit between the main strips. Having cut the required amount, we proceed to installation. We make a jumper underneath the crab and press them tightly together so that the crab clicks inside. Having installed all the jumpers in this way, we align them in a straight line according to the drawn diagram. Then we fix all the crabs and profiles with 4 screws.
Installation of the frame is completed. It is possible to equip heat and sound insulation, as well as lay wiring for lighting.
Rules for facing GKL surface

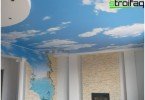
We mount the gypsum plasterboard sheets to the ceiling frame: drywall plates are attached to the profiles with self-tapping screws
We apply sheets of drywall to the prepared frame and fasten it with screws to the profile. We make sure that the edges of the GCR lie on the profile. For reliability, we fasten all the sheets apart. To do this, you will have to cut some, but this is done very easily. First, cardboard is cut under the ruler on one side, gypsum is gently broken, and then cardboard is cut on the other side..

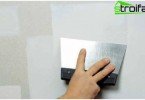
After installation, first you need to putty the joint joints and places for installing self-tapping screws with putty, then cover the entire ceiling with a putty mixture
The installation of the false ceiling with your own hands is completed, it remains to complete the decoration. To do this, carefully joints and align all joints and places where the screws are screwed. We wait until the putty is completely dry, after which we apply the finish layer of finishing materials. At the end we mount lighting devices. All installation work on the false ceiling is quite simple for beginners in the construction business. The main thing is to comply with the technology of work.