How to make a ceiling with your own hands
When entering the room, first of all, we pay attention to the ceiling. Moreover, this happens at the subconscious level, and therefore, if the ceiling is even, does not have cracks and other defects, then we may not notice it. But if it looks messy, the overall impression of the room will be ruined, no matter how luxurious it may be. In order to achieve an ideal surface, it is necessary to carefully observe the technology of repairing the ceiling, do not neglect a single step, no matter how insignificant it seems, otherwise all the work can go down the drain. In this article, we will talk about how to make a ceiling with your own hands, and about some secrets that make it easy to achieve an excellent result..
Content
- Good preparation – quality repairs
- Plaster leveling technology
- Dry ceiling alignment technology
Good preparation – quality repairs
No matter how trite it may sound, the level of ceiling repair to a large extent depends on its preparation. This is what we will do first.
First, you need to free the entire room from furniture and other interior items. All that can be taken out – we take out to the next room. If something doesn’t go through the doorway, or you don’t want to take it apart, you can cover such items with sheets or polyethylene.
Secondly, we are preparing the necessary tool. At the preparation stage, we need a spatula, a whetstone, a bowl of water and a soft rag. The putty knife needs a small size, about 5-7 cm. It will be hard to work too large, because in order for its edge to be completely pressed against the surface of the ceiling, you will need to make great efforts, but you should not take too small, otherwise the work will take a huge amount of time.

The preparation of the ceiling for finishing depends on the method of subsequent processing: cleaning is mandatory, but the previous decoration is removed only before whitewashing or painting
So, let’s get started. We take a small spatula and sharpen it as sharply as possible. Now we carefully remove the old coating from the ceiling: plaster, paint, lime, etc. During operation, the spatula must be sharpened periodically. Believe me, this will save you a huge amount of time, which is important at this stage, since the work is really boring and tedious, but the final result depends on it. You must admit that it will not be very pleasant if a piece of paint or plaster falls off before the eyes of a newly renovated ceiling due to the fact that somewhere a piece of the old coating remains.

After cleaning, you can wash the ceiling with a common household chemical diluted in warm water.
Now the ceiling must be thoroughly washed with clean warm water and a small amount of detergent. You need to do this by changing the solution several times. Remove all dust, lime residue and other impurities from the ceiling. Do not wipe the entire surface with one rag, remember that the quality of the repair depends on how carefully you prepare the surface.
The ceiling can be primed only after it has completely dried
But that is not all. After the ceiling has completely dried, it must be covered with a primer layer. We pass the seams and corners with a brush, and on the entire remaining surface the primer can be applied using a roller.
Tip: Use the same primer and leveling compound for the ceiling..
If you do not plan to install suspended or suspended ceilings, then the preparation includes one more step – leveling the surface. First, consider the case when the ceiling differences in height do not exceed 50 mm. Such irregularities, as well as the seams between the plates and small cracks can be eliminated by covering the surface with gypsum mixture.
Plaster leveling technology
- We dilute the solution, strictly following the instructions indicated on the package. We prepare a small amount of the mixture at a time, since the gypsum dries very quickly. Usually enough 2.5-4 kg.
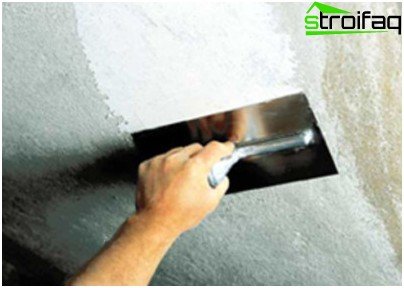
- We put the solution on one side of the ironed, apply it to the ceiling and, gently pressing, rub the composition on the surface so that it sticks, but does not squeeze out. The first layer should be approximately 15-20 mm, while not achieving a perfectly flat surface. At this stage, it is important to fill in large bumps and cracks, and everything else will be masked by the following layers.
- Now all large irregularities and tubercles need to be cut with a spatula. It is better to do this until the solution has completely dried. Defects are easier to identify by moving a long rail over the surface of the ceiling.
- We apply the second layer of gypsum, again without achieving mirror evenness. This is also a leveling layer..
- For the third layer, we dilute the solution a little thinner and apply it not with ironing, but with a wide spatula.
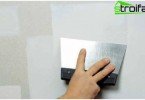
- After the surface has completely dried, we clean all seams and irregularities with coarse-grained emery paper.
- Remove the dust remaining after sanding with a large wet brush.
- Now cover the prepared surface with a primer.
- In conclusion, apply a layer of finishing putty.

It is better to level the ceilings in a “wet” way in several layers
Tip: If the unevenness of the ceiling does not exceed one millimeter, then you can do with one layer of gypsum. The greater the difference in height, the more layers you need to apply.
Dry ceiling alignment technology
Quite often, network users wonder how to make a ceiling with their own hands if the difference in ceiling height reaches a few centimeters or more, if there are huge cracks in the ceiling or the tiles are laid unevenly. Naturally, the wet method will not be able to solve the problem, therefore, the “dry” leveling of the ceiling surface is used, that is, its coating with sheet building materials.
The most commonly used drywall for this purpose. Today it is the most affordable material, both in terms of cost and the ease of working with it. In addition, it is quite durable and has a large number of positive qualities..
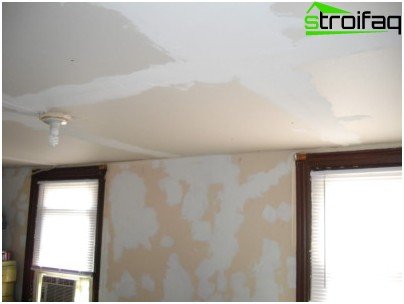
The “dry” method is the alignment of ceilings with drywall, plywood and other sheet materials
Preparatory work for the “dry” alignment is exactly the same as for the “wet” method. The only difference is that a primer with bactericidal and antimicrobial properties should be used. Further, a lath made of a metal profile is applied to the ceiling, while its horizontalness is tracked using the building level. Sheets of plywood, drywall or fiberboard are attached to the crate, depending on the choice of the owner. After that, the resulting ceiling can be painted or coated with any selected material..
How to whitewash the ceiling
There are still people who prefer whitewashed ceilings. In principle, they can be understood: the whitewashed ceiling looks neat, gives the room coziness and freshness.
When whitewashing, each subsequent layer should be applied perpendicular to the previous
The good quality of such repairs largely depends on the correct preparation of the whitewash solution. For every 10 square meters, we need 3.5 liters of water, in which 90 grams of wood glue should be dissolved. With a small amount of water, you need to dilute 2.3 kg of lime, 15g of blue and 60g of laundry soap separately from each other, and then carefully introduce the resulting mixture into a solution with glue. The composition is thoroughly mixed and applied in 2-3 layers.
Tip: when whitewashing, each layer must be completely dried.
How and what is the best color
Before painting, after preparatory work has been completed, the surface of the ceiling must be primed with diluted paint. Be sure to use exactly the one you have chosen for painting the ceiling. At this stage, unfinished areas and small defects that are invisible on a cracked surface may appear. All identified deficiencies should be addressed..

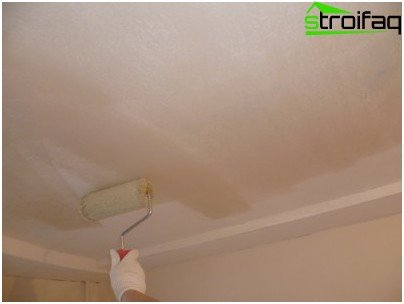
When painting the ceiling, you will need both a roller and a small brush for painting corners and hard-to-reach spots
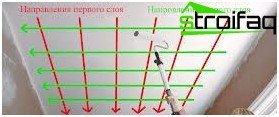
Next, we proceed to painting the ceiling. As a rule, you should start from a wall with windows. We carry out the first strip with a brush, carefully painting over all the protrusions and corners. The remaining surface can be covered with a roller, passing with the brush at the end of the work the remaining joints of the ceiling with the walls.
Important: Each coat must be applied in one direction, but each subsequent coat must be perpendicular to the previous one. It is better to apply 3-4 light layers than one thick.
In order for the painted surface to retain its gloss for a long time, at the end of painting it is necessary to close all windows and doors, preventing the appearance of drafts and the penetration of sunlight. No need to speed up the natural drying process, you will have time to ventilate the room a little later.
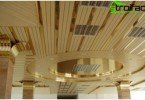
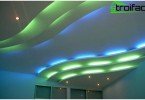
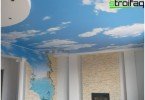
How to install a stretch ceiling
Of course, if desired, stretch ceilings can be done independently. The technology of their installation is not so complicated, but nevertheless it is better to trust this work to professionals in their field. There are some specific features in it..
After the surface of the ceiling is treated with an antiseptic composition, you can proceed to fasten the bearing profile. To do this, first on one level you need to draw a horizontal line around the entire perimeter. Next, it should be glued to the profile to ensure its even contact, and then fix it with screws at an equal distance from each other.
Tip: Do not fix the screws at a distance less than 10 mm from the edge of the profile.
Before you start working with the tension material, the room must be warmed up to a temperature of 40 ° C and then constantly maintain it until the installation is completed. The film with the help of a building hair dryer warms up to 60 ° C and after that is stretched to the profile. The corners are attached in the following order: first one, then the opposite, now remaining in turn. After the corners are firmly fixed, we attach the entire film to the profile in increments of 80 mm. Now with a spatula we tighten the material evenly around the entire perimeter.
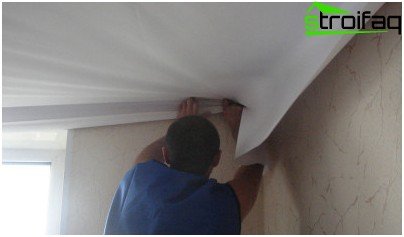
The most difficult step in the installation of suspended ceilings is fixing the last corner of the material
Tip: if wrinkles and wrinkles are formed during installation, they can be smoothed out in a circular motion after heating the canvas with a construction hairdryer to 60 ° C.
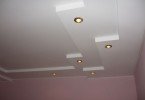
How to make a false ceiling with your own hands
In this case, after preparing the surface of the ceiling, it is necessary to install a suspension system. Similarly to the previous technology, a horizontal line is drawn along the perimeter of the room on which the guide profile will be mounted. On the ceiling at a distance of 600 mm from each other, lines are drawn in both directions. The points of their intersection will determine the location of the suspensions.
The ceiling profile is fixed by the ends in the grooves of the guide and is firmly fixed by suspensions from two sides. All ceiling profiles must be installed at the building level..

Frame construction for hanging drywall sheets
On the resulting suspension system, sheets of drywall, plywood or any other selected material should be attached. After the installation is completed, the entire surface must be puttied, that is, prepared for further finishing work. After the putty layer is completely dry, the entire ceiling must be sanded with fine-grained emery paper and cleaned of dust, and only after that you can proceed to its finishing.
Remember, any ceiling made with your own hands will serve for a long time only subject to the technology of its installation. Therefore, if you do not have patience, diligence, accuracy and can not even imagine which side to approach a screwdriver or screwdriver, entrust this work to specialists.