How to make a ceiling of panels with your own hands
A suspended ceiling made of plastic panels is one of the lightest and cheapest options for ceiling finishes. Usually it is installed in bathrooms and toilets, corridors, sometimes in residential areas. In particular, if it is necessary to save money on building materials. For the installation of this design, you do not need to have special building qualifications, you can do without experience in the repair field. The ceiling of the panels with their own hands is able to make even a teenager. The main thing is a correctly selected instruction and proper accuracy.
Content
- The main advantages of plastic
- Range of panels for ceilings
- How to determine the quality of PVC panels?
- Number of parts needed: calculation
- Installation of ceilings from plastic panels
- Errors of mounting panels to the ceiling
The main advantages of plastic
- Excellent moisture resistance. This is the main advantage of this type of material, due to which it is the PVC panels that are mounted on the ceilings of bathrooms and toilets.
- Ease of care. It is enough only to wipe with a damp or dry cloth sometimes. All pollution is removed very simply..
- Universality. The panels will look good in the hallway, in the bedrooms (especially exclusive series from leading manufacturers), and in the kitchen. They are faced with loggias and balconies..
- Plastic ceiling construction is able to hide any defects of the ceiling (even the most significant and large-scale), utilities (wiring, pipes, cables). PVC panels allow you to mount in them the elements of spot lighting – various lamps.

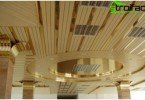
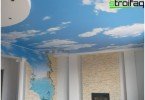
You can choose plastic panels for any interior composition

Range of panels for ceilings
Panels made of PVC (polyvinyl chloride) are presented in the markets and in stores in a large assortment. There are wall (hard and heavy), ceiling (light, but quite fragile). Ceiling – more fragile, even a slight touch with a hand or a mounting tool can leave a notch, as well as spoil the appearance. Working with them requires special care and accuracy..
It is also worth knowing that plastic ceiling panels can vary significantly in width, texture and color. Sometimes their surface imitates wood, marble or other popular decorative materials. Some types of such panels are specially made to create the illusion of covering the ceiling with wooden boards. Others give the ceiling a holistic, monolithic look, especially when viewed briefly.
PVC panels can be:
- Glossy coated with special varnish
- Matte. It is pure PVC, uncoated and the cheapest
- Colored or with a pattern. In this case, the manufacturing technology of building materials will be as follows:
• transferring images from thermal film to a plastic panel is the most economical and common option;
• Direct printing with high resolution is performed on special equipment; Thus, structures and ornaments with many shades and colors (marble, wood species) are imitated..
It is very important not to make a mistake and acquire high-quality material, no matter what structure and color palette it has.

Plastic panels for the ceiling are represented by different options in texture, relief and a colorful palette
How to determine the quality of PVC panels?
- The first thing to do is to carefully inspect the entire surface of the panel, pay special attention to ensure that its correct geometry and the quality of the external surface are observed – uniform drawing, evenness. Quality PVC panels should have an absolutely smooth and even surface, transverse or longitudinal distortions, irregularities and lines are unacceptable.
- The stiffeners located in the inner cavity of these plastic panels must not be visible from the front..
- Also count the number of internal stiffeners, compare them for several types of PVC panels of the same width. After all, the more there are, the stronger the design of the future ceiling will be..
- Of particular importance is the thickness of the stiffeners and the outer walls of the panels, most importantly – the front (it should be the thickest and strongest).
- Then take 2 (or more) panels and try to tightly connect them in a monolith with the corresponding sides. Pay attention to the quality of the docking, its lightness, absence or presence of a gap between the panels. All high-quality panels are easily joined and do not leave noticeable traces of assembly.
- It is also important to determine their structural strength and the strength of the material itself. To do this, squeeze the PVC panels with force and examine the results of your experiment. Any high-quality panel will retain its integrity, does not deform and does not crack. Although a barely noticeable deformation is quite acceptable, the main thing is that it does not interfere with docking with other panels.
- Then check this plastic for bending. Bend-fold any corner of the panel several times. And if for 3-5 such bends the plastic survived – well, then the panel will last a long time. And if it started to crack or broke, then the quality of the material is very low, the manufacturer saved, exceeded the content of PVC chalk in it. The defective panel may burst during installation, and in the future “be afraid” of any influences.
Plastic panel ceiling option – rack structure with alternating matte and chrome elements

Number of parts needed: calculation
If you decide to make a plastic ceiling with your own hands, then the main thing to start with is to calculate the exact number of fasteners and plastic panels themselves.
- First you need to calculate the exact area of the ceiling (multiply the lengths of its sides). Then divide the resulting number by the area of the 1st PVC panel (it is indicated on the package). Add 20-15% to the resulting number, rounding to a larger number. This amount must be allocated to cuts..
- Then calculate the required number of mounting profiles. Draw a diagram of the ceiling, observing the scale, its size. Draw parallel lines along the 1st of its sides. These lines will serve as a marking for mounting mounting profiles. It is believed that the optimal distance between parallel profiles is 50-61 cm. Based on this, calculate the total number of profiles.
- To make a profile around the perimeter of the ceiling, purchase a rigid UD design. To mount the cross bars (if any, they are usually used only on large areas of more than 6 m2), take the lighter ones – CD.
- Then calculate the consumption of fasteners needed for the profile and pvc ceiling panels. To do this, consider the fasteners to the ceiling of the mounting profiles themselves (1 dowel per 0.5 m of the profile) and the fasteners that are used to hold the panels on the profiles. It will take screws with fairly wide hats. Buy them at the rate of 1 pc. 0.5 m PVC panel length.
- Sometimes you need to calculate the amount of plastic ceiling plinth. He closes the gap well. To purchase the right amount, divide the entire perimeter of the ceiling by 3 (this is the standard length of the product). Then round by a multiple of 3 in the larger side..

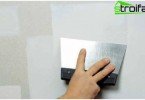
The method of attaching plastic panels
Installation of ceilings from plastic panels
- Using the building level, it is necessary to mark the profile fastening lines (UD) along the entire perimeter of the ceiling, while striving to achieve an ideal horizontal plane. It is necessary to retreat from the ceiling from 5 to 10 cm, sometimes more. It all depends on its curvature and on the size of the fixtures. Use tape measure and a water level in your work.
- The perimeter profiles are tightly attached to the wall. Voids and crevices must be avoided. To the strips fixed around the entire perimeter of the ceiling, a transverse profile (CD) is mounted – the basis for fixing PVC panels.
- Then, to the strips that are fixed around the perimeter of the structure, a plastic mounting L-shaped profile is attached (using self-tapping screws).
- Before you start filling the space with PVC panels, it is necessary to lay all the internal hidden communications (pipes, wiring), make holes in the panels for the spotlights.
- Direct installation of PVC panels always starts from the wall. They are cut precisely along the entire length of the ceiling using a small hacksaw (preferably metal).
- The first panel is very tightly inserted into the prepared L-shaped profile, fixed along the entire length with self-tapping screws, and the subsequent panels are also tightly inserted one after another and are attached to the profile rails.
- If you plan to trim the ceiling with plastic skirting in the future, then do not forget to wind the edges of the panels to be mounted in L-shaped strips from the end walls.
- It is usually the most difficult to mount the last panel. Its width often has to be adjusted to the distance that remains to the wall. Then it is very neatly inserted into the L-shaped bar.

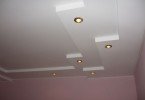
The sequence of installation of fixtures in a plastic suspended ceiling

Errors of mounting panels to the ceiling
If covering the ceiling with plastic was easy, then some troubles are possible. They must be able to warn.
- It is possible that unpleasant odors can occur in a bathroom, toilet or other room. Usually this is due to multiplied fungus and mold under the panels. Therefore, surfaces should be pre-treated with special solutions..
- Do not stick plastic with liquid nails directly on concrete – no ventilation between the panel and the ceiling is permissible.
- Take a closer look at the quality of the plastic. Its service life depends on it. Chasing cheapness, you risk getting a ceiling that quickly deforms, loses color, with a toxic effect. Cheap plastic will disappoint with transparency. If you turn on the light, all internal communications will immediately appear.
- Do not forget about parallel wiring. For some reason, it is often remembered after the panels are already mounted. Be sure to check the fixtures before installation.
- Sometimes, when installing plastic panels, instead of the necessary metal profile, wooden planks and bars are used, instead of self-tapping screws, they are made to measure the panels with brackets. Many people find it easier and cheaper. However, subsequently such devices do not pay off, their use turns into big problems (especially in rooms where there is an increased level of humidity). A wet, drying wooden base inevitably warps, bends, as a result of which the appearance of the ceiling spoils, and sometimes the whole structure is destroyed.
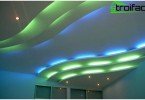
False plastic ceiling – a great solution for arranging a loggia

All these simple recommendations listed in the article will be an excellent tip for everyone who is going to plaster the ceiling with plastic panels. There are many details, but the process itself is completely uncomplicated. Get the necessary quality materials, stock up on time and patience and get ready to do everything in accordance with the instructions. Believe me, the result will exceed your expectations..