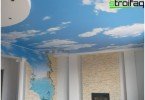
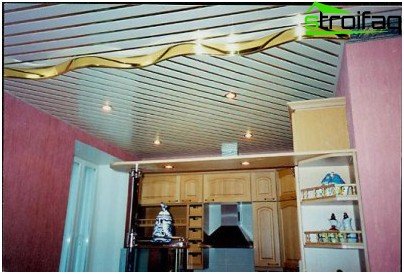
A false ceiling is most often installed in bathrooms or in kitchens. This is explained by moisture resistance, durability and environmental friendliness of the material, as well as ease of maintenance of the coating, but in no case does not mean that it cannot be used in other rooms. A huge selection of materials, type of coatings and a wide range of colors allows you to use them in almost any room. Such ceilings are especially good in long corridors or loggias. In addition, do-it-yourself rack ceiling can be mounted in just a few hours.
Content
- Types of rack ceilings
- Attractive qualities and cons
- Long list of benefits
- Disadvantages: brief but objective
Types of rack ceilings
The rack structures are divided into ceilings:
- open type;
- closed type.
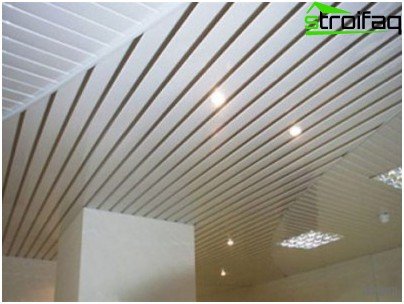
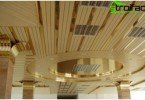
Slatted ceiling ceilings
The device of a rack ceiling of an open type provides for the presence of gaps between panels up to 16 mm wide. They can be left for better ventilation, or can be decorated with various inserts. Closed ceilings may also look as if there are gaps between their slats, but in reality it is either recesses or decorative decoration with a material of a different color or texture. Most often, panels of closed structures are laid close to each other.
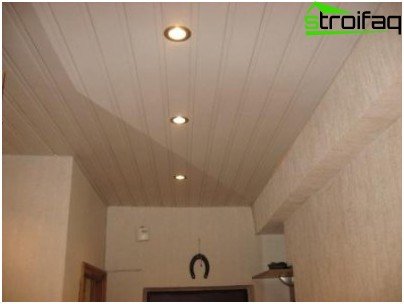
Closed rack ceilings
Attractive qualities and cons
Before you finally choose which ceiling to be mounted with your own hands: rack or tension, you need to know about the main advantages and disadvantages of each type. Since our article is devoted to rack constructions, we’ll talk about them specifically.
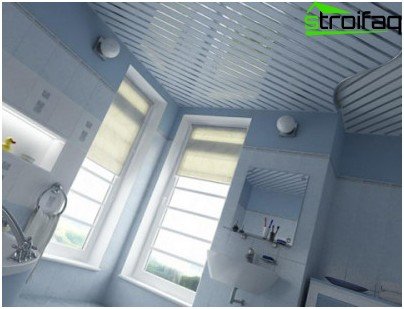
High resistance to high humidity, microclimatic changes and various influences make rack ceilings indispensable for bathrooms and kitchens
Long list of benefits
- Universality of design. The installation of a rack ceiling is permissible in rooms of any area, regardless of temperature and humidity in them: in trading and industrial halls, in residential and non-residential buildings. A huge selection allows you to choose the coating for the most sophisticated style.
Of course, like any other suspended ceilings, slatted ceilings slightly reduce the height of the room, but, you see, the result is worth it …
- Durability. Usually, rails are made of the highest quality steel and are coated with a special coating that is highly resistant to mechanical stress, chemicals and microclimatic changes..
- The installation of a false rack ceiling is simple and does not require specialized skills, high-precision tools and special preparation of the ceiling surface. All necessary fasteners can be purchased at any hardware store..
- Environmental friendliness. The materials used in the manufacture of the rack ceiling are environmentally friendly. Mold does not form on the coating and other microorganisms do not multiply.
- The presence of a sub-ceiling coating allows you to mask wiring and other communications.
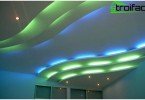
- It is possible to create multi-level structures with various lighting options.
- The high level of moisture and fire resistance allows them to be used in rooms with increased fire safety requirements and excessive humidity.
Disadvantages: brief but objective
If we talk about the shortcomings, then in the rack ceilings they are practically nonexistent. The only thing you can encounter is minor inconvenience in the event of a need for repair, a slight decrease in ceiling height and a fairly high price.
What inconvenience does the repair face? The fact is that the installation of the rack ceiling with your own hands is carried out in a strictly defined sequence, and if the panel fails somewhere in the center of the ceiling, it will not work so easily to take and remove it. To replace a damaged rail, you will have to disassemble the entire coating to the very end.
If it is not planned to lay any communications under the ceiling, then its height will decrease by a minimum, insignificant amount, necessary only for placement of load-bearing tires, therefore such a “drawback” may not be noticed.
As for the high price, given the durability of the coating – this fact becomes controversial. It is easy to verify this by calculating how many times it will take to change the cheaper coverage during this time and how much such savings will cost.
So the decision has been made. But do not immediately run to the store for rails and fasteners, you need to do something else.
Calculation of the rack ceiling
Before you go for the material, you need to measure the size of the room and finally decide what kind of lighting will be in the room. Based on these parameters, we will calculate the rack ceiling.
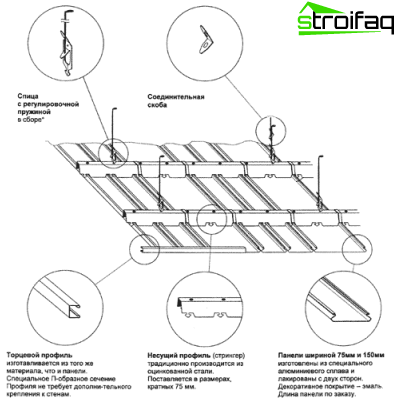
Suspended ceiling device
If you plan to install several spotlights, you first need to determine their type in order to know exactly what height you will need to lower the suspended ceiling with your own hands – rack or any other. Moreover, this value should be at least 20 mm greater than the height of the selected light source.
The calculation of the rack ceiling is not particularly difficult. The main thing is to choose the most suitable rails for the length. Typically, manufacturers offer panels with a length of 3 or 4 meters. If the width of the room is, for example, 1.5 meters, then it is better to purchase three-meter slats, dividing them in half, we can easily get the required width, and material waste in this case will be minimal. As a rule, construction store consultants have sufficient experience to not only correctly determine the amount of material, but also to select all the necessary fittings and fasteners, but if you decide to do it yourself, then note that when buying a ceiling rail, it is better to increase the calculated amount by 10 percent , just in case.
Yes, there is one more important moment! If in the room where you plan to install the rack ceiling with your own hands, a larger number of corners (5 or more), you must definitely purchase an additional support rail.
What tool is needed for installation
We do not need any specialized equipment and tools. Installation of a rack ceiling is carried out using tools that can be found in the arsenal of almost every owner:
- knife;
- a hammer;
- hammer drill;
- pliers;
- pencil or marker;
- building level;
- dowels and screws;
- metal scissors.
How to prepare for installation
If you can’t even imagine how the installation of the rack ceiling is carried out – the video below will help you navigate. Masters with any experience in working with suspended ceilings can immediately start marking under the profile.
Marking under the end profile is carried out using a building level and a pencil. An even horizontal line is drawn on the walls around the perimeter at a previously defined level..

Marking under the bearing profile is carried out strictly according to the level
Installation instructions for rack ceiling
After the markup is completed, we proceed to the installation of the profile. Again we measure the length of the wall, but now along the marked line and cut off the profile of the same size. Some manufacturers immediately produce a profile with holes. If this is not your case, then you need to drill them yourself.
Important: The first hole should be at a distance of 50 mm from the wall, all the others at a distance of 40-60 mm from each other.
After attaching the profile to the line, we mark with a marker on it the holes in the profile and drill holes in the wall, necessary for the dowels. Having done this procedure on all four walls, we “sit” the profile on the screws, while at the internal corners it is attached end-to-end, and on the external at an angle of 45 °.
We turn to the markup again. Now you need to mark the location of the carrier tires. The first should be placed at a distance of 35-40 mm from the wall, and the rest at a distance of a meter from each other.

Mounting the busbars of the rack ceiling: mounting to the ceiling
We cut the tires with metal scissors and, applying them to the ceiling, mark with dots (or crosses, like anyone else) the places where it will be necessary to drill holes for their fastening. They should be 30-40 mm from the ends of the tire. The remaining holes will need to be arranged so that the distance between them is about 1-1.5 m, and they are as far as possible equidistant from each other. There are two options for mounting tires to the ceiling:
- Directly to the ceiling base for self-tapping screws.
- On adjustable suspensions using a special bracket.
Tires should not lie on the corner profile, they are designed to hold the ceiling panels, so they must be firmly attached to the ceiling base.
Now we proceed to the most interesting stage, we begin to mount the slats. First they need to be cut into size. Better if it is 5 mm smaller than the width of the room.
Tip: do not immediately cut all the slats into size: very rarely there are rooms with perfectly even walls. Therefore, it is better to do this gradually, each time measuring the required length.
First, we install the rail on the corner profile slightly inclined, and then gently straighten it to the desired position and lock it with the help of special clamps with which the supporting tires are equipped. The second panel is installed next to the first, but the third in the second row of latches on the opposite side, because maybe the first row will be slightly shorter than the others and you will need to adjust the width of the panel. An intermediate profile is installed between each pair of panels..

Installation of slatted ceiling panels: the second panel is installed next to the first, but the third in the second row of clips on the opposite side
Tip: If the last rail needs to be cut in length, then it is better to do it as follows: draw a line with a sharp knife along the ruler and bend / unbend the panel along it until it breaks.
To fix the last rail as tightly as possible, several small wooden pegs must be placed between it and the wall. Do not worry, they will hide under a decorative baseboard that will give the whole work a complete and perfect look, while the more noticeable the unevenness of the walls, the wider the baseboard should be chosen.
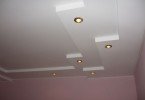
Holes for light sources
So, the ceiling is ready, when you look at it, the soul rejoices, and here comes a moment that can make not only the novice builder, but also the experienced craftsman worried. How to accurately make holes for fixtures? After all, it’s very a pity to spoil only created beauty with your own hands.

Marking holes for ceiling lights
You can, of course, mark circles on the ceiling with a caliper, each time meticulously measuring their diameter, but it’s better to immediately make a template and simply put it in the right place. In order to accurately cut a hole with scissors, you first need to drill a hole in the center of the marked circle, otherwise you can deform the ceiling rail when it is pierced. Further, the whole circle needs to be cut into thin slices and simply break off each part from the circle, swinging it from side to side. As a result, you get a perfectly flat hole for the lamp.
That’s all. Now it remains only to restore order in the room and you can forget about repairing the ceiling for many years.