DIY Armstrong False Ceiling Installation
Despite its simplicity, conciseness and the inability to create any original, extravagant design with many elements, Armstrong suspended ceiling is in great demand by consumers. And no matter how paradoxical this may sound, precisely because of these shortcomings of their own. Due to the simple device and the ability to remove each tile separately, the repair comes down to replacing only damaged panels, and not to disassembling the entire structure, as happens when repairing other types of suspended ceilings, and this did not go unnoticed by buyers. Laconicism and rigor allow Armstrong ceilings to blend harmoniously into any interior, from government agencies to the most sophisticated rooms. In addition, they are in a price category that is accessible to people with even very limited financial resources..
Content
- More on Armstrong Ceilings
- Calculation of a false ceiling Armstrong
- The main stages of installation
- Markup
- Suspension Installation Rules
- Wall profile mounting
- Installation of carrier rails
- Laying the panels at the end
More on Armstrong Ceilings
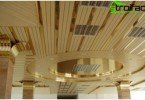
To be honest, speaking of the impossibility of creating an original design in the first words, we significantly exaggerated. In fact, Armstrong ceilings are available in different colors, and their texture is the most diverse: from simple matte to mirror. Therefore, creating a unique design is not such a big problem. Moreover, Armstrong ceiling tiles are absolutely independent from each other. They can be replaced at any time with new ones or on panels of a different color, with additional ventilation grilles or lamps, completely changing the appearance of the ceiling.
Armstrong Ceiling Example
Armstrong ceilings are unusually light, but despite this, they support not only their own weight, but also the weight of the built-in equipment. By the way, the unique design and the ability to remove tiles makes it possible to place various communications in the subceiling space, both at the construction stage and subsequently.
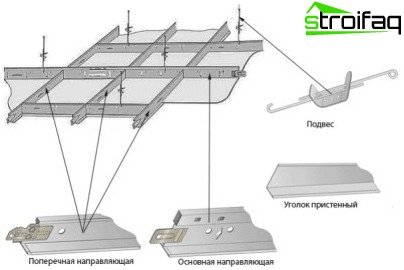
The uniqueness of the device lies in the use of a special mount used only in such types of ceilings. It consists of two spokes with a spring mechanism, thanks to which you can adjust the height of the ceiling surface.
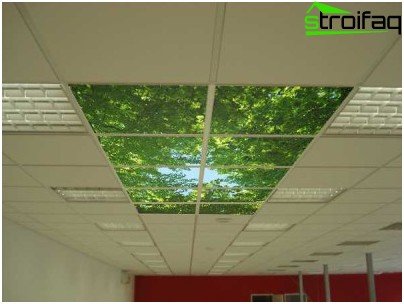
Original Armstrong Ceiling Design
What is suspended on these knitting needles? This is the simplest system of profiles and jumpers that form a cellular system with a mesh size of 600×600 mm. Cardboard panels are inserted directly into the cell and lie on the edges of the profile.
Tip: in order not to subsequently be tormented with the search for panels that are suitable for texture and color, you can immediately lay the tiles in several layers. If replacement is necessary, it will be enough to remove the bottom, and its place will immediately be taken by the following.
Naturally, such ceilings have a drawback. The panels made of mineral fiber are very afraid of humidity, therefore, in case of breakthrough of heating or water pipes in the under-ceiling space, it is inevitable to have to change the entire wetted coating.
Calculation of a false ceiling Armstrong
The calculation of Armstrong suspended ceiling of any kind is carried out according to three schemes, differing in the location of the profiles. Consider one of them:
- The length of the rails 600 mm is calculated as follows – 800 mm per square meter of ceiling.
- Guides 1200 mm – 1600 mm per square meter.
- Rail length 3700 mm – 800 mm per square meter.
- Corner – 500 mm per square meter of surface.
- Suspension 0.6 pieces per square meter.
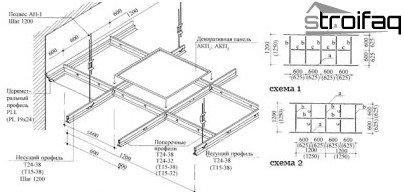
Armstrong suspended ceiling installation schemes
In principle, you don’t need to particularly delve into these calculations, since all stores specializing in Armstrong ceilings are equipped with special computer programs that allow consultants to quickly and correctly calculate the optimal amount of necessary material. But if you want to complete all the steps yourself, then the above ratios are the most profitable in the economic plan. It is important: if the room is large (more than 200 square meters), then it is better to purchase profiles with some margin. It is quite difficult to guess its value, so in this case it is better to trust real professionals.
The main stages of installation
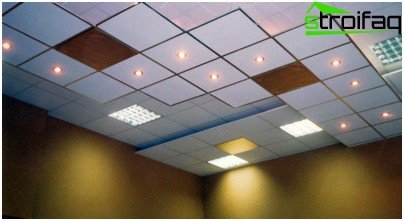
Armstrong suspended ceiling installation is carried out in several stages. Before starting work, it is better to establish all communications (if any are planned), because although it will be possible to do this later, but still such work will cause certain inconveniences.
Arrangement of false ceilings Armstrong
Tip: it is better to start installation from the middle of the room so that the plates are equally trimmed on both sides.
Markup
First you need to determine the lowest point of the ceiling in the room. We mark in all the external and internal corners of the room the marks on the walls, located at an equal distance from the floor. Now measure the distance from these dashes to the ceiling and determine the smallest. We will mark the mounting points of the bearing corner, starting from this point.
Important: the supporting corner is attached to the wall at a distance of at least 150 mm from the lowest point of the ceiling, or such that after laying the panels, the resulting surface covers at least with a small margin all laid communications, as well as taking into account the height of the lamps and ventilation grilles.
We set the first mark by measuring the necessary distance from the lowest point of the ceiling. Next, using the laser level, we project it onto all the other walls. We connect all the received points in one line.
Now we find the center of the ceiling. This is necessary so that the location of the panels at the end of the work is symmetrical. To do this, draw the diagonals. The point of intersection will be the desired center. Through it, parallel to the walls, draw two lines that will serve as central guides.
It remains to mark the location of the suspension brackets. We have already found the first point – this is our center of the surface. Now from it, at a distance of 900 mm, on parallel to the central guide lines, mark the remaining points.
Suspension Installation Rules
We attach the main rods of the suspensions to the ceiling on the anchor or dowel, which can be recognized by the presence of an eyelet. To fasten the carrier rail on it, it is necessary to mount the rods of the suspensions with a hook. For this purpose, all rails are equipped with special holes. Between each other, two rods are connected using a butterfly spring.
Wall profile fastened with dowels
Tip: suspensions should be installed at a distance of not less than 900 mm from each other and 600 mm from the walls.
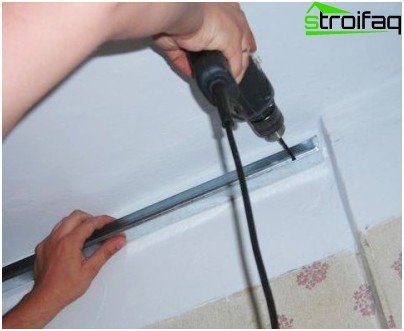
Wall profile mounting
The corner profile is attached to the marked line with dowels, so that it forms a “shelf” on which the rest of the rails will “fit”.
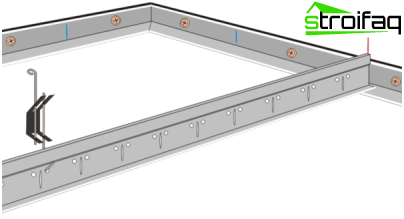
Installation of the wall and bearing profile
Installation of carrier rails
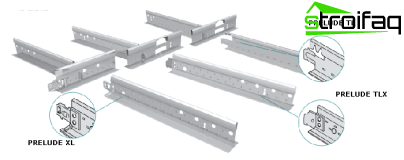
Mounting of carrier rails 3700 mm
The carrier rails are T-shaped. Their ends have special slots designed for fastening short profiles in them. Such slats are usually installed parallel to any pair of walls, at a distance of 1200 mm from each other. In some cases, the length of the rails may not be enough, but they are easily, and at the same time very reliable, fastened to each other with special locks.
Mounting rails 1200 mm long
We install these slats at a distance of 600 mm from each other and walls perpendicular to the supporting profiles. Armstrong suspended ceiling rails are equipped with special locks that allow easy and quick installation by yourself.
Mounting rails 600 mm
The smallest rails are installed perpendicular to the rails of 1200 mm so that each side of the cells becomes equal to 600 mm.
The connection of the rails with the supporting profile
Laying the panels at the end
This stage is not particularly difficult. The only thing I want to focus on is the need to work with gloves, since the mineral fiber from which the panels are made can cause severe irritation. If any pattern is applied to the plates, then they should be laid very carefully, choosing the image direction correctly.
Armstrong ceilings are considered the simplest in the modern market. It is possible to assemble such a ceiling in a small room in just a few hours, and for existing companies that have all the necessary tools and extensive experience, even less.