Do-it-yourself ceiling made of drywall
Thinking of building your own drywall ceiling? For a knowledgeable person to implement such an idea is not difficult, and for a beginner – the task is completely solved. This is a great way to save money and acquire an important skill if you are doing this for the first time. Having mastered the ceiling, it will not be difficult for you to make slopes, piers, sheathe walls with this material. Drywall is very popular, almost no repairs are complete without its use. And there are a number of reasons for this..
Content
- Benefits of Drywall Ceilings
- Varieties of drywall, their properties
- Installation and installation of false ceiling
- How to make a drywall ceiling: step by step instructions
- Fastening material to the frame
- Second level ceiling device
Benefits of Drywall Ceilings
- Drywall, a sheet of which consists of gypsum lined with cardboard, is absolutely environmentally friendly. It does not secrete toxins and is non-allergenic. Therefore, ceilings from it are made in bedrooms, nurseries and any other residential premises..
- Its surface is smooth, even and without cracks. Perfect for both painting and wallpapering.
- Good sound absorption, thermal insulation qualities.
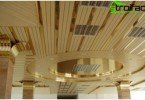
- The ability to create an original ceiling design, for example, the construction of a multi-level structure using stucco.
- Plasticity (sheets can be bent, moistened before that, and then dried with warm air, used to finish curved surfaces).
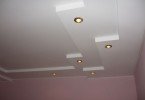
- Helps to hide communications (ventilation ducts, water pipes, various cables), use built-in types of fixtures.
So, having appreciated all the advantages, you decided to equip the suspended ceiling using this finishing material. The next step you will have to choose its specific variety.
Varieties of drywall, their properties
- GKL – gypsum plasterboard, lined on both sides with soft cardboard glued to the surface of the gypsum. The standard length of such sheets can be 2000, 2500, 2600, 2750, and 3000 mm, and width 1200 mm. They are 12.5 and 9.5 mm thick. For living quarters, it is better to use 9.5 to lighten the weight of the structure. Get off with gray cardboard.
- GKLO – fireproof gypsum plasterboard. It is usually not used in apartments, but only in factories, for decorating air ducts, communication shafts.
- GKLV – waterproof gypsum plasterboard. They are used in bathrooms and kitchens, bathrooms, but only if there is exhaust ventilation and protection of the front surface with waterproofing compounds, ceramic tiles, waterproof paints, primers or ceramic tiles. Get off with green cardboard.
- GKLVO – moisture resistant gypsum plasterboard with increased fire resistance. Combines the properties of all of the above.
- GVL – gypsum fiber sheets. They are not pasted over with cardboard. Gypsum is reinforced with special fluff pulp waste paper. Such sheets have increased hardness and resistance to flame. They correspond to the standard sizes of a regular sheet, but their thickness is more – 6 or 10 mm.
- GVLV – moisture resistant gypsum sheets.
Installation and installation of false ceiling
This is a design of 4 main elements:
1. Drywall sheets.

Drywall Sheets
2. Ceiling guide profiles UD (28-27 mm) and profiles of ceiling main CDs (60×27 mm). Guides – are attached to the wall just below the ceiling level along the entire room around the perimeter. The main bearing profiles (longitudinal) are already inserted into them. Between them are the main secondary (transverse) profiles. Drywall sheets are attached to these profiles (both longitudinal and transverse). They can be recognized by C-shaped curved edges, longitudinal corrugations and stiffeners.

Connection of the main ceiling profile and the wall guide
3. Suspensions direct (universal) and with a clip. Most often, direct universal U-shaped suspensions are used, which are attached to the main ceiling, and the main profiles are already attached to them. Suspensions have frequent holes in the sides. This allows you to fasten the profile to them at different heights, adjusting it.

Location of suspensions on the base ceiling
4. Connecting elements: anchors and dowels, with which suspensions are attached to the ceiling, fasteners-crabs – fasten the main longitudinal with the main transverse profiles, dowels that attach the guide profiles to the wall.
Typically, frames consisting of profiles on suspensions are divided into two types: single-level and multi-level.
Drywall Ceilings respectively, too.
To install a drywall ceiling, you will need the following tools:
- Level (better water)
- Roulette
- Drill with a puncher with various nozzles: for mixing the solution, for drilling (drill), for cutting the necessary holes for the lights)
- Screwdriver
- Simple triangle or square (to measure right angles)
- Fender or pencil
- Construction hacksaw
- Fishing line
- Plane
- Lamp spot ceiling
For the final stage of leveling the ceiling you will need:
- Sandpaper
- Putty knife
- Putty
- Construction knife
- Putty tank
- Reinforcing tape
How to make a drywall ceiling: step by step instructions
After all the materials, tools and components have been prepared, you can proceed to installation.
1. First, we determine how much the new suspended ceiling will be below the base. At least 10 cm will have to be donated, because the standard built-in lamp will take 9 cm in height.
2. We make markings on the walls around the perimeter for fastening the guide profiles. For these purposes, we measure the height of the room in all angles. Having chosen the lowest angle, we mark the necessary distance from the floor (namely from the floor, but not from the ceiling), we designate the horizontal along the entire wall, using the water level. Lines can be beaten off with a masking cord at the points designated by the level.
3. On the wall lines we drill holes for dowels in the wall with a step of 30-40 ms, then we fasten the guide profiles.
4. Now we fix the suspensions on the ceiling with a step of 60-70 cm, having previously drawn parallel lines, that is, by marking.
5. Insert the main profiles into the guides.

Gypsum ceiling frame: main profiles inserted into rails and connected to suspensions
6. We fix the main profiles to the suspensions, then we bend them. For evenness, it is advisable to pull a fishing line or cord.
7. We attach to the main profiles the main secondary profiles. They are fixed in places where sheets of drywall are planned to be joined. It turns out a kind of metal grill, which is a single-level frame.
8. Lay the wires for future wiring. Remember to cut through the grooves the cable will run through. Grooves should be located in the wall from the switch to the ceiling. After passing the cable, make the wiring in the ceiling, release the free ends for the lamps in predetermined places.
9. The next step is fixing the drywall to the frame.
Fastening material to the frame
After the metal frame is built, it is necessary to attach gypsum board sheets to it. This is a difficult procedure, the implementation of which is divided into several stages:

Fixing a drywall sheet to a metal frame: contouring control using spirit level
1. Cut with a hacksaw – a special one with small teeth (or a regular clerical knife). It is best to cut sheets of 120×250 or 120×125 cm. The main thing is that the ends of the sheet exactly fall on the supporting frame lattices. The sheets should lie on a flat surface (preferably on the table) horizontally. Next, along the level, draw on the drywall with a knife from the front side. Then slide the sheet off the table and break it. After turn over and cut the cardboard on the other side.
2. The edge formed after the cut is treated with a plane. It should turn out smooth, without kinks. All protruding edges are cut with a sharp knife..
3. Cut out openings for recessed lights and ceiling sockets. They should be carefully measured, determining the exact location on the sheet, then marked, and then cut with a drill with the desired nozzle or hacksaw. If pipes pass through the drywall, the diameter of the hole must be made > 10 than pipe diameter.
4. Ceiling decoration with plasterboard. Plasterboard plates can be fixed to the frames in two ways: longitudinal and transverse. With transverse mounting, they are perpendicular to the main supporting metal profiles. At longitudinal – in parallel with the main bearing profiles. If there are additional lattices, then the sheets must be secured from their angle in two perpendicular directions. If there are no additional lattices, then fastening is carried out from the end of the sheet or from its center. Self-tapping screws are installed 10-15 mm from the edge of the sheets. The screws are installed from the front surface of the sheet perpendicularly and to such a depth that their heads could not pierce the cardboard and did not protrude above the front surface. They should also be included in the metal frame. > 10 mm deep. The length of the screws is selected based on the total thickness of the planned drywall sheathing. The maximum permissible distance from one self-tapping screw to another is 150 mm. This value can be doubled if faced with tiles repeatedly. Screws should be installed in the guide profile closer to its rear wall, then the screw will not be able to bend the profile shelf inward. Cardboard should not be disheveled in places where screws will be fastened. If the screws are deformed or were placed by mistake, they are removed, and new ones are not removed < 50 mm from unsuccessful mounting location.
Important! Joints of sheets must be located on the profile!
Plasterboard plates do not need to be done close to the walls. It is better not to putty the gap, but to cover it with a ceiling corner. Then in the case of expansion of the plates it will be possible to avoid deformation of the ceiling. When directly fixing the plates to the ceiling, you need to work together, or use supports.
Plates should be placed horizontally, adjusted to each other and screwed to the frame with screws.
Important! Before installing drywall must not < 2 days to mature in the room in which it will be mounted. Then it will gain humidity and room temperature.
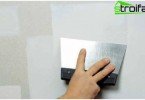
5. Putty joints. Do not putty right away. Wait 2 days. Then inspect the joints for defects and repair them. To clear a surface of particles and dust. It is better to use a reinforcing tape, laying it in all joints. It prevents cracking. If you use expensive, high-quality putty, then it is enough to process only the joints (and then paint on glass from a spray gun), if cheap, then you should putty the entire ceiling, and then paint with a roller. Sequencing:
– clean the edges of the seam, moisten them, fill the seams with putty, pressing it with a spatula; – having applied the main layer of putty, lay the reinforcing tape, pressing it with a spatula. Do not leave air bubbles. Coat the surface of the tape with a thin layer of putty and wait for complete drying; – polish the joints with sandpaper; – apply a layer of putty on a previously dried layer; – apply another leveling layer of putty and allow to dry; – remove irregularities with sandpaper.
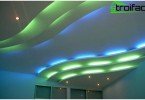
Second level ceiling device

Installation of the second level of the ceiling from drywall: the construction of a figured frame
- Plan in advance, make a drawing of the drawing, outline it on the ceiling.
- To beat off the height of the second from the first ceiling level.
- We fix the guide profile.
- We install the main guides of the second level to the main guides, stiffeners of the first.
- Bend the profile for the necessary radius sections.
- We breed wires under the lights.
- Saw the plate of the desired shape and fix it, as on the first level.
- We cut out a strip of drywall and close the box.
- We install lamps.
- Plastering.
If you carefully follow the above instructions, then there will be no questions how to fix the drywall to the ceiling. You can do everything thoughtfully and accurately. It’s enough to show patience, make efforts and you can get an excellent ceiling design made by yourself.