The most common terraces are in the form of separately attached rooms without glazing. There is no way to place them on the foundation of the house when the latter has been built a long time ago, so the owners erect an extension on the columnar pillars (if the foundation of the house is high) or simply on a gravel pillow (when the foundation is low). You cannot use these square meters in the winter in this form. It seems unreasonable to spend significant funds on arranging non-residential premises. Let’s consider how to warm a veranda qualitatively and without unnecessary expenses.
Content
- Development of a work plan.
- The process of exterior wall decoration.
- Window processing.
- Floor insulation.
Development of a work plan
It does not make sense to warm the open terrace, so either you need to spend money on glazing it, or even leave this venture. There is no need (especially if this is done at the summer cottage) to install plastic windows. In this case, you can safely do with ordinary window panes, which you can install yourself, fixing them with wooden battens.
The greatest heat loss occurs through windows and walls. A smaller amount leaves through the floor and ceiling, but only if the extension is not located directly on the ground. In the absence of a foundation, heat is lost through the floor at almost the same level as through the walls.
The process of warming windows, floors and ceilings, unlike walls, takes place indoors. Mounting materials on indoor walls is not profitable for several reasons. Firstly, laying the insulation inside leads to the fact that the walls freeze in the winter anyway, and the material itself is not able to reflect all the cold. Secondly, the dew point shifts inside the room, so there is a big risk that the material will gain moisture, which will subsequently cause fungus and mold. Thirdly, carrying out these works outside is much easier than inside (although they may be suspended due to weather conditions).
So, the progress should look like this:
- glazing of the room;
- wall insulation from the outside;
- window processing;
- floor insulation (if necessary);
- ceiling insulation (optional).

A little effort and your porch will be warm
The process of exterior wall decoration
Work will begin with a thorough treatment of all surfaces. It is necessary to eliminate all cracks with silicone sealant or a simple tow, and also remove all elements that do not hold well or interfere with work (old withered paint and shutters, for example).
The material should be selected according to several criteria: cost, durability, level of heat transfer, resistance to adverse conditions. At the moment, mineral wool meets almost all of these criteria, the only thing that can confuse is cost. It is about warming it that will be discussed further.
After preparing the surfaces, we proceed to the assembly of the first horizontal frame, in the niches of which the insulation will fit. For its manufacture, you should purchase wooden slats (5×5 cm), which must first be treated with protective agents (this will extend their service life). They should be fixed across the wall, the distance from one rail to another is the width of the mineral wool slab minus two centimeters. The reduction is done intentionally, namely to ensure rigid fixation of the canvas, otherwise it will crawl.

The use of metal profiles will increase the life of the frame several times. But working with him is a little more difficult. The photo also shows the additional fastening of the material with special elements. They are not needed with the correct structure of the frame, as well as with the use of rigid insulation boards
A membrane film is stretched over the filled cells of the first frame. It will protect the material from getting wet during rain, as well as small slots of the walls from blowing. You can fix it with a conventional construction stapler.
On top of the first frame protected by a film, a second, but only vertical, is mounted. It is on these rails that the siding elements will be mounted on top.
Window processing
Double-glazed windows do not need additional protection, and ordinary windows – yes. They need to be processed not only at the joints of the frames, but also the canvases themselves (especially if only single glass protects you from the street, not double).
First, we glue the glass itself using a special energy-saving film. For its installation you will need double-sided tape and a regular hair dryer. At the very top of the canvas, glue a long strip of tape, remove the protective layer of paper and glue the edge of the film to it. Slowly press the surface of the film to the glass and direct a stream of hot air to its surface. A hot stream will ensure a snug fit. At the bottom we fix the edge of the film with the same tape.

With the help of a film, you can protect the entire window, but for this you will need to pull it from one slope to another. If its width is not enough, then individual segments overlap each other with an overlap (15 cm).
Joints of frames are sealed with a special solution. We take a certain amount of chalk and twice as much building gypsum. Slowly add water and knead the mixture until the consistency of thick sour cream. Using a spatula, apply the mixture to the joints of the frames. We wait about ten minutes until the mixture dries a little. Then we turn any cloth into a roll, moisten with water and go through this wet roller over the putty, thereby leveling it. When spring comes, we just open the leaves, the dried pieces of the mixture simply fall off by themselves, without damaging the integrity of the frame coating.
It is possible to insulate windows with a rubber sealant, but the work in this case is more complicated. Careful fastening of the gasket itself will be required, as well as fitting of the hinges of the wings to ensure a tight fit.
Floor insulation
It should be noted that after carrying out these works, the ceiling height will decrease by about 15-20 cm. You should start with the complete removal of the old flooring. If it is supposed to re-lay the removed parquet or linoleum, then it is necessary to handle the dismantled elements very carefully. If the coating consists of many segments, they should be numbered or their arrangement should be indicated in some other way..
If the floor is with irregularities, they must be corrected and a new screed must be made first. After that, in the area of the plinth around the perimeter of the whole room, 2 cm thick insulation tape is laid without additional fixing (we cut them from a mineral wool slab). Then wooden logs are laid along the room, their thickness should be equal to the thickness of the plates of insulating material. Fastening is carried out with screws, the step between the lags is equal to the width of the plates. After that, the insulation plates are laid.
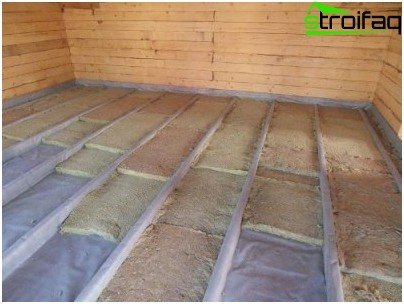
To avoid moisture absorption by the material, you can put a film under it (it is mounted on top of the lag)
Chipboard plates are laid on top of this structure, they must be placed with an offset relative to each other. As a result, it turns out that the middle of the canvas from the first row falls on the joint of two sheets from the second. After that, you can lay new flooring or return to the old place..
The ceiling is insulated according to the same principle: assembly of the frame, filling with insulating material and cladding. The work is voluminous, but not difficult to perform, so to cope with them yourself is quite easy, even without the help of assistants.