
Laying tiles on a wooden floor
The practicality and functionality of the floor, covered with ceramic tiles, is without a doubt at the highest level. Tile floors show their best side in the kitchen, in the bathroom and in many other rooms. Tiles as flooring are most often laid in houses where concrete slabs are used for floors, while completely forgetting that laying tiles on a wooden floor is quite real.
Content
- Tile preparation
- Tools and materials that you need?
- What is preparation for?
- Level with concrete screed
- Dry leveling method
The reason for refusing to lay the tiles on the wooden floor was the requirement for a rough floor for tiles. The fact is that ceramic tiles require a rigid, fixed base, otherwise the fastening solution laid under it will crack and collapse, and with it the tile. Therefore, those who dared to make such a flooring had to fill in a thick layer of concrete screed, and this is a very laborious and costly matter. In addition, such a design significantly increased the weight of the floor, which negatively affected the design itself. Modern developments in construction have made laying tiles on a wooden floor accessible to anyone who wants to update their wooden floor without resorting to time-consuming and voluminous work.
Tile preparation
Tools and materials that you need?
First of all, you need to decide on the tile for the future floor. Today, the choice is huge and limited only by designer imagination and financial capabilities. When choosing a tile, you should be careful not to confuse the floor tiles with wall tiles. The fact is that in appearance they are very similar, but the strength and surface of the tile are different. Floor tiles have higher strength than wall tiles, and its surface is created with anti-slip effect. Together with the tile, we choose the glue for it. The brand of glue will depend on the type and size of the tile, its moisture-absorbing ability, operating conditions and the base on which the tile will be laid. Along the way, we choose grout for joints.
Important! You should choose a grout of the same company as the glue. When choosing a color, it is necessary to take into account the lightening of the grout after it dries.
As for the tool, in order to lay the tiles on the wooden floor, you will need:
- ordinary spatula and grater with teeth for applying glue;
- rubber spatula and sponge for mashing seams;
- glass cutter or tile cutter, in extreme cases, you can use a grinder;
- containers for mixing the adhesive solution and grout;
- tape measure, square, marking line, laser level;
- a hammer with a rubber nozzle;
- drill or screwdriver;
- mixer nozzle for a drill.
What is preparation for?
According to technology, tiles on a wooden floor can only be laid on a quality prepared base. To do this, first of all, it is necessary to conduct a full audit of the wooden floor, which usually consists of several layers: flooring, substrate, subfloor and log. If the floor is old, then each of the layers may have certain damages and defects that will not allow you to make a durable floor covering from tiles.
To eliminate defects and create a solid foundation, you will have to do the following:

The preparation of the wooden floor for tiles consists in repairing and leveling the rough foundation
- We completely remove the floor covering and the substrate. If the subfloor and logs do not creak or fail when walking on them, then leave them as the basis.
- If the logs and the subfloor require repair, then we completely remove the draft boards. Rotten and damaged logs are replaced. Under the sagging logs we lay a new substrate and set horizontally in level.
- We protect the logs and the subfloor from decay, fungi and mold, treating them with special protective impregnation, and let dry.
- After drying, the space between the lags under the top is covered with expanded clay.
- We lay the boards of the rough floor, leaving a gap between them of 5-10 mm. We fasten boards with self-tapping screws.
- We put glassine on the rough floor and lay a new substrate on top.
It remains to create a reliable substrate for the tile. You can make it a traditional concrete screed, or you can on the principle of a dry screed.
Level with concrete screed
The concrete screed will be quite heavy, and not everywhere it can be equipped. But if there is a desire, and the conditions allow it to be done, then the following must be done:
- The subfloor is reliably waterproofed.
- We lay a metal mesh on top and fasten it to the subfloor using self-tapping screws.
- Using a laser level, we install beacons on the walls. The height from the subfloor to the lighthouse should be 3 cm.
- Pour the concrete screed and let it dry completely.
Dry leveling method
This type of screed is more preferable for wooden floors due to the lower load on the floor structure. It is done as follows:

Dry tile screed
- On top of the waterproofing of the subfloor, we lay the GVL sheets (gypsum fiber sheet), GKLVU (moisture-proof plasterboard sheet), TsSP (cement-bonded particleboard), moisture-proof plywood. The sheets themselves are stacked in one or two layers.
- We fix the sheet with self-tapping screws in increments of 15-20 cm.
Important! We lay the sheets in such a way that the joints of the sheets fall on the middle of the floorboard.
- Glues between sheets glued with special glue for drywall sheets.
- We process the surface with a deep penetration primer, let it dry, and glue the masking net. Then again we process with a primer.
Important! The floor should be even, so at all stages we check its horizon using a level. If laying tiles on a wooden floor is carried out in rooms with high humidity, then it is necessary to make high-quality waterproofing. To do this, the joints are glued with strips of polymer membrane waterproofing, a width of 30 cm. At the joints of the wall-floor we make an inlet of 5 cm to the wall.
We put the finish coating
Regardless of what the foundation, concrete screed or gypsum sheets will be, a certain sequence of work must be observed. This will greatly facilitate the laying of tiles. To lay a tile on a wooden floor, you must perform the following steps: marking the floor, laying tiles and grouting.
Floor marking – the basis of aesthetics

Diagonal tile layout requires careful layout
The layout is based on the centerlines of the room. For a conventional laying method, a transverse and a longitudinal line are marked. A transverse line connects the middle of the long walls of the room, and a longitudinal line connects the middle of the short walls. Diagonal marking lines connect the corners of the room. They are used when the tile is laid diagonally.
The lines are applied to the base using a marking cord. Using the drawn lines, we lay out the tile over the entire area, starting from the center of the room. First, lay out towards the corner next to the door. Then we move to the next corner so as to complete the layout near the door. All this is necessary to see the flooring as a whole. This is done first of all in order to reject tiles with uneven edges or other defects. Secondly, if there is a fireplace, staircase, bathroom or any other central objects in the room, they should be highlighted. To do this, around them you need to put a full-sized tile or a tile of a different color. Thirdly, it is necessary to select and prepare the right amount of tiles to trim.
To trim with the least marriage, the tile must be soaked for 45 minutes in water. Trimming itself must be done using a glass cutter or a special mechanical tile cutter. If there is neither one nor the other, you can use the grinder. Trimming can be done at the time of marking or during tile laying. Everyone decides for himself..
A clear sequence of work
- First of all, we prepare the adhesive solution. To do this, pour a certain amount of water indicated on the package with glue into the container and add the glue mixture itself. First, manually, and then with a drill with a mixer nozzle, thoroughly knead the mixture to the consistency of sour cream. Leave for 10 minutes and then mix again..
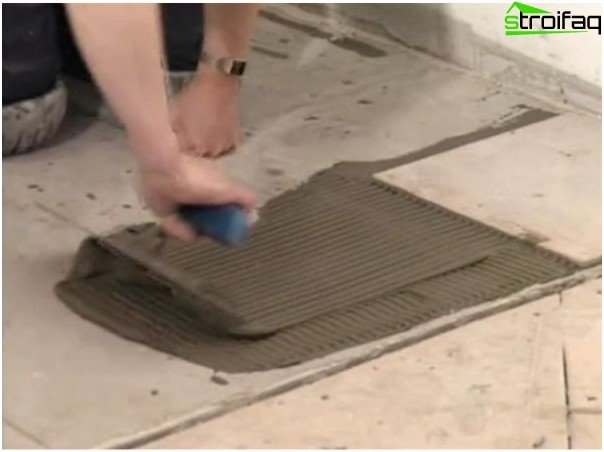
Apply glue to the leveling layer of plywood with a notched trowel
- Now you can start applying glue to the surface using a gear grater. To do this, apply the adhesive mixture to the base using a spatula. Then we smooth out the smooth edge of the grater. In conclusion, for uniform distribution of the mixture over the entire surface, we carry out a serrated edge at an angle of 45 degrees.
Important! The thickness of the adhesive layer should be 2-3 mm higher than the height of the grater teeth. You can start laying tiles on the floor from the center of the room or corner, using axial lines as guidelines. The main thing is to complete near the doors.
- The glue application area should not exceed 1 m2, otherwise it will be very difficult and inconvenient to lay the tiles.

To form smooth beautiful seams we use plastic crosspieces
- On the base covered with glue, lay the tile. Press it firmly to the floor with your hands. We tack large-sized tiles with a rubber mallet from the center to the corners.

We control horizontality by setting the level on several tiles simultaneously
Important! Tiles can be laid in a sutured and seamless way. To create uniform seams between the tiles, we put special delimiters in the form of crosses. We remove the cross-stitch crosses after partial hardening of the glue on the newly laid floor. At laying clinker tiles glue is applied to the floor surface and to the tile surface.
- After laying at least three tiles, check the level of their plane. If there is a skew, we remove it with a rubber mallet, tapping it along the overestimated edge. The excess amount of glue is removed with a spatula..
- Having laid the tiles in this way over the entire area, let the glue dry. Then proceed to the last stage.
At the end of grouting

Grouting will enhance the aesthetic qualities of the cladding
Important! Seams can be overwritten only after the glue dries. Otherwise, you can break the tile by moving the tiles while walking on them. Before the grout itself, we fill in the place where the crosses were with the adhesive solution, and while we are preparing the grout, let it dry.
- Grout for joints is prepared in the same way as glue for tiles. The difference is only in quantity and consistency, it should be like pasta.
- Using a rubber spatula, fill the inter-seam space. Remove excess with the same spatula and re-coat the seam.

Tile washing after grouting
- As soon as the last seam is smeared, we give the grout about 30 minutes for partial polymerization and proceed to washing the floor. To do this, using a sponge soaked in warm water, remove the remnants of the grout and adhesive solution. Do not tighten with a sink, since after drying the grout is very poorly removed from the surface of the tile.
Finally, after an hour, we rinse the floor again and let it dry completely. After a week and a half, a coating of tiles laid on a wooden floor will be able to withstand heavy loads. Properly and efficiently performed work on laying tiles will allow to serve such a coating for more than a dozen years.


