
How to lay laminate flooring in an apartment yourself
Is your old flooring tired of you? Linoleum rubbed, and carpet is strewed with old age? Want a change? They are closer than you think! Laminate is the most modern and stylish way to decorate the floor in your apartment. Inexpensive, fashionable, beautiful. It is easy to buy (an assortment such that your eyes get tired of choosing), it is easy to deliver (an ordinary passenger car is enough), it is easy to assemble (even a 10-year-old child can cope with this task). But still, how to lay a laminate, because there are probably “pitfalls” in this business? Let’s solve this problem together!
Content
- Step 1. Preparing the base of the floor
- Step 2. Lay the backing
- Step 3. We lay the laminate
- Rules for laying adhesive laminate
- How to lay a laminate with click locks
- We lay a laminate with locks such as “Lock”
Step 1. Preparing the base of the floor
The very first thing you will need to do upon arrival from the store home is to put the laminate in the original packaging in the room where you plan to repair. In this state, he should “rest” for several days (2-3). What is it for? Laminate gets used to the environment where he will spend the “rest” of his life.
In order for the laminate to lie evenly and serve you for more than one year, you need to be very responsible for leveling the base of the floor. If the old floor is wooden, then check if all the boards are intact and whether they fit snugly together. Having discovered irregularities and distortions, they need to be eliminated by replacing the most “curves” and the oldest boards with new ones or just use grinding.
If the base is concrete, then it is not necessary to resort to leveling with a screed or other labor-intensive methods, it is enough to make sure that the floor does not have too pronounced defects such as mounds and pits. Well, if these irregularities are too noticeable, then you still have to spend time, and effort, and money for a screed or self-leveling base.
Step 2. Lay the backing
How to lay laminate flooring? This question may cause a grin in someone, someone may have a fear of the unknown, and someone may even say that he is not interested in the answer. Sometimes it’s better to know in advance what is ahead than to look for information later, phoning friends and neighbors or frantically “clicking” on the keys of a laptop. So, in order for everything to really be in accordance with the rules, it is necessary to lay a plastic film and a substrate, which will act as a “pillow”, softening the physical load on the laminate.
Polyethylene is also needed for vapor barrier, because moisture is the main enemy of the laminate, especially if attacks are carried out “from the rear”. The film is laid in the direction perpendicular to the one in which you will lay the laminate. The seams formed between the polyethylene canvases can be sealed with ordinary stationery tape, and so that the film does not “run away” when laying the laminate in several places, it can additionally be fixed with small pieces of adhesive tape.
A substrate is laid on top of the vapor barrier, which, as it were, takes a “blow” on itself, thereby increasing the service life of the floor covering.

Laminate flooring – the key to longevity of your flooring
Step 3. We lay the laminate
The way the laminate is laid depends on what kind of lock system is used on the panels themselves and whether it is at all. Yes, there is also a laminate that does not have locks, but is laid on the floor with an adhesive, which plays the role of a fixative. Let’s take a closer look at the technology of laying laminate in all three cases.
Rules for laying adhesive laminate
The adhesive laminate has one, but an undeniable advantage – all joints are reliably protected from moisture thanks to the adhesive composition, which extends the service life of the floor covering by several years. But there is a minus, however, compared to the plus, it is tiny – your expenses for repair work will increase by an amount equal to the price of special glue. Although there is one more drawback – if you decide to move and take the laminate with you, then you will not succeed, because it is impossible to disassemble what was securely glued and it is impossible to damage anything.
Laying the adhesive laminate must begin with the application of glue on the ends of the panels. And then proceed according to the “tongue-and-groove” scheme described in the previous paragraph. Before connecting to the previous ones, each panel must be lubricated with adhesive, but do not do this “by eye”, read the instructions, which must be attached to both the laminate and the adhesive.
Glue application on the ends of the laminate
Do not save on the latter – buy exactly the glue that is designed specifically for such work, otherwise you are at great risk of becoming a victim of your own greed.
Remove excess glue immediately from the surface of the laminate with a damp cloth, otherwise you will have to deal with mopping the floor from dried drops, which are not so easy to agree to leave a “settled place”.
How to lay a laminate with click locks
You need to start laying the laminate from the corner farthest from the door, located on the left side of the room. Orient the panels best along the wall in the direction of the light falling from the window..
Along the perimeter of the room, pre-install wedges, the thickness of which should be at least 10 mm – this is a wall gap, which with any method of laying the laminate takes place (at the end of all work, these wedges are removed).
Important: the size of the wall gap is calculated from the ratio of 1.5 mm per 1 meter of the length of the room. That is, if the length of the room is 12 meters, then the width of the gap should be at least 18 mm.
The first panel is placed at the left corner along the wall. The second one is inserted from the front side of the first panel at an angle of about 30 degrees and is latched by pressing it to the floor. With this “Makar” you need to get to the end of the wall, and if necessary, you can cut the last board.

The first row of laminate – a matter of five minutes
The second row must be slightly shifted so that its seams do not become a continuation of the first row. To do this, you can saw off the first board by 3-4 cm, then you will get the same checkerboard pattern, which not only gives a beautiful aesthetic appearance to the room, but also allows you to evenly distribute the load over the entire coating area.
You can use cropping from the first row to start the second.
Each row must be assembled separately, interconnecting panels from the ends. When the row is fully assembled, it is necessary to combine two consecutive rows. To do this, the second row at an angle of 30 degrees is inserted into the crest of the first and latched by pressing until it stops.
Laying laminate with click lock
As you can see, the answer to the question: “How to lay the laminate on your own?” turned out to be very simple, so you can safely proceed to the task. Wait a minute! After all, there is still a laminate with locks such as “Lock”.
We lay a laminate with locks such as “Lock”
Laminate of this type is considered more economical, although less reliable, because this connection is much more likely to fail, creating various deformations on the floor.

Laminate with lock
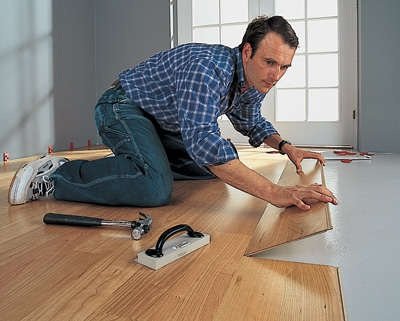
Laying such a laminate is quite simple – the spike of one panel should go into the groove of the other. You don’t even have to snap anything for this, although you will need a few more tools, in particular a hammer and a wooden block.
You need to start everything from the same left corner. Lay the first panel, then the second from the end. But! It must be brought strictly horizontally, and to connect use a block and a hammer, with which you will knock down the second panel until it fits tightly into the groove.
Having laid the first row of the laminate in this way, proceed to the second, but again do not forget about the displacement that will give you a checkerboard pattern.
It would seem that everything is the same, but no! The second row starts differently than with the Click type laminate. The first panel of the second row after it sawed off immediately connects to the first panel of the first row (you do not need to assemble a whole row, and then connect it to the first!). Next, take the second panel and, having retreated a few centimeters from the first, connect it to the next panel of the first row, and only then, easily knocking it out with a hammer, combine the two panels of the second row with each other.
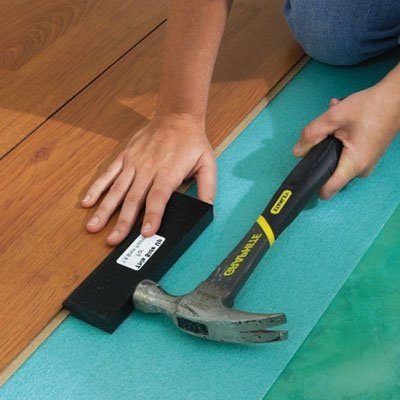
Laying a laminate with locks. Hammer and bar knockout
So, now you can make sure that laying the laminate is a matter of one day, not a week, as it might seem initially. The main thing is to start, and you can already finish without difficulty.


