More and more, more and more and with increasing geometric progression, people are moving away from the ossified stereotype that the cottage is a place for hard labor. Now, traveling outside the city, it is fashionable to spend time contemplating the stars and nature, having a cup of hot tea on a cold evening or a glass of cool beer on a hot day with a large group of friends. The ideal place for all these pleasant activities is the terrace in the country. If finances do not allow hiring workers for its construction – it does not matter, because it is very easy to do it yourself.
Content
- What are we dealing with
- Option One – The Lightest
- Option two – medium difficulty
- Option Three – Laborious
What are we dealing with
Very often, people confuse concepts and do not fully understand what exactly they are going to build on their house plot. Either it will be a veranda, or a gazebo, or the notorious terrace. To distinguish the weight of these buildings from each other is very simple. So country terraces are endowed with the following characteristics:
- mission – creating a comfortable venue for idle pastime;
- almost never performed in the form of a room closed from street space;
- not necessarily made in the form of an extension to the main house, it can also be a separate building.
- the main part is the site, additional and completely optional parts – the foundation, roof, railing.
- sizes are not limited, it can have an area of about three square meters, and more than thirty.
- accommodation at the annex – not only near the entrance to the house, but in any suitable place, it can even go around the entire building around the perimeter.
Unlike such an extension, the veranda is completely closed. It can also be used for relaxation, but for the most part is created to warm the hallway. Part of the cold air remains outside the walls of the veranda, and the other part is heated inside it, which allows for proper protection of the entrance room. The gazebo is almost always endowed with restrictive sides and is never an attached part to the house..
Option One – The Lightest

Planning a terrace is best done in advance, even at the stage of developing drawings of the house itself. As a result, the roof of the building itself will serve as a canopy over the site
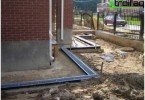
In the above photo, the terrace in the country was made almost flush with the surface of the earth. And for its manufacture, ordinary paving slabs were used. The pattern can be chosen to your liking. Doing such a terrace in the country with your own hands is necessary according to the following scheme.
- We measure the area of the future building. It is advisable to arrange pegs around the perimeter that will not allow to go beyond the edges of the perimeter.
- We dig out the land from the site, deepening approximately 15 (maximum 20) cm.
- Level the site using the construction level. If you wish, you can make the surface a little sloping, literally a few degrees (used in the absence of a canopy). Thus, during rainfall, puddles will not form on the surface, all water will naturally flow down.
- We fill in the dug indentation with crushed stone. The thickness of its layer is approximately 5-7 cm.
- The next step is to carefully compact the embankment. To do this without special equipment is difficult, but possible. We take old boards or sheets of chipboard, we lay them out over the entire surface, and press on top with the load. You can use anything you want: bags with construction waste, sand, cement or bricks. After a day, we remove everything and continue to work.
- Pour a layer of sand over the rubble, its thickness is 7-10 cm, but it can go a little in plus (depending on the thickness of the tile you choose).
- Then again we level the next embankment and carefully moisten it. It is impossible to simply water from a hose, otherwise pits will form. A garden sprayer is a good fit for this. Then we lay the tiles.
Option two – medium difficulty

You can create a combined type of terrace. A small part of it can be located under the roof of the house, and the rest will be open. The photo shows a sample of the envelope version of the terrace: built along the entire wall of the house and goes around the corner
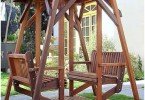
Consider a photo of country terraces, which are made of wood. They need more thorough care: annual painting or varnishing, inspection for damaged or rotten elements, timely replacement of them, etc. The open terrace in the country considered by us is done as follows.
- Wooden pegs with a length of 20-30 cm are processed over the entire surface with bituminous mastic. This is done to protect the elements from rotting, as they will be directly in the ground.
- The processed elements are driven into the ground, so that even rows are formed (a step between them is 40-50 cm).
- Near the protruding tops of stakes wooden logs are laid, which are also processed with mastic. Using screws, attach the lags to the stakes.
- Along the perimeter (edges of the site) logs processed with varnish are laid and are also mounted using self-tapping screws.
- The voids between the rows of lags are filled with gravel. The height of the embankment should be such that about 2-3 cm remain to the edge of the lag.
- Boards are sewn from above perpendicularly laid rows. Before laying, they must be treated with antiseptics, and after – with varnish.
Option Three – Laborious

When building a terrace on an elevation (high foundation or slope of the landscape), it is necessary to equip the site with restrictive elements – railings. This is especially important when there are young children in the house.
The complexity of the implementation is associated with the arrangement of several crates. Since the design rests only on a few support pillars, and the common platform “hangs” in the air, it is necessary to work on the strength of the entire device. So, the work goes in this order.
- Depending on the total area of the structure, the required number of support posts is calculated. It is desirable that for each square meter there is one support (in this case 4 pieces).
- In the locations of the pillars we tear out the recesses, which are two times the diameter of the future support. Pour the concrete solution onto the gravel cushion laid at the bottom of the pit.
- After concrete hardening, we build on these sites supports of ordinary brick.
- In order not to be wiser with fasteners, just in the upper part of the support we make a through gap in the middle of the masonry. Its width is equal to the width of the beam, which will then be placed there. It is fixed in the recess with the same mortar of cement and sand..
- Having laid the bars parallel to each other, from one support to the second, we begin to make the first crate. Perpendicular to the two main logs, we lay the bars in steps of 40 cm.
- On top of the first crate, a second one, which consists of three lags, is laid. Two of them are placed around the edges, one in the middle. Laying is done again perpendicular to the previous row.
- The last third crate is mounted on three lags laid. The process is similar to that described in the fifth paragraph..
- After the coating is sewn from properly treated boards. Finishes the construction process of varnishing a wooden surface.
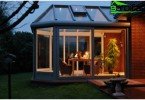
If desired, you can supplement the platforms of self-made terraces with additional elements: low sides or railings. On wooden structures, small holes can be made into which metal gratings are inserted. They will play the role of drainage. But most often, platforms are equipped with canopies, awnings and full roofs..