Do-it-yourself wall plastering
A variety of innovative finishing materials is difficult to compete with ancient methods, proven by successful centuries-old practice. No matter how fast, lightweight, progressive finishing technologies appear, plaster remains the leader in ratings. Despite the complexity, dust, construction dirt, the long-term process, we, like our distant ancestors, plaster the walls with our own hands. We are not afraid of the degree of complexity of the work, because the final result and the long list of priorities that are characteristic for practical wear-resistant plaster are important.
Content
- Indisputable advantages of plaster
- List of negative aspects
- Wet method: application technology
- Compositions for plastering walls
- Plastering the wall with cement mortar
- How to plaster walls with gypsum mortar
Stucco provides the opportunity to realize almost any design projects. This is the best option to eliminate the flaws of builders, to align the walls and create stucco patterns by hand. It is used to form a diverse texture, color and surface texture..
Finishing masters own a number of specific technologies for applying stucco mixture to walls, so that democratic material turns into torn natural stone, sawn rock or into ordinary masonry. In terms of expressiveness, Venetian and terrazite plaster can compete with photo wallpaper and finish with a 3D structure. And from the number of colorful options and a combination of various methods of applying fantasy birds decorators grow kilometer wings.

Even 3D effects are subject to plastering
Indisputable advantages of plaster
The choice of plaster mixes as a finishing material is argued by the superiority of their operational, technical and aesthetic qualities, more precisely the height of the totality of the entire set of indicators.
In the list of priorities for applying plaster are:
- water-repellent qualities of the material, the ability to dry after emergency wetting without loss of decorative indicators;
- optimization of the insulating characteristics of the structure;
- air permeability, that is, the ability to pass excess household fumes, preventing premature aging and deterioration of building materials, due to which a humidity balance in the premises, favorable for living, is also established;
- compliance with sanitary-hygienic and environmental standards;
- the ability to subsequently change the textured and colorful concept of decoration;
- incombustibility, on the basis of which plaster is preferred for facing facades and interior decoration of wooden buildings;
- affordable repair cost, especially tangible if the walls are plastered with your own hands and the most affordable formulations are used.
List of negative aspects
Despite a convincing list of arguments in favor of applying plaster on the walls, this material has a number of significant drawbacks.
- in case of violation of the technology of applying the plaster mixture and non-observance of the time required for hardening, cracks and other defects may appear;
- facade decoration can only be performed at positive temperature;
- for applying to walls with a smooth or glossy surface, preliminary preparation, a primer layer, installation of a mesh netting, special notches will be required;
- low productivity of laborious work;
- building restrictions on the thickness of the plaster layer.
The disadvantages of plastering include the unnecessarily complicated process of finishing wooden houses, the need for complex preparation. Negative parties recognize the ability of textured plaster to “absorb” dust accumulating in the relief grooves. This minus is also characteristic of the material, which included large sand particles. True, the plastered surface can be washed with almost all household cleaning products that currently exist. To eliminate the need for frequent care, it is better to cover with a special varnish, natural or synthetic wax.

Varnish and wax prevent plaster contamination.
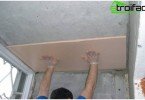
Wet method: application technology
Traditionally, plaster mortars are applied in three successive layers, each of them performs a specific function.
- Spray – the first layer that provides adhesion of the finish to the surface of building materials. For its application, solutions with a consistency of thick sour cream are used. The thickness of the layer applied to the wood should not exceed 9 mm, while processing foam concrete and brick walls 5 mm. Spray is leveled only on even concrete surfaces for the purpose of observance of equivalent thickness.
- Soil – the second layer, is carried out with a solution with a thicker consistency, is applied after hardening of the previous spray. Reminiscent of the dough, the solution is leveled and rubbed to obtain a relatively flat surface. Soil determines the thickness of the plaster, plays the role of the basis for the final finish.
- Nakryvka is the final stage of the plastering work. For the third top layer, solutions with finely dispersed carefully sifted sand are used. Before applying the plaster mortar, the consistency of which resembles not too thick sour cream, the dried soil is moistened to improve adhesion between the two layers of plaster, then the surface is carefully leveled.
Before performing each of the stages of applying plaster, you must wait for the period regulated by building codes and recommendations of manufacturers of ready-mixed mixtures.
Future plasterers interested in the question of how to plaster walls for wallpaper or for a different type of cladding, you need to know that if the technology is violated, all the work done will be futile. The plaster will exfoliate, crack and upset the performers with other negative manifestations..

Do you want to perfectly apply the plaster with your own hands – follow the technology and be patient
Compositions for plastering walls
In the almost forgotten past, sand and cement binder served as components for the production of stucco mixtures. Now there are a lot of ready-made formulas, the formulas of which are enriched with a variety of modifying additives. These components affect ductility, adhesion, curing speed, and the ability to harden at a certain temperature. Thanks to the introduction of plaster modifiers, it is convenient to dilute and apply. Only the cost of ready-mixed plaster mixtures not everyone wants to purchase. Therefore, adherents of budgetary repair and finishing schemes prefer practical cheap cement compounds and the most popular gypsum plasters.
Materials made on the basis of cement are significantly different from gypsum plaster mixtures, both by application methods and by specific properties that affect the scope of application.
Plastering the wall with cement mortar
The main components of cement plaster are screened by river or sea sand and traditional cement with a variety of improving additives. The fractional size, talking about the size of the grains, determines the possible thickness of the plaster layer: the finer the dispersion of the material, the thinner the plaster layer.
The method of preparing a solution from ready-made mixtures produced by the industry is extremely simple. A container with a volume of 7 or 8 liters is half-filled with water, whereupon the dry composition is then added portionwise with regular stirring with a construction mixer or manually with a trowel. Those who want to save money can make a cement mixture on their own. For this, cement of the frequently used M400 brand and sifted clean sand in a ratio of 1/3 will be required.
It is undesirable to increase the proportion of the main binder component, due to the violation of proportions, the hardening period may be reduced. Then it will be difficult for the performer to smooth out and carefully smooth the surface in a timely manner.
For a “patch” on the walls of cement plaster you will need a trowel or a spatula, for leveling trowels or as a rule, for smoothing the grater. Inexperienced finishers who decide to plaster the walls with their own hands for the first time, a spatula and a grater will be enough.

Do-it-yourself plaster tools
It is no accident that in the circles of professional plasters the technique of applying a cement mortar is called a blotch. The mortar from the spatula must really slap into the wall. Only then the mortar will adhere well to the surface to be treated, since its smallest particles, under the influence of the impact force, will be able to freely penetrate the upper layers of the building material. The movements of the plasterer of the slurry mortar resemble the movements of the player in ping-pong, there are splashes, dirt around, but they will have to be reconciled with for optimal grip.
It is not necessary to fill immediately a large segment of the wall; it is better to start finishing the part, the area of which will not exceed one meter. Having finished “spanking” the planned area, you can begin to align. It is carried out with a grater in a circular motion directed counterclockwise. During the leveling process, a solution is added to the voids, excess material is removed from the wall and sent back to the container with the solution. The superimposed layer of cement mortar should dry for at least 7-8 hours, then the next layer slops.
Smooth angles are made with the help of a trim board attached by self-tapping screws to a wall adjacent to the work surface. And when you need to plaster an adjacent wall, the board is not nailed, but fixed with beams. For the formation of geometrically accurate truncated (concave angles) use two semi-fastened together at right angles. Beginning plasters need to remember that all excess mortar and all flaws must be eliminated in a period not exceeding 12 hours. After this time, removing the hardened solution will be problematic..
How to plaster walls with gypsum mortar
Plaster mixes, also called alabaster compounds, were created to facilitate the work of plasterers. They can be applied without problems, harden quickly, but are inferior to cement mixtures in terms of strength and durability.
There are mandatory requirements: alabaster solution is diluted in a perfectly clean container, applied with clean tools, since the presence of impurities can reduce the solidification process.

It is easier to work with gypsum plaster for those who decided to plaster the walls with their own hands.
The performer does not need to possess specific tricks. Gypsum plaster is easily applied to the partitions with simple movements using a trowel, putty knife or trowel. To prepare the mixture, you need to read the manufacturer’s instructions and clearly follow its recommendations. Plastic material is spread on a wall section, then it is leveled with a rule or a large spatula. Alignment is carried out first in the vertical direction, then horizontally. A layer of gypsum plaster dries in 2-3 hours.
Flat angles are formed by a reinforced corner device, after an elementary pressing of which the plane is adjusted with a spatula. Within an hour after the start of the hardening process, it is necessary to remove all excess gypsum plasters, which beginners do not always have time to handle. Among the shortcomings of this finishing material, poor compatibility with oil-painted surfaces is noted, alabaster and putty do not fit well. Do-it-yourself wall plastering in such cases may fall off due to the fact that moisture begins to be released from the gypsum mortar during hardening. It is this that causes the plaster to peel off from the glossy surface and changes the percentage of moisture in the putty.
Lighthouse Interior
For potential plasterers seeking to learn how to plaster walls for wallpaper, non-woven, tile and other types of lighthouse finishes, describing the technology may be too complicated a complicated process. In fact, everything is much simpler than it might seem to an inexperienced person frightened by unusual terms. It’s really easier to learn the performance technique using video courses, but instructing on the simplest alignment method using metal profiles can come in handy.
You will need a large rule with a length of 2 meters or more, self-tapping screws, alabaster or concrete mortar, plasterer tools, as well as metal profiles, now produced by manufacturers of finishing materials and technological devices. They can’t be called too cheap, but they cost significantly less than the services of professional plasterers, in addition, they will help to do the job better and faster..
- Extreme lighthouses (vertically mounted slats) are more convenient to place at a distance of 20 cm from the intersection of the partition with an adjacent wall or the end of the wall.
- To identify the curvature of the partition or the surface of the load-bearing wall vertically, a level or a primitive cord with a load at the end is used.
- Along a vertically located rule, gypsum tubercles are applied after 20-30 cm.
- By pressing the rule over the tubercles, an imaginary level is formed, to which the alignment process will be oriented..
- The position of the beacon is fixed with a solution.
- The next beacon is set similarly..
- To determine the exact position of the intermediate beacons, if they are needed for a surface with a large area, cords are stretched between the points of the beacons at the same level. As intermediate devices, indicating the future surface of the plaster, you can use self-tapping screws driven into the wall flush. They will need to be removed after completion of work.
- As soon as the solution used to fix the beacons has hardened, the gaps between the profiles.
- The rule is pressed against the lighthouses and as if the plaster mortar is leveling along the rails.
The rule along the rails-profiles is moved in the vertical direction, occasionally alternating with slight turns to the right and left to create an even layer. After the plaster dries, the lighthouses break out of the wall, the furrows remaining from them are carefully filled with mortar.
There is another way to apply the solution using beacons. It’s quite simple to do it yourself with such wall plastering.
Plastering is a complex type of finishing work, but an absolutely inexperienced person can cope with it. It is necessary to be patient, thoroughly study the manual and clearly fulfill all the requirements. Subject to these conditions, an impeccable surface and excellent results will delight the owners.