Putty walls
Performing repairs is rarely done without puttying and priming the surface of the walls. This type of work is carried out at the final stage to obtain a smooth and even surface. In addition to a flat surface, the putty walls have a number of advantages, including a neat appearance and ease of further work. Performing the work yourself, it is important to know how to putty the walls to get a smooth and smooth surface for painting or wallpapering. Putting the walls with your own hands is a fairly simple type of work, the main thing is to understand what to do, follow the procedure and be able to handle the tool.
Content
- Why wall putty is needed.
- Wall puttying methods.
- Starting surface putty.
- Lighthouse method.
- Surface finish.
- Hard putty walls with cracks.
Why wall putty is needed
Wall decoration can be divided into three main stages. The first step is surface preparation. It consists in removing the old coating, cracked putty and plaster. At the second stage, we carry out rough finishing of the wall surface. This includes reinforcement, leveling and puttying. The final third stage is reduced to wallpapering, painting or another way of decorating the walls. Many are accustomed to performing only the first and last stage, completely losing sight of the rough finish. This small omission will negatively affect the appearance of the walls and the overall impression of the repair. The need to perform work such as leveling walls, puttying walls for wallpaper or puttying walls for painting, becomes apparent only at the final stage of work, when nothing can be changed.
The obvious advantages of puttying the walls are a smooth surface, smoothing of the influx of plaster, small recesses and cracks. In addition, the plastered walls have a uniform surface on which any finishing materials will perfectly fall.
As for the leveling of the surface, then with this type of work everything is somewhat more complicated. The fact is that the alignment carries an aesthetic load, while the putty is technical. And the answer to the question of whether to do the alignment depends on financial capabilities and the desire to see the symmetrical corners of the premises.
Wall puttying methods
For high-quality repairs, it is necessary to perform the procedure of puttying surfaces before the final finish. To know how to properly putty the walls, you should first understand the methods of puttying. There are the following methods: starting putty, lighthouse putty, finishing putty and putty for cracks. Each of these methods is performed by different types of putty and is used for specific purposes. Before you putty the walls for painting or for wallpaper, you should start the putty and level the walls.
Starting surface putty

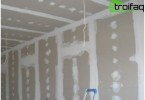
Starting wall putty is a crucial stage, the volume of subsequent work depends on the quality of its implementation
For starting putty, gypsum-based plasters with an admixture of various additives are used. Starting putty is carried out with the aim of leveling the walls, sealing the strobes and holes. The layer thickness can reach up to 15 mm. With a large thickness, putty-plaster should be applied in alternating layers. Each new layer is applied with pauses to dry the previous one. For high-quality application of starting putty-plaster, use a paint net. With its help, the material has a better adhesion to the surface, the possibility of cracking almost disappears, and the surface itself is more even.
Important! To make the surface as smooth and even as possible, use a coarse paint net.
Lighthouse method

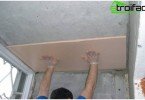
Lighthouse wall putty allows to simultaneously eliminate surface defects
Performing this putty method requires the same materials as the starting putty. It is used for leveling walls, sealing up shtroba and holes. Before filling the walls with lighthouse putty, beacons are installed, which are made of wooden, plaster or metal battens. The lighthouse is exposed in a vertical and horizontal plane under the level and is filled with putty-plaster. Thanks to this, the surface is perfectly flat and vertical..
Important! Lighthouse putty is an order of magnitude more expensive than putty using a paint net, but visually does not differ.
Surface finish
This method of puttying is also called “bumblebee”. Putty is applied on the lighthouse or starting to give the surface a perfectly smooth and even appearance. The result is a surface without pores and cracks. The finishing putty is applied with a thin layer and completely repeats the plane of the previously applied starting putty.
Important! Finishing putty is designed to give a smooth surface. It cannot be used for leveling, since the layer of finishing putty is not more than 1.5 mm.
Hard putty walls with cracks
This method is used when it is necessary to locally “patch” the surface of the wall. Puttying cracks can be done with a simple spatula. As a material, gypsum and alabaster mixtures can be used, but satengips are the best material for this type of puttying. Before proceeding to puttying cracks, it is necessary to increase the width and depth of the crack itself. This is done for better adhesion of putty. To do this, draw a sharp angle with a spatula or a knife along the crack itself. Next, apply a deep penetration primer and let it dry. Now apply the putty itself with a spatula and let dry.
Important! It is more difficult to work with alabaster and gypsum because they do not have sufficient elasticity. The advantage of these materials is their drying speed – about 10-15 minutes. Satengips is more elastic but has a longer drying time..
Selection of materials and tools
To complete the work, you will need the following tool:
– spatula small 10-15 cm;
– large spatula 25-30 cm;
– corner spatula;
– drill and plug-in mixer;
– sandpaper;
– brush and roller;
– 15-25 liter net capacity.

Wall sanding tool kit
With materials, the situation is somewhat more complicated. The putty market provides a huge selection, ranging from simple and cheap based on drying oils to expensive, prepared putties. Those with a limited budget or a desire to save money can opt for dry putties.
They are cheaper and of good enough quality. For applying the starting layer, coarse putty should be used; for the last layer, finishing putty is used. There are a number of universal putties, but for the quality of work and economy, it is worth choosing according to the method of their application..
Important! In dry putties, a serious drawback is their poor resistance to moisture. With increased humidity, they become soft again. To be safe from this phenomenon, it is better to immediately choose moisture-resistant putties.
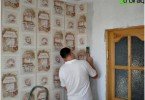
To putty and other finishing materials well kept, the surface is primed. The applied primer coat will fix and preserve the surface from minor damage. In addition, the primer contributes to better absorption (absorption) and adhesion to the base surface of the plaster, paint, wallpaper glue and putty. When choosing a primer, you should pay attention to the type of surface on which the primer will be applied. Primers with a high degree of penetration are applied to a highly porous and loose surface, universal primers are applied to a medium-porous surface. Apply a primer with high adhesive properties to a non-porous dense surface. For high-quality adhesion of finishing materials, specialized primers for a certain type of surface should be used..

It is more convenient and faster to prime the surface with a roller
Important! For priming surfaces in rooms with high humidity, special waterproofing primers should be used. Such primers are applied in two layers.
How to putty walls: stages of work
1. We process the surface with a primer. To do this, use a roller. Hard-to-reach spots, corners and joints are primed with a brush. We are waiting for its complete drying.
2. If necessary, align the walls with plaster or starting putty. After drying, primer again.
3. If we use dry putty, you have to deal with its preparation. To do this, pour a small amount of water into the container and add putty. First, mix with a spatula, and then use a drill with a mixer. Add water gradually.

Kneading solutions is carried out in strict accordance with the instructions of the material manufacturer
Important! Putty readiness is determined by its consistency. On the video demonstrating how to putty the walls, you can see what it should be: elastic and slightly stick to the surface of the spatula. If the putty drains, then it is liquidish and a dry mixture should be added. If lumps, then vice versa – dry.
4. We apply the starting putty. To do this, use a large spatula. Putty is applied in medium portions and evenly distributed over the surface of the wall. We keep the spatula at an angle of 25-30 degrees and apply putty in one motion along the diagonal. To avoid bumps and transitions, each subsequent layer is lapped.
Important! When applying the starting layer, putty should be kneaded in small portions, for quick development. This is to ensure that dry particles do not appear in the mixed mixture, which can affect the quality of work. Do not be afraid of the appearance of strips from the spatula, they will be aligned with the finishing putty.
5. For even angles we use a special angular spatula. First, with a small spatula, apply a small layer of putty to the entire height of the corner or slope, and then level it with an angular spatula. Let it dry well throughout the day.

Puttying corners and slopes with a special angular spatula ensures the formation of perfectly even corners
6. After the starting putty has completely dried, you can proceed to the finish. Putty putty in small portions on a large spatula with a small one. Then apply evenly to the surface. The thickness of the layer of finishing putty should be from 1.5 to 2 mm.
7. Before you putty the walls for wallpaper or painting, you should wait for the complete drying of the starting putty and the first layer of the finish. After 12 hours, the first layer of finishing putty will dry and the surface can be prepared for the final stage of putty. To do this, apply the finish layer, wait for it to dry. Now it can be sanded with a special holder and sandpaper.
Important! Before applying each new layer of putty, the previous one is preferably primed.
The putty of the walls for painting differs from the putty of the walls under the wallpaper with the quality of the final grinding of the surface. For wallpaper, a perfectly smooth surface is not so important. Wallpaper itself will partially hide the roughness. But for paint it is critical, especially if you use enamel. Therefore, for sanding walls for wallpaper, sandpaper with grain from P80 to P120 is suitable, and for painting the wall, sanding is worth sandpaper with grain from P120 to P150.
Puttying the walls is not so much complicated as a time-consuming process that requires a lot of time. All works require increased attention, but the result will please with its grace and perfection..