Wallpaper is a great opportunity to create an atmosphere of coziness, warmth and comfort in an apartment or house. A huge assortment of this finishing material allows you to easily choose the option for any interior. A wide range of colors, a variety of drawings and textures – all this makes the wallpaper an indispensable assistant in such a complex business as repair. But, having decided to decorate the walls with a paper embodiment of design thought, many people have the question of how to glue wallpaper on drywall or any other surface?
Content
- Drywall preparation for wallpapering
- Drywall putty for wallpaper
- Grinding the base before gluing
Drywall preparation for wallpapering
Before proceeding directly to the gluing itself, you need to carefully prepare the surface of the drywall.
Drywall putty for wallpaper
The quality of the drywall primarily depends on how well it was assembled. The main criterion for assessing the final result is the seam, so the first thing to do is to assess the quality of the seams and correct the defects. If there are protruding screws at the joints of the drywall boards, then they must be tightened. The other extreme is a screw that is too deeply twisted, creating a ragged edge around itself. Such a screw is best removed and replaced with another, but put it at a distance of about 0.5 cm from its original location..
Inspect the wall surface for dents or scratches. If any, then they must be repaired with plaster putty. If, even after such a procedure, the defect is still visible, you can repeat it.
Important: apply the next layer of putty only after the previous one has dried.
After this, all seams, corners and joints are sealed with a grout..
For gypsum plasterboard finishing, gypsum putties are most often used, since they are quite economical, easy to use and quickly set..
It is not difficult to prepare the solution – following the instructions, you need to bring the mixture to the consistency of thick sour cream. The main thing is to make sure that the mixture is uniform and without air bubbles.
Important: you need to dilute the mixture in small portions, because if it is not used immediately, it will dry out.
It is necessary to start putting putty from the ceiling. Gently with a damp spatula fill all joints and crevices. And so that the work was done without blemishes and quickly, you can buy a special reinforcing tape that will help make the seams perfectly even.
To glue the reinforcement tape you need:

Bonding reinforced tape to putty
- apply a thin layer of the mixture a little wider than the width of the tape
- place the tape on the mixture and press it carefully with a spatula
- run along the entire length of the tape with a spatula at an angle of approximately 45 °
- let dry for a day.
After the surface dries, proceed to leveling. To do this, use a wide spatula to remove all irregularities and materials remaining after work.
Now you can apply the first layer of putty directly on the reinforcement paper, and the strip width should be about 15 cm. With a spatula, you need to make movements perpendicular to the wall and try to make them as even as possible, so as not to budge the tape.

Correct trowel position when leveling walls
Do not forget about the holes from the screws – they also need to be aligned with putty. And again we leave everything to dry for a day.
Next, the dried surface is again checked for defects. In case of their presence, we eliminate them with a spatula. The third layer is best done with putty in the form of a paste – it has a fine-grained structure and better aligns the walls. it must be applied with a width of 20 cm along the seam with a wide spatula. And again leave to dry for 12 hours.
After drying, apply the last coat in the same way as the previous one and leave it to dry for 8 hours.
Now you can make sure that the wall is perfectly flat. You can use a lamp for this – you can see much more irregularities in the light than in ordinary daylight. In the presence of defects, we eliminate them with fine-grained putty.
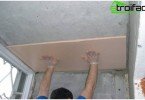
Grinding the base before gluing
Plasterboard putty for wallpaper does not end there, because the last stage remains – grinding, which must be done carefully so as not to damage the cardboard. For these purposes, it is recommended to use a special grater with grinding nets..
Important: never use sandpaper to sand drywall.
The preparation of drywall for wallpaper itself takes much longer than gluing, but the appearance of the room will largely depend on how responsibly you approach this stage of repair..
Wallpaper Sequence
Wallpapering on drywall should begin with calculations. It is necessary to accurately calculate the number of rolls and make markings on the wall for gluing the first canvas. For these purposes, you can use the classic plumb, which is done using a long thread and a small weight. Having drawn an even line on the wall, measure its height with a tape measure.
Next, measure the first canvas of the same length as the height of the wall. If the wallpaper is plain or has a pattern that does not need to be adjusted, then you can immediately cut several strips of the same length.
Layout and wallpapering should start from the window to make the seams as invisible as possible..
Important: glue must be selected in accordance with the type of wallpaper.
The glue is applied directly to the wallpaper, then, so that it is better absorbed, the wallpaper is folded in half for 5-7 minutes. In case you glue the walls with heavy wallpaper, then for better adhesion it is recommended to pre-glue the walls with glue.

Preparing wallpaper for sticking
When wet from glue, they can stretch a little in length and width, consider this fact and adhere to the same amount of time for impregnating the paintings.
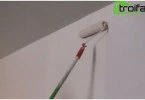
After gluing the wallpaper on the drywall, we level them with a soft brush or a special roller. This is done in order to expel air from under the panels. Excess glue must be cleaned immediately with a rag, otherwise after drying there will be shiny traces that will treacherously give out seams.

Leveling wallpaper on the wall
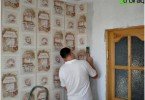
Most modern wallpapers are glued back to back, so you should carefully adjust the canvas to each other. If for some reason you can’t glue the wallpaper in this way (for example, in the corners), then you can glue the canvas overlap, and then with the help of a sharp knife or blade and a flat rail, cut off excess strips.
Wallpaper pruning is carried out after they have completely dried. Glue-impregnated cloths are not recommended to be cut, especially if they are already glued to the wall. If necessary, the edges of the canvas, which for some reason have moved away from the wall, can be glued with PVA glue.

Sticking on the first canvas. Excess trim can only be done after the adhesive has dried
Tips and tricks for gluing drywall wallpaper
- during repair work related to wallpapering on the walls, be sure to close all windows so that the draft does not violate the temperature conditions in the room.
- do not turn on fans and air conditioners until the wallpaper is completely dry.
- Use only the adhesive recommended for your type of wallpaper..
- carefully prepare the drywall surface for gluing, because in the presence of irregularities and roughness, the wallpaper will wrinkle, and the appearance of the room will leave much to be desired.
In general, gluing wallpaper on drywall walls is nothing but prolonged preparatory work related to puttying, it does not differ from the same operation, but on ordinary walls made of concrete or wood.