Leveling the floor with plywood
Modern floor coverings, such as laminate, parquet, carpet, linoleum and many others that are not bearing materials, are laid only on perfectly flat surfaces. Old houses with wooden plank floors almost always require leveling. To achieve this, there are several ways, one of which is the alignment of the wooden floor with plywood. This option does not require a large amount of work related to opening the old floors, replacing lags and rickety boards. Just on top of the old floor, a new crate is made, on which plywood sheets of suitable thickness are laid. At the same time, it is possible to slightly raise the floor level, while maintaining the maximum height of the room.
Content
- Cycle for minor defects
- Floors with adjustable logs
- Plywood floor leveling technology
- Custom floor alignment
- Work execution algorithm
Cycle for minor defects
Over time, even the most high-quality wood floors lose their flatness due to the deflection of the boards or vice versa their bending. As a result of these processes, hollows appear in some places, and “humps” in others. The position of the boards relative to each other also changes. If on top of such a floor without preparation to lay linoleum, carpet or laminate, then these floor coverings will not last long. Crack, rub, bend under the influence of daily stresses, because you have to walk on the floor, and not just admire its beauty.
The disadvantages of a wooden floor can also be eliminated using the scrapping procedure, which is carried out using a grinding or scraper. However, this process cannot be called easy and simple, and besides, it is associated with large dusting and pollution of the room. Before you begin to cycle the surface of the plank floor, you must drown all the nails that secure the floorboards to the logs. To do this, use a hammer and beards.
On a note! The beard belongs to the hand tools intended for cutting holes in sheet metal, as well as for deeper driving into the material fasteners.
The difficulty is that not a single nail should be missed. Otherwise, the knives of the looping machine will run into this obstacle, after which they will have to be removed and re-sharpened. After installing the knives, it is still necessary to reconfigure the looper. Finding nails is complicated by layers of floor paint, which has been repeatedly applied to wooden floors. In addition, it is difficult to loop the floor in the corners, as well as along the perimeter along the walls.
The disadvantages of hitching can also include a decrease in the thickness and bearing capacity of the boards. By and large, the problem of leveling the floor in this way is not completely solved, because due to different moisture parameters in the summer and winter periods, the boards undergo further deformation.
Therefore, the best solution to the problem of leveling wooden floors is considered to be a flooring of a perfectly flat material – plywood or chipboard (particle boards). At the same time, these materials are laid on a good support, which are aligned logs.
Floors with adjustable logs
The market offers floors with adjustable lags, which are very easy to install, but, unfortunately, expensive. A design feature of these floors is the presence of screwed adjusting pins on the logs, which rely on the draft floor. By screwing or unscrewing these supports, the floor is perfectly horizontal. It is possible to lay floors with adjustable logs on any basis. The gaps between the lags are filled with insulation. In addition to the high cost, these floors take up to 7-10 cm of room height, not counting the thickness of the selected finish. In rooms with low ceilings, the use of adjustable floors is not justified.
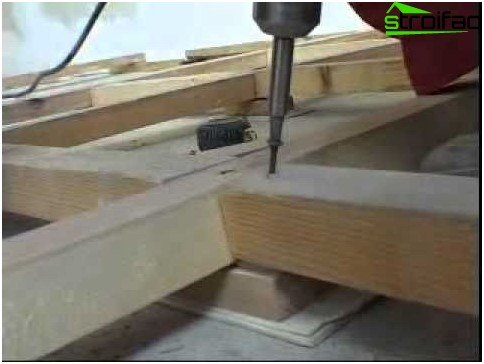
Logs can be attached to both a concrete and a wooden base
Plywood floor leveling technology
In practice, a more affordable technology for leveling a wooden floor is often used, which consists in laying thin lags a short distance from each other under the leveling layer of plywood. They make lags from strips of plywood, using sheets of different thicknesses. We list the main stages of this process..
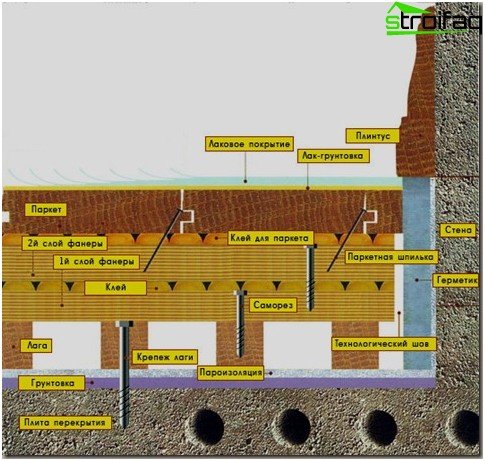
The scheme of the device of the floor on the logs with two layers of plywood
- Install beacons over the entire floor. As beacons, use ordinary self-tapping screws, screwing them into the corners of mentally drawn squares, the sides of which are equal to 20-30 cm. The presence of a screwdriver and a building level facilitates the process significantly, with which the necessary height of the beacon is determined.
Important! The greater the thickness of the plywood chosen for leveling the floor, the less often the logs are positioned. However, it is not recommended to lay logs at a distance exceeding 35 cm.
- Guided by the exposed beacons, begin the process of laying logs, the width of which is 30-50 mm. Since the edges of the sheets should fall on the logs, first lay out the plywood on the floor and circle its outline with a chalk, pastel or chalk pencil. On the drawn lines indicating the junction of the leveling material, place the logs. For their fastening use self-tapping screws or glue: PVA, PVA-Moment, PVA-Carpenter and other types of glue on wood.
Important! Do not allow the lag to sag by placing glueed plywood pieces cut from sheets of various thicknesses in these places.
- After completing the lag mesh, allow time for the glue to completely dry..
- After that, proceed to laying plywood sheets, fixing them with self-tapping screws with countersunk heads. Moreover, pre-drill and pre-drill the attachment points so that the screw caps are recessed into the surface of the plywood sheet.
- Lightly sand joints and attachment points.
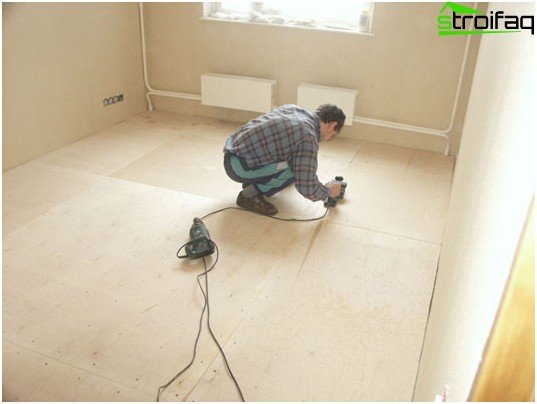
Grinding the seams of plywood sheets
Using this method, you will level the floor by lifting it by only 2-3 cm. If linoleum or carpet is chosen as the topcoat, then plywood is covered with two or three layers of varnish in front of their flooring. If you decide to lay the laminate, then do not forget to lay the substrate on the plywood. Cork or foamed polyethylene is suitable for these purposes..
Important! Plywood is laid on the logs, the thickness of which is at least 12 mm.
Custom floor alignment
A very non-standard technology for leveling the floor is to putty its surface with a mixture made of fine sawdust and PVA glue. We can say that in this embodiment, a kind of screed is made of PVA-sawdust putty, on top of which thin plywood is laid (5-8 mm). At the same time, laying plywood on a wooden floor, leveled in this unusual way, saves money, but increases the execution time. After all, a home-made putty dries for about two days. When applying several layers in places with a large difference in height, time increases, since the next layer is applied only after the previous one dries.
Work execution algorithm
- Fill beams on the wooden floor, which previously set horizontally.
- Fill the space between the slats with a mixture of PVA glue and sawdust, which in its consistency should resemble thick sour cream. It is recommended to pre-moisten the sawdust and squeeze a little. Otherwise they will draw moisture out of the glue too quickly..
- The thickness of the applied layers should not exceed 1-2 cm. Therefore, it is recommended that the procedure be repeated two to three times as necessary, checking the level-rule for the evenness of the applied layer.
After drying the PVA-sawdust screed, lay the sheets of plywood, fixing them with self-tapping screws according to the technology described above.
The principle of laying plywood sheets resembles brickwork, technological gaps must be left between the elements and around the perimeter
This technology is suitable for people who have free time during which they leisurely carry out work with their own hands. The indisputable advantage of this method is the minimal rise in the floor, which is limited by the level of the “highest board”.
Laying plywood on a concrete screed
In houses with powerful wooden or concrete floors, the floors are leveled with a concrete screed, the thickness of which depends on the height difference, but does not exceed 3-10 cm. At the same time, the following work plan is followed:
- surface primer;
- screed device;
- priming;
- warming;
- plywood laying.
The concrete screed must be allowed to dry thoroughly. This usually takes about a month..
After that, waterproofing is applied to the cleaned concrete coating. Experts recommend laying sheets of moisture-proof plywood, the thickness of which should be at least 12 mm.
Cutting and fitting plywood sheets
- First, simply lay out the plywood sheets, cut into squares measuring 60 by 60 cm, on the floor surface in the intended places. At the same time, consider the need for the presence between the seams of the coating of damper joints, comprising 8-10 mm Also note that plywood sheets should not touch walls. It is advisable to leave a gap between the wall and plywood with a size of 15-20 mm.
Important! Lay the plywood sheets with a mixture, excluding the intersection of four joints at one point (like brickwork).
- After the fitting is completed, number the sheets and draw up a layout chart with their numbers. Remove the plywood to prepare the base for laying it..
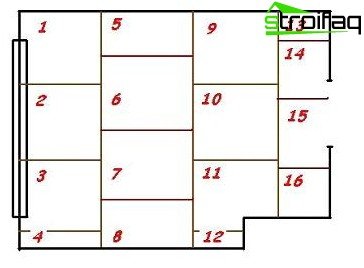
Plywood sheet fitting
Concrete foundation preparation
Clean the concrete screed from small irregularities resulting from other types of repair work. Then carefully remove debris and dust from the base with an industrial vacuum cleaner. If you do not have such equipment and there is no place to rent, follow this procedure with an ordinary broom. After cleaning, perform priming that will help:
- remove remaining dust;
- penetrating deep into concrete, give strength to the upper layer of concrete screed;
- improve the adhesion of dissimilar materials to each other.
On a note! In construction, a primer is one of the varieties of a primer. The primer is made of the same material (paint, glue, mastic), which is supposed to cover the surface. However, it contains a greater amount of solvent, which provides better penetration into the treated surface. Apply primer with a roller or brush..
Plywood flooring
- Apply adhesive mastic to the prepared base with a notched trowel. The layer thickness should be approximately two millimeters..
- According to the diagram, put the plywood sheet in its place and fix it with screws with plastic dowels. In this case, drill a concrete screed to a depth of 6 mm directly through the plywood. Open the hole so that the self-tapping head is drowned in the leveling material.
- After the plywood is laid, it is ground to obtain a perfectly even and strong base for parquet or other finishing coating..
Now you know how to properly level the floor with plywood. Choose the appropriate method, purchase material and go to work. If you want to hire a team of builders, you can speak the same language with them and choose real professionals to perform the work.


