
Alignment of the wooden floor
Despite the fact that wooden floors are the undisputed leader among all types of flooring, old creaking boards are able to cross out the whole effect of the newest interior. That is why the repair in the room ends with the restoration or replacement of the foundation. The choice of modern fine flooring is very wide. This is a laminate, and linoleum, and carpet. You can spread them directly on the old floors, but, deciding on this, many are faced with problems such as removing the creak and leveling the wooden floor. That’s about alignment and will be discussed in this article..
Content
- Need or extra work?
- Leveling the wood floor with plywood
- Prepare for work
- About the steps in detail
Need or extra work?
Is it necessary to level the floors in front of the laminate or linoleum flooring, or can these work be dispensed with, since the new coating will reliably hide all the flaws of the old from prying eyes? Alas, this is not so. Even the most durable coating laid on curves, shattered boards, very quickly lose its ideal shape, and, consequently, its entire external gloss. If a soft coating is laid, then a difference in the height of the base of not more than 1 mm is allowed for it. Laminate can swell even with such a minimal difference.
In the modern construction market, there are many ways to level a wooden floor, but the following are more popular:
- plywood floor leveling;
- PVA-based putty alignment;
- leveling with self-leveling mixtures;
- scraper floor.
Aligning a wooden floor with your own hands is not such a difficult process as it initially seemed. Practically anyone with elementary skills in working with tools can do this job, following some rules..
Leveling the wood floor with plywood
Plywood is one of the most convenient materials for leveling the floor. With its help, you can get a perfectly smooth rough surface that is absolutely suitable for any finishing coating, lifting the floor by only 20-30 mm. In addition, the alignment of the wooden floor with plywood is simple, quick and economical..
This alignment of the wooden floor under linoleum is ideal.
Prepare for work
The moisture content of the plywood sheets for leveling should be the same as the overall humidity level in the room. This can be achieved by slightly moistening both sides of the sheet with water and keeping them in the room for two days..
Be sure to check the general condition of all utilities located under the floor before laying plywood, because after that it will be very problematic to get here, and also take care of sufficient air circulation in the underground space.
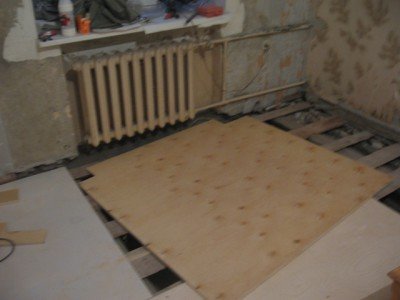
Plywood sheets are laid on logs up to 50 mm thick
When working, we need:
- plywood sheets;
- level;
- screwdriver;
- self-tapping screws;
- glue PVA-woodworker.
About the steps in detail
1. First you need to install beacons, which are used as ordinary self-tapping screws, screwed on the entire floor surface to the required height. They should be installed at least 350 mm.
Tip: the thicker the plywood used for leveling, the less often you need to install beacons.
2. Now you can begin to install the lag. In this case, it will be strips of plywood with a thickness of 30-50 mm. We attach them either with glue intended for wood, or using self-tapping screws. If gaps form in some places between the surface of the old floor and the logs, we lay in them specially prepared pieces of plywood, lubricated with adhesive.
3. For ease of installation, plywood can be cut in advance into 600x600mm squares, carefully monitoring the delamination of the ends. If you saw that this still happened, such material must be replaced – its quality is poor.
4. The entire surface of the base is thoroughly cleaned from the smallest irregularities, and after that from the dust formed.
5. Squares of plywood are laid on the logs only after the glue has completely dried. When working, it must be ensured that the joining of the sheets occurs only on the logs, and also so that at no point on the surface four planes are connected at the seams simultaneously
6. Extremely precisely cut through all arches, ledges and bay windows.
7. Fasten sheets of plywood with countersunk head screws.
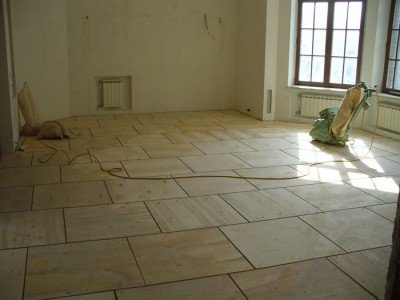
For ease of laying, sheets of plywood are recommended to be cut into canvases 60×60 cm
Tip: so that the self-tapping screws do not protrude, the fastening points must be pre-drilled and countered.
Then it all depends on what kind of finishing coating is used:
- if you plan to lay a carpet, it is recommended to cover the plywood with several layers of varnish;
- if a leveling the wooden floor under the laminate – it is necessary to lay the substrate;
- linoleum – it is best to sand the surface of the plywood a bit by passing it with a grinder. Focus on the joints of paintings and places of attachment to the lags.
PVA-based putty leveling
Using a filler based on PVA and sawdust for little money you can even out the floor surface of a sufficiently large area.

Wood flooring can be leveled using PVA putty
Preparing the floor for leveling
First you need to thoroughly clean the surface of the floor. Sawdust, which is planned to be used in work, needs to be slightly moistened. This is to ensure that they do not pick up moisture from PVA too quickly..
Putty by technological rules
- On the floor are filled with slats that act as a lighthouse. It is necessary to expose them according to the level.
- The entire space between the rails is filled with a mixture of sawdust and PVA. If a thicker leveling layer is required, then the coating is applied in several steps. At a time, no more than 10-20 mm of the composition is poured, and each subsequent layer is applied only after complete drying and shrinkage of the previous.
- The horizontalness of the obtained surface is checked with the help of a level, if necessary, the irregularities are smoothed out by additional application of putty.
The main disadvantage of this method is the need to dry each putty layer, which leads to significant time costs, as well as low quality of the resulting coating.
Self-leveling mix application
Self-leveling mixes are a relatively new coating on the modern construction market. They are a composition that, when diluted to a liquid state, is distributed on the floor surface and after drying forms a sufficiently elastic and even base for laying a new floor covering.
And again the preparation
Before applying the mixture, the wooden floor must be prepared. All the shattered boards are necessarily strengthened with screws, and all the sticking-out heads of nails or self-tapping screws are sunk below the floor level. Next, the base is carefully sanded and cleaned of dust, as well as removed layers of paint and varnish, using a vacuum cleaner. All wide slots are covered with acrylic.
Tip: to seal the cracks, you can use the same self-leveling mixture, but only diluted to the consistency of very thick sour cream.
Next, a moisture protective primer is applied to the floor, providing better adhesion of the mixture and the base of the floor. The lower part of the walls is insulated with double-sided construction tape, and on it, in turn, is marked with the level of pouring the mixture.

Before pouring the mixture in the lower part of the doorway, it is necessary to set the bar to prevent the solution from flowing into the adjacent room
Important: the level marked on the wall should not be less than the minimum allowable coating thickness declared by the manufacturer of the self-leveling mixture.
To avoid the flow of the solution into the adjacent room, near the door you need to attach a bar with a height not less than the planned level of the bulk floor.
Self-leveling mortar filling
- A reinforcing mesh is laid on the prepared base, which is attached using a construction stapler. When connecting the mesh webs, they should be placed with an overlap of approximately 50 mm.
- We prepare the mixture in accordance with the manufacturer’s instructions and carefully mix it with a drill and nozzle. Then it should stand for at least 15 minutes, after which it is thoroughly mixed again.
- A self-leveling mixture is poured onto the floor surface and carefully distributed over the entire surface with a rubber mop, while carefully checking for air bubbles.
Tip: You can easily get rid of air bubbles by using a rubber roller with spikes on it..
4. We are waiting for the complete drying of the mixture, maintaining a certain temperature in the room.

The finished solution of the self-leveling mixture must be thoroughly mixed with a special drill nozzle
A significant drawback of using a self-leveling mixture, which, however, can not be avoided by almost any method, is raising the floor level. But the convenience of such alignment confidently outweighs this minus.
Leveling a wooden floor
Scraping is one of the most time-consuming, but at the same time effective, methods of leveling the base. It is possible to loop manually, but, due to the high complexity and low efficiency of such work, we will not consider manual looping.
So mechanical picking.

The smoothing of the surface of the wooden floor with a loop consists in removing the upper worn layer
Preparing for looping
First you need to remove all the curtains, cover the existing furniture with a protective film or polyethylene, otherwise everything will be covered with fine dust, which cannot be avoided in the process of cycling. All carpet buttons must be removed from the floor and the heads of the nails deeply sunk..
Important: when operating the looping machine, it is necessary to be in noise-protective headphones and a respirator in order to prevent damage to hearing and pulmonary passages. Hands should be protected with tight gloves..
How to cycle a wooden floor
- We start to cycle from one corner of the room, gradually moving to the opposite corner with a “snake”.
- After removing the first layer, all holes and cracks are sealed with putty, which should be selected in the same color as the flooring.
- After the putty is fully hardened, we continue hinging.
- Near skirting boards and other hard-to-reach spots, the floor is cycled using a manual angle tipper.
- After the dust has completely settled, the surface is treated with a vacuum cleaner, wiped with a soft cloth dipped in a solvent, and varnish is applied to it.
Tip: if any board has damage, then you can simply turn it over, setting it in the same place. Simple replacement of the board will cause differences in the color of the floor.
Of course, each method has its own advantages and disadvantages, therefore, when choosing, you should be guided by both a specific situation and your own financial capabilities. Only by carefully weighing the pros and cons of each method, you can make the final choice and get a really high-quality result for many years.


