How to make grounding in the country with your own hands
Country houses ceased to be just garden buildings for summer vacations, and turned into a full-fledged suburban housing. At the same time, we equipped them with all the benefits of civilization, including multi-power electrical equipment, such as refrigerators, washing machines, microwave ovens and much more. All these devices make our life easier, but they are sources of increased danger. Therefore, do not forget about grounding in the country.
Content
- Grounding principle
- What should be the grounding
- How to secure the cottage
- Personal device example
Grounding principle
We’ll touch on the theory a bit to understand why we need troubles with grounding equipment.
The electric current that flows through the wires and approaches the consumer devices has the property of flowing in the direction where the least resistance is. This is very similar to how water behaves..
What happens if the insulation of the appliance is broken? The current will look for a place where the resistance is the smallest, tends to zero. If grounding is not equipped, the weak point begins to spark and shoot lightning. It’s good if this firework stops the machine. If the process is smoldering, low-current, the fuses will not work. Then, when you touch the device, a person will receive an electric shock, which can have disappointing consequences. And if his legs suddenly turn out to be wet, it’s generally scary to imagine what will happen.
In order to protect the inhabitants of the house and electrical appliances from electric shock, it must be taken to the place with the least resistance. This place is the ground, soil.
What should be the grounding
The resistance of the ground loop should be much less than the resistance of the human body. Without going into the jungle of details, we assume that it should be less than 4 ohms. In some sources you can find other numbers: 0.5 Ohm, 30 Ohm and even 60 Ohm. More detailed information should be obtained in the PUE or contact the power supply organization. But we will proceed from the fact that the less the better.
The depth of the grounding electrodes depends on many factors, such as soil structure, groundwater level and climatic conditions.
Important! The general rule is this: the more the soil is saturated with water, the shorter the depth is to hammer the electrodes and place them with a smaller pitch from each other.
Peat has the lowest resistivity – 20 Ohm * m, black soil and clay a little more, but loamy sand – already 150 Ohm * m. Sand is considered the most dangerous – its resistance is from 500 to 1000 Ohm * m depending on the level of water occurrence.
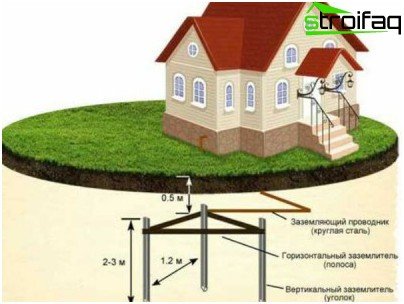
The depth of penetration of the electrodes can be from 1.5 m to 3 m or more. The magnitude depends on how close the water is. If the level is within 2.5 m, it is enough to deepen by 1.5 – 2 m.
The distance between the electrodes in the circuit can be from 1.2 m to 3 m.
The number of electrodes in the circuit depends on the resistance of the soil and can be 3 pieces, forming a triangle. If this design is not enough, the number of electrodes can be increased by connecting them to an existing circuit.
The distance from the circuit to the house should not be too large. Enough 3 – 5 m.
Important! The most appropriate and appropriate solution will be to contact your local energy department. Ask ordinary electricians how to equip ground loop in this particular region. What characteristics are needed, at what depth to set, how far to bear. Moreover, you still need their services to check the resistance of the resulting ground loop on your site.
How to secure the cottage

Grounding arrangement at the cottage
The most common way to equip the ground loop is a triangle with steel electrodes at the tops driven into the ground to a depth of 1.5 to 3 m. The entire loop must be placed below the freezing depth of the ground.
You can connect the electrodes to each other with steel strips or fittings, it is necessary only by welding. From one of the electrodes, it is necessary to draw a steel strip to the power cabinet, simply a shield. If the distance from the house to the circuit is too large, a cable can be routed from the shield, which can then be secured to the electrode with a bolt.

Materials for grounding electrodes and their sizes
What can be used as electrodes:
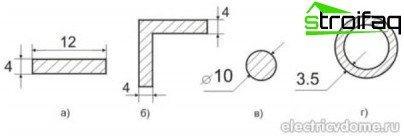
- Steel corner 4 * 4 mm minimum.
- Round steel (fittings) – 10 – 12 mm2.
- Steel pipe with a wall thickness of 3.5 mm.
- Steel strip with an area of at least 50 mm2, e.g. 12 * 4 mm.
The main criterion when choosing a material for electrodes is the cross-sectional area, it should be at least 1.5 cm2, as well as the convenience of driving into the ground. Those. it can be any sharp steel conductive rod, at least an I-beam, at least a profile pipe. The main thing is to sharpen the end so that it more easily enters the ground. The corner can be cut obliquely with a grinder, making a sharp wedge. The fittings must be smooth, unrefined. Otherwise, the contact of the electrode with the ground will not be strong enough. Voids are formed that will reduce the loop resistance..
Information for those who do not want to use improvised materials, but are used to doing everything thoroughly and expensively, it is possible to purchase a ready-made kit that is designed to equip the ground loop. It is a 1 meter long steel copper-plated electrodes, assembled by a threaded connection. It is convenient, efficient and quite expensive. But if possible, use this option.
As strips connecting the electrodes to each other, you can use steel strips 40 * 4 mm or reinforcement 12 – 14 mm. The main criterion is a minimum cross section of 50 mm2. And do not forget, we connect only by welding.
Personal device example
First of all, we determine the material and design of the grounding loop. Options have already been described above. We will tell you how to make a grounding in the form of a triangle.
Then we select a place convenient and close to the distribution cabinet, the distance is considered to be optimal no more than 10 m.
Getting to earthworks:

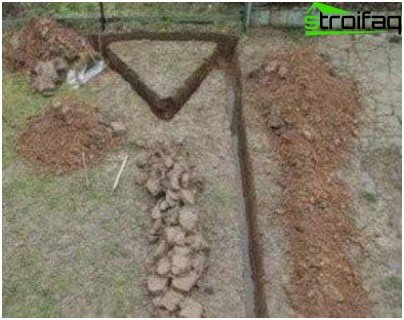
This might look something like a ground trench
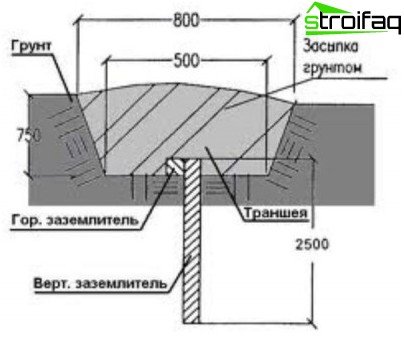
- We dig a trench in the form of an equilateral triangle. Depth should be at least 0.8 m, preferably 1 m. A width of 0.5 m will be enough. In addition, we dig a trench leading to the power cabinet.
- We drive in electrodes at the vertices of the triangle, if the density of the soil allows it. Otherwise we drill wells.
- The electrodes should protrude above the ground so that strips can be welded to them. If we drilled wells, and did not clog the rods, we fill the well with soil mixed with salt. This will significantly reduce the loop resistance. And although the corrosion in this case will increase, the grounding will last for many more years.
- We weld strips to the electrodes, forming a closed triangle, we lead one strip from the electrode to the power cabinet.
- We fix the strip to the shield or ground wire with a bolt of at least 10 mm in diameter. Be sure to weld the bolt to the strip.
- Check the resistance of the ground loop. To do this, you need a special device – an ohmmeter. It is expensive enough; buying it to take measurements once every ten years, and even once in a lifetime, is pointless. Therefore, we invite a person from energy management or a special organization. They will check the resistance and draw up the relevant documentation. The indicator should be less than 4 ohms. If more, it is necessary to increase the ground loop by driving in more electrodes and combining them with existing ones.
- If you are satisfied with the resistance of the circuit, we fall asleep in the trench. We use only homogeneous soil, without construction debris or crushed stone.
Grounding scheme in the trench
Important! A little trick: some craftsmen advise to properly fill the ground loop with water before people come to their energy management. This will reduce his resistance. There will be no problems with obtaining documentation. Although the idea itself is quite interesting: experts really advise you to regularly water it on hot days, but still, we’ve made the mess for the sake of the authorities. Therefore, it is better to make grounding qualitatively, so that its resistance even in drought conditions is optimal.
Please note that if you are the owner of a charming mountain house, all of the above may not suit you. For grounding in rocky soils, horizontal or beam electrodes are used. They can be placed in the form of diverging rays or a grid, making a step from 3 to 10 m. A good option would be to use electrolytic grounding. Though expensive, but very effective.
As you can see, equip do-it-yourself grounding not be difficult. The most difficult will be to determine the length of the electrodes, their number and the distance between them. The rest is a matter of technology.


