How to make grounding with your own hands
Previously, when building houses, no one did grounding, and there was no special need for this. Currently, with the advent of many electrical devices, such as a gas boiler, electric heater, washing machine, refrigerator, computer, etc. The topic of grounding has become very relevant. To understand how to make grounding with your own hands, you need to understand for a start the principle of its operation. It is with this that we will become acquainted in this article, as well as with how to install the ground loop.
Content
- Grounding: what is it for?
- How to make grounding
- Ground electrode selection
- Ground loop device
- Entering the building with grounding
- Ground Reliability Test
Grounding: what is it for?
Grounding is a special wiring that connects various electrical devices in the house with a grounding device. The main goal of such an event is to increase security..
Why grounding is needed :
- it will exclude electric shock to a person who has touched the body of an electric apparatus;
- will ensure the normal functioning of electrical devices, since the manufacture of them takes into account the presence of grounding;
- reduce electromagnetic radiation of high frequency;
- reduce the amount of interference in the mains.
How to make grounding
We will need three-wire wiring in large quantities, metal rods, welding machine. Grounding works are divided into 3 categories:
- installation of the grounding device itself;
- installation work for wiring with residential grounding;
- installation of fittings, taking into account the presence of grounding.
According to European standards, everything sockets must be earthed, since modern household appliances are equipped with specific plugs with grounding “antennae”.
To make a decision on how to make grounding with your own hands, you need to consider which devices will be connected without fail to a grounded outlet. These include:
- Electrical devices that generate dynamic processes: washing machines, electric meat grinders, food processors. In other words, all devices with an electric motor are potentially fraught with the threat of phase breakdown on their body.
- High power power devices. Today, even ordinary electric kettles can be attributed to this category..
- All electronic devices. In the case of computers that generate static electricity, grounding will protect not only humans, but also protect the machine itself from damage..
From this we conclude that grounding is simply necessary in the bathroom, in the kitchen, as well as in places where computer equipment is connected. Where not very powerful devices will be connected, sockets can be ordinary. Although, most owners prefer to make all sockets in the house safe, as European standards require..

According to European standards, all sockets must be earthed
Ground electrode selection
For grounding electrodes, in order to save, steel is most often used, although it would be nice to use copper or steel in a copper sheath. The most important criterion for choosing a grounding electrode is the cross-sectional area. If we use an angular or rectangular profile, the cross-sectional area should not be less than 150 sq. Mm. When using a steel pipe, the minimum wall thickness is 3.5 millimeters, and the diameter is 32 millimeters. The length of the grounding electrodes must be no less than two meters. Earthing should not contain any coatings that would impair electrical contact (paints, etc.)
Ground loop device
The grounding device is actually a fairly simple design. For it, you will need three grounding electrodes. We drive them into the ground, giving the shape of an equilateral triangle (the length of each side is at least 1.2 m). Before loading the electrodes into the soil, preparatory excavation work is required. Further work on the grounding device follows in this order:
- We dig 3 holes 50 cm deep in the form of grounding (equilateral triangle), connect them with trenches.

Earthing trenches
- Before driving in, we sharpen the electrodes using a grinder.

Electrodes pointed with a grinder
- We take a large sledgehammer and hammer the grounding electrodes.
- If the soil is hard, it is possible that under the impact of a sledgehammer, the ends of the electrodes will begin to deform strongly. In this case, it is necessary to cut off the deformed areas with a grinder and then continue to work.

Ground electrodes clogged with a sledgehammer
- The next step is the interconnection of the electrodes. We use a steel conductor with a cross section of more than 50 mm2 for this. You can also use a steel strip 4 mm thick and 40 mm wide.
- We connect steel parts best by welding. It is possible, of course, and a bolted connection, however, the ideal solution is welding.

Welding electrodes to a steel strip
- We draw a steel strip to the intended place of entry into the house. We bring it above the surface of the earth.

The conclusion of the strip to the surface of the earth to the place of entry into the house
- We weld the M8 bolt or the M10 bolt to the strip. Subsequently, we will wind on it a wire leading to the shield.

The wire leading to the shield is wound to the welded bolts
- At the end of all these actions, you can fill up the pits.

The ground strip is connected to the house, trenches are covered with earth
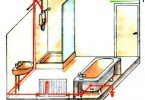
Entering the building with grounding
The case is almost complete: we made a grounding device. Now it is necessary to arrange wiring to bring the grounding to the switchboard itself. To do this, you need a three-wire wire. The most durable are considered copper monolithic veins.
Three-wire wires are used, as a rule, when there is a need for a special configuration of the lighting system to install the wiring from the switch. It is these wires that are needed for grounding. We replace them with ordinary monolithic veins. Now to the outlet we derive not only the phase and zero, but also the earth.

Grounding the outlet with a three-wire wire – phase, zero and ground
We bring three wires to the glasses of all outlets, adhering to the color marking in order to know exactly which wire is the ground. After all, it is not so essential to confuse the phase with zero, it is important not to confuse the phase with the ground, since the socket in this case will not work. Gently twist the “ground” with the “ground” in all the existing junction boxes and see that the grounding goes everywhere as a separate residential.
The wiring is divorced, we proceed to the installation of accessories. But first, check if our grounding is reliable.
Ground Reliability Test
Having done the earthing installation with your own hands, it is necessary to test the system. It would be best to use an earth resistance meter for these purposes. But, since it is unlikely that a home master will have such sophisticated equipment, grounding can be done in the following way:
- we take a portable incandescent lamp (from 100 W) and connect one contact to the ground, and the other to the phase;
- the lamp will light up brightly if self-grounding is performed soundly. If the lamp does not light up or just burns dimly, this will mean that the grounding has a high resistance due to poor-quality electrical contacts in all nodes;
- in order to eliminate high resistance, we clean well all wires, tubes, clamping mechanisms, in a word – everything that plays the role of an intermediary between the ground and the ground contact in the socket.
Brief action plan
Summarizing the operations described above in detail, you can draw up a short plan of action for organizing grounding with your own hands:
- The manufacture of a grounding device in the form of a triangular metal frame with an edge of 1 meter. Rods 1.5m long are welded into each corner of the triangle..
- Immersion of the grounding device in the soil: with the frame to the top, with pins to the bottom.
- Welding a metal strip to the device, with which the ground is connected to the meter.
- Performing wiring from a three-wire wire in the house, connecting the excess core to grounded outlets.
- Connecting this core to the ground on the meter.
- Installation of sockets with the connection of grounding antennae to the additional conductor.
- Another important point is the organization of lightning protection of the building (this is a topic for another discussion).
As you can see, making a home grounding with your own hands is quite simple, it is only important to act in accordance with the recommendations and comply with the technology. But you yourself will provide your home with good electrical wiring with reliable grounding, avoiding unnecessary costs. Well, if you are still haunted by doubts, invite an acquaintance of an electrician to check if you did everything right.