Almost one in three knows from their own experience that hunching a shovel over an old trough to knead a mixture is far from a pleasant experience. And every second person knows about it from the stories of his friends. Therefore, the question of how to make a concrete mixer with your own hands is not at all idle. After all, a little tense at the very beginning, you can greatly facilitate your life in the future. Let’s consider how easy it is to realize this venture, and what pitfalls can occur in the process.
Content
- Existing device options and their differences
- Manual drive assembly process
- Assembly process of an electric drive device
Existing device options and their differences
The main separation is according to how the mixture is kneaded. The following four main methods are used, which are used in various models..
- Gravity method
It is carried out due to the auxiliary force of our planet Earth. Rotating, the drum raises on its walls an nth amount of the mixture, which then falls back onto the residues below. So, striking over and over itself over and over, the mixture is mixed and appears in the end in a form that is quite satisfactory for the builder. It is impossible to use this option on the scale of a large construction project. The quality of the finished product is far from ideal, and the volume of the mixture kneaded at one time is small (otherwise the quality will suffer).
- Mechanical method
The necessary components are poured into a fixed container, which are mixed together by means of a screw rotating around its axis. In addition to the indicated movement, the screw must move along the perimeter of the container if its diameter is much smaller than the diameter of the latter. This option is not used for large volumes of work, since its energy costs are very large. When trying to use a simplified version at home (a drill with a mixer nozzle), it can also fail. The device is not intended for long-term operation, and if you take breaks, the mixture will just freeze.
- Vibration method
The mixture in a fixed container is kneaded with a special mixer, which creates waves in it. Using this method, a very high quality solution is obtained. Most often used in works related to the construction of complex structures (for example, dams). Practically not used at home.
- Combined methods
They are the most widespread. The mechanical and gravity method of kneading are combined. Either it is a rotating container with rotating kneading nozzles inside it, or it is a rotating container with rigid ribs on its inner walls. The quality of the finished product is several times higher than that of the simply gravitational method, and the cost of electricity is several times less than when using only the mechanical method.
Manual drive assembly process
Before you begin to understand how to make a concrete mixer, we will specify what tools and details we need during operation.
- Capacity with a capacity of about 200 liters. The material does not matter much, it can even be durable plastic.
- A metal rod of circular cross section, which will play the role of an axis.
- 200 mm nails that will be part of the comb used for more thorough kneading.
- Two metal rails whose length is equal to the height of the tank.
- Metal profile pipes, which are necessary to create a supporting frame and handles.
- Crankshaft crown for fixing the axle.
- Door hinges.
- Two loops (from the hook lock).
- Rubber compressor.
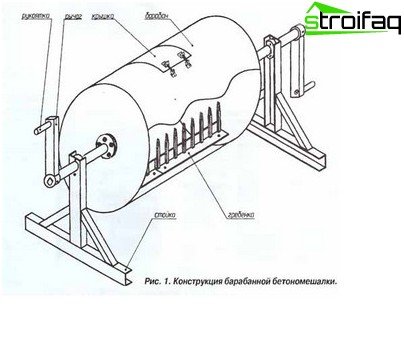
The photograph does not show one very important element. In order for the design to last as long as possible, it is necessary to strengthen the junction of the axis with the drum. On the upper and lower lids of the tank, it is better to weld two metal rails that cross each other
Almost all connections are made by welding, except for attaching the crown to the side of the tank and lid.
Assembly is carried out in the following sequence:
- Welding support posts.
The height of the racks is adjustable at your discretion, but it is desirable that the finished structure is at least 1.2 m. Otherwise, the process of filling the tank and freeing it from the mixture will be problematic. The width of the perpendicular supports should be approximately twice the width of the tank. Oblique supports are welded at an angle of 45 degrees.
- Door Hole Cutting.
The dimensions of the hole are determined individually, but the most acceptable indicators are 30×30 cm. The cut-out area must be slightly reduced, not more than 0.5 cm (on each side). A rubber seal is glued around the perimeter of the hole. On the door itself and on the tank near the edge of the hole, two rings from the lock are fastened, which will be fastened with a plait.
- Mounting a rake inside the tank.
Nails are welded to metal rails in increments of 5-10 cm. The rails are welded inside the tank opposite each other..
- Axis mounting.
Crowns are attached to the sides of the tank with screws and nuts. An axis is threaded into the holes, which is welded to the crowns at the joints. The attachment point is reinforced with cross-welded rails.
- Mounting the handles and tank to the base frame.
The top of the support post should be between the tank and the edge of the axle. In the uprights, holes for the axis are drilled. Fasteners are carried out by two metal washers, which are fixed with screws and nuts. Handles in the form of the letter “G” are welded to the edges of the axis.
Assembly process of an electric drive device
The frame itself with the tank can be made almost the same as described previously. But instead of the handles with which we carried out manual kneading, a special device with a motor is installed.
Usually, a gear ring is used in factory elements, but for us it will not be the best solution. Firstly, its cost is quite high. Secondly, not everyone can do such a thing independently.
A worthy replacement can be a device assembled from the following parts:
- flywheel (from any, even very old, car);
- pinion gear (using it, the starter will be connected to the flywheel).
- wheel hub.
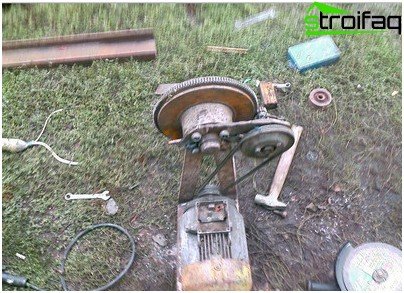
To ensure the necessary speed of rotation, it is necessary to supplement the gear transmission with a belt
In addition, there is another difference. The axis is not welded to the tank, it will rotate using a motor, and the tank itself will remain stationary. No ridges are welded inside the tank, instead of them, blades are welded to the axis, which will knead.
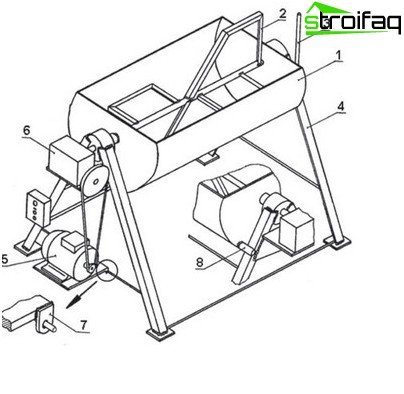
The open construction is shown in the photo, but it is inconvenient in that at a high rotation speed the mixture is very sprayed. It is advisable to weld on top the second part of the tank after mounting the blades.
Self-production of a concrete mixer will help to accelerate construction work at least three times (in the case when the manual version is used). In addition, you will get rid of the need not only for an expensive purchase, but also for a less expensive rental device.


