How to dry a cellar
In most cases, the mistakes made at the stage of construction lead to dampness in the basement of the garage. And the most interesting: to take into account all the nuances and foresee every possibility of moisture getting into the cellar is almost impossible. And it’s good if there are no ground waters around, and none of the neighbors equips in the immediate vicinity storm sewer. But a huge number of owners of garages with a basement in the spring and autumn still have to face a significant problem – how to dry the cellar. In our article, we will not only consider the main methods of drying the room, but also give some tips on the correct basement waterproofing.
Content
- We plan, excluding humidity
- How to dry a basement in a garage
- Drying Method with Roasting Pan
- Candle Drying Method
We plan, excluding humidity
To prevent the appearance of damp in the cellar, you need to think at the construction planning stage. When constructing a basement, in no case should porous materials, such as expanded clay or foam blocks, be used. It is also not recommended to use any type of brick, since in practice it is very problematic to ensure the proper water resistance of this material. The best option is concrete, not only for the bottom of the cellar, but for all walls.

As a building material for the basement of the garage, it is better to choose concrete
The next question that appears during the construction of the garage cellar is which design to choose – prefabricated or monolithic? Of course, a monolithic basement is less laborious, and its service life is much longer, but foundation blocks can be used if desired..
Construction work is best done in the summer, when water in the basement of the garage is an extremely rare occurrence. Then it will be possible to avoid the emergence of groundwater in the prepared pit.
How to dry a basement in a garage
Despite the careful choice of location, enhanced waterproofing and other measures to prevent the appearance of damp in the basement, it is not always possible to take into account all the little things. So, let’s look at the main ways to dry a cellar in a garage.
Before proceeding with the waterproofing of the already built basement in the garage, you need to think about how to dry the damp cellar. It’s best to do this in the warmer months. To begin with, we take out from the cellar everything that is there, that is:
- shelves;
- shelving;
- vegetable box.
After that, thoroughly clean the floor, even from the smallest debris. Now the room should dry for two days in a natural way. Further (especially in the spring-autumn period), you should definitely dry the basement.
Drying Method with Roasting Pan

To maintain the draft necessary for normal burning in the bucket, it should be slightly modified by welding the legs and cutting holes in the bottom
One way to quickly dry the basement requires an old metal bucket. The bucket is placed in the middle of the cellar, a fire is made in it and maintained until the room is completely dry. Hot air creates a forced circulation, and stale, moist air is quickly expelled from the basement. An additional plus of the method – smoke remarkably destroys mold and bacteria spores in the walls, and also for a long time evicts unnecessary insects.

How to dry a garage cellar using a roasting pan
Candle Drying Method
The second method of drying the basement is even easier than the previous one. All that is needed for him is to increase the ventilation pipe to the floor and put a burning candle under it in a metal vessel (for example, in a tall can). Now, in order for the initial draft to appear, right in the pipe we light a small piece of paper. All. Further, the necessary thrust will be supported by the flame of the candle. Thus, in 3-4 days, replacing the cinder with a new candle, you can completely solve the problem of how to dry the basement in the garage.

How to dry a garage cellar with a candle
Tip: instead of a candle, you can use a dry fuel tablet.
Only after completely drying every square centimeter of the basement of the garage, you can begin work on waterproofing.
Methods for waterproofing a cellar in a garage
Usually, to protect against moisture, special waterproofing additives are added to concrete already at the stage of building the basement, reinforcing the protective properties of the material from moisture and groundwater. Let’s look at a few more ways to protect the cellar from moisture and moisture..
How to do external drainage
The most reliable way to avoid basement getting wet is to drain groundwater from the foundation either into storm sewers or off site. True, this method is suitable, both in terms of efficiency and cost-effectiveness, only for detached buildings, and not for parking lots, garage cooperatives and basements of large houses.
Tip: it is best to carry out an external drainage system simultaneously with the construction of a basement garage.

The correct arrangement of the external drainage of the cellar
External drainage technology:
- A trench must be dug around the entire perimeter of the basement, 0.4 m below the cellar floor and 0.4 m wide. At the same time, wells are drilled every 2 meters to the sand layer, into which plastic pipes for drainage are installed. To prevent crumbling soil and crushed stone from entering the drainage pipe opening, they must be covered with a fine galvanized grate.
- After that, the bottom of the trench is closed with geotextile (in order to avoid siltation) so that the ends of the material extend onto the walls of the recess, and the trenches themselves are filled with gravel or crushed stone to a height of about 0.4 meters (make sure that the upper edge of the backfill layer is slightly higher than the lower edge cellar walls).
- Above, crushed stone is wrapped with the remains of geoseptic matter. The result of all these manipulations will be a horizontal drainage pipe around the entire garage, preventing groundwater from entering its perimeter, as well as their accumulation.
- Next, fill the trench with soil in several stages, carefully ramming each layer to prevent the structure from shedding.
Important: when drilling wells, it is necessary to ensure that they do not go deep into the sand layer, and also that sewage from the sewer system does not get into the drainage system, since mainland sands are an aquifer containing drinking water. Having allowed stocks to enter, you and your household will be the first to suffer.
Internal drainage device
If the question often arises, how to quickly dry a large cellar, then it is worth equipping it with an internal drainage system. To do this, interconnected pipes are placed around the entire perimeter of the building, into which the water entering the basement flows.
To drain the garage cellar in the modern construction market, a wide range of specially designed pipes of various diameters is presented: perforated, corrugated, with stiffeners. Pipes with a diameter of 110 mm are most effective. Drains should be equipped with special holes located along the entire length of the pipe at an equal distance from each other.
Tip: Internal drainage is best done before flooring. Otherwise, you have to break it.
Internal drainage technology:
- A trench is dug around the entire perimeter of the basement to a depth of 0.4 m.
- The bottom is carefully compacted and geoseptic material is spread on it..
- The trench is covered with gravel or gravel at 0.15 m.
- Drains are laid on top of the backfill layer with a slope of 3 mm per meter of pipe length.
- Drainage pipes are completely covered with medium-sized gravel (5-15 mm) so that the holes are not clogged with smaller particles and are covered with geotextiles.
- The trench is completely covered with sand and rammed.
- To collect water from pipes at the lowest point in the basement, a collection well should be constructed. Now you can buy ready-made industrial PVC wells up to 3 m high, which are lightweight and durable. But some people prefer to make their own concrete well, which significantly increases the amount of work.
- A drainage pump is installed in the well, which is switched on automatically when the float in the well reaches a certain level. When lowering the float to the initial position, the pump motor is turned off.
Advice: the place where the pumped water will be discharged should be taken care of in advance. To do this, a hose is connected to the pump, conducted either off-site or in the local sewage system.
Interesting: instead of a well, you can use an ordinary two-hundred-liter barrel, but in this case you will need to regularly ventilate the basement of the garage.
Basement Injection Protection
This innovative method is one of the most expensive, in addition, it requires the presence of certain skills and special equipment, as a result of which such work should be entrusted to professionals, and not try to cope on their own. Injection waterproofing is effective even for objects built of brick, foam block and cinder block.
The technology of the injection method of waterproofing
- Holes with a diameter of 1.5 to 4 mm are drilled around the perimeter of the structure at a distance of 20 to 80 cm from each other, depending on the wall thickness, soil density and other influencing factors.
- Expansion packers are installed in the holes, into which insulating substances are injected under high pressure using a special pump.
The undoubted advantage of the method is that such waterproofing can be carried out at any time without opening the floors, foundation and without removing the lining. In addition, polymer waterproofing agents are very durable and environmentally friendly materials, and due to their reduced viscosity they are able to fill even the smallest cracks in the walls and foundation.

Injection waterproofing works: polymers are injected into the holes formed around the perimeter under pressure
Penetrating waterproofing
The most effective way to waterproof the cellar of a garage is through penetrating waterproofing..
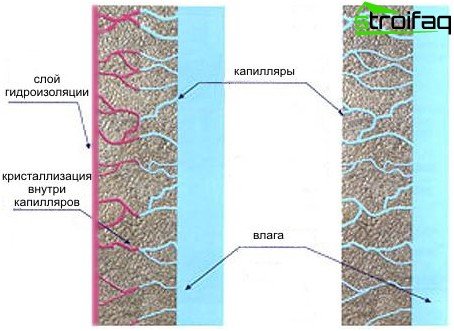
The principle of penetrating waterproofing is to block pores and capillaries by creating new structural compounds
This type of material makes it possible to quickly and efficiently cover not only the surfaces in the basement, but also all concrete and even brick surfaces. High efficiency when working with wet objects allows you to work from the inside, avoiding the debilitating digging of the outer walls.
The waterproofing mixture is diluted with ordinary water, and the resulting solution is applied to a previously moistened surface. The mixture, having reacted violently with water on the surface of insulated objects, forms crystals that completely fill the capillaries of concrete or brick..
After the basement is completely dried and waterproofed, shelves, boxes and racks can be brought back. Before this, they must be thoroughly washed and treated with an antiseptic solution, for example, copper sulfate (today it is one of the cheapest, but at the same time highly effective ways to protect against mold).