Initially, the doors carried only the function of retaining heat in the house, so people were more concerned about this component than about their appearance. Modern technologies allow you to harmoniously fit interior doors into the interior of any style and direction, without forgetting about their functionality.
The most popular in the door market were sliding designs. The installation of sliding doors allows you to add uniqueness and originality to the design of the room. They make it possible to significantly expand the space of the room, without requiring additional space for the opening of the wings, as well as arrange the area around them in accordance with the general style.
Content
- Main advantages and disadvantages
- Classification by installation and type of mechanism
- Sliding Door Design
- What you need to install sliding interior doors
- Installation of a sliding structure
- Dismantling the old door
- We put the walls in order
- Box installation – responsible work
- We fix the upper guides
- Carriage assembly and limiter installation
- Groove at the bottom of the door leaf
- Carriage Mounts – An Important Part
- Door leaf installation
- Sliding system decoration
Main advantages and disadvantages
The first generation of sliding doors was a very thin partition, stuck in runners and causing only irritation. It is for this reason that many still do not dare to change the more familiar swing structures. Also, the myth about the complexity of a procedure such as do-it-yourself sliding door installation. Still, most of the population of our country tries to avoid calling a specialist at home or additional expenses caused by paying for his work.

Modern sliding systems
The design of sliding doors is being improved with each new model, and modern systems already have a number of indisputable advantages:
- saving the space required to open the swing door;
- it is impossible to open such a door;
- the ability to choose the size and material;
- the absence of loops that begin to creak over time;
- absolute safety – it is impossible to pinch your finger with such a door;
- the ability to implement any design idea;
- harmonious combination with the environment;
- possibility of combining adjacent rooms.

One of the drawbacks of sliding systems is poor sound insulation
Of course, there are a number of drawbacks of coupe systems:
- The device of the sliding doors is such that the gaps between the box and the canvas cannot be avoided. Therefore, such designs have much less sound and heat insulation properties. They practically do not isolate the room from the noise emitted in the next room.
- Such doors have a slightly higher price..
- As a result of improper installation or due to poor quality of the mechanism, the leaves can move unevenly along the runners, which can lead to their jamming..
- Care must be taken to ensure that there is free space on the side of the door into which the door leaf moves. Putting a cabinet or some other dimensional object near this wall is possible only if the door enters a special pocket. Otherwise, the cabinet can only be placed at a certain distance of at least 100-150 mm. This, in turn, leads to a decrease in usable area, for which the installation of sliding doors is most often contemplated. The lack of a wall with a pocket for the door leaf – it can not be used for mounting wall lights, paintings, decor elements, as well as for installing switches and sockets.
- A large amount of dust will accumulate in your pocket, which is extremely difficult to remove.
- Quite often, in the niche in which the sash is hidden, the sliding door leaf is jammed due to skewing of the rollers.
Tip: it is better to provide for the possibility of removing one side of the niche under the canvas of the sliding door. This will help to avoid the problems described in paragraphs 5 and 6..
Therefore, before deciding to replace conventional swing structures with sliding ones, you should carefully consider everything, weigh the pros and cons, and only then decide whether it is really necessary.
Classification by installation and type of mechanism
Installing sliding interior doors is not as complicated as they usually imagine. Maximum reliability and high quality construction completely depends on the accuracy of installation work and the utmost accuracy of all necessary dimensions and calculations. First you need to decide which sliding door you would like to see in your home.
All sliding systems can be divided into two groups:
- wall mounted;
- visible structures moving along the wall.

Sliding systems in which doors go into the wall
By the type of mechanism, such doors can be divided into three types:
- the canvas rests on the upper suspension – non-threshold systems;
- the canvas is held on the lower suspension. The disadvantage is the presence of a small nut on the floor, which can be drowned, but such designs are considered the easiest to install and also are the cheapest;
- The system uses both of the above mounting options. This type of door is the most reliable and convenient in use..
Tip: it should be noted that the price of a door mainly depends not only on its type, but more on the quality of materials and the type of hardware. That is, replacing expensive platbands, door handles, locks and castors with cheaper analogues, you can significantly save.

Sliding doors, in which the leaf is held only on the upper suspension, are called non-threshold
Of course, entering the door into a special pocket allows you to save some room space, but it requires additional work and the destruction of part of the wall near doorway.
Tip: you can mount the canvas not only by breaking the wall, but also by installing an overhead structure made of drywall. As a result, the length of the room will decrease by approximately 100 mm, and you will be able to avoid a rather complicated procedure.
Sliding Door Design
Sliding systems consist of several components:
- frame with glass or solid filling;
- a mechanism consisting of a guide, clamps, roller carriages, etc .;
- platbands and extras;
- decorative strips designed to mask the driving mechanism;
- accessories (special locks and handles).
There are several options for door frames:

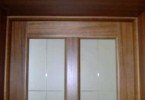
Glass sliding doors
- Various tinted MDF frames.
- Frames made of aluminum profile. They are distinguished by their lightness and durability, they are absolutely not afraid of humidity, they allow the absence of decorative elements, as they can be painted in any color or anodized.
- Tempered glass doors (frameless structures). Suitable mainly for the high-tech style, ideal for highlighting meeting areas and for wet rooms.
Of course, doors with a wooden frame are slightly more expensive, but they have higher thermal insulation..
The mechanism used to carry out the movement of the sliding door consists of one or more rails with roller carriages serving as the fastening of the door leaf. An aluminum profile is usually used as a guide..
Rollers are made from a special polymer material that is extremely resistant to damage and abrasion. The rotation is carried out by rolling bearings, which ensures ease of movement of the carriage.
Interesting: accessories for sliding systems have a number of distinctive features. Handles must be recessed, otherwise they will interfere with the operation of the door. An ordinary direct lock will not be able to close such a structure, its bolt must be hook-shaped.
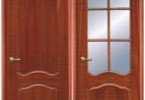
A large selection of door leafs allows you to implement many interior design options. Do not use a solid wood canvas, since the severity of this material leads to distortions of the entire structure, leading to a decrease in ride smoothness.
Important: the sliding door should be made as light as possible by using lighter materials, such as aluminum. If the weight of the sash will exceed 70-75 kg, it is better to install on each four or more rollers.
What you need to install sliding interior doors
Before proceeding with the assembly of interior sliding systems, you need to prepare all the materials and tools that you may need during the installation process.

When installing interior sliding doors without a screwdriver or drill can not do
So, we need:
- a screwdriver or an electric drill;
- punch (if you need to sample the inside of the wall);
- crosshead screwdriver;
- two platbands. One is installed on top of the door, and the second on the opposite side of the one into which the door opens;
- anchors;
- self-tapping screws;
- door handles – 2 pcs;
- finish nails;
- extras – 2 pcs;
- a rack for adjoining a door in a closed state;
- necessary accessories, such as rollers, mounting materials, metal (preferably aluminum) guide rail;
- door leaf;
- dry wooden beam 50×50, the width of which is twice the same size of the door.
Tip: in order for the door leaf to fit perfectly, carefully measure the doorway and increase the linear dimensions (width and height) by seventy millimeters.
Installation of a sliding structure
To carry out any complex options (installation of multi-leaf doors, glass, having a very large weight or equipping a pocket in the wall) it is better to invite real experts, since any errors during the installation process can hit your pocket very hard. A person who has never dealt with sliding structures can only install simple sliding doors.

The installation of sliding sliding doors can easily be done independently.
If you purchased a ready-made kit, then the installation will not take you much effort or time, since it will already have all the necessary accessories provided by the manufacturer. But if you decide to create a sliding system according to your preferences, then you will have to pick a complete set yourself and it is very difficult to do this work for the first time to avoid mistakes.
Let’s try to draw up such instructions for installing sliding doors, which will allow a beginner to quickly and accurately carry out all the necessary work. Gather yourself, you will need utmost care and accuracy.
Installation should begin with the opening. We measure the height of the opening in three places: on the left, in the middle and on the right, and the width in three places: above, on the center line of the wall and below. Next, we check the verticality, perpendicularity and straightness of the respective sides. If the design provides for framing, then you should measure the minimum and maximum wall thickness, be sure to take measurements in the corners of the opening, and not just on the sides.
For ease of understanding, we will divide the entire further process into simple steps.
Dismantling the old door
First you need to remove the old door, door hinges, carefully remove the platbands on both sides, after this dismantle door frame. If it is well fixed and will not impede the free movement of the wings, then you can leave it, this will be a continuation of the wall.
We put the walls in order
Now you need to carefully align the walls, filling all cracks and cracks. The opening must have clear dimensions (height, width and thickness), parts of brick or foam concrete should not protrude anywhere, drywall should be cut.
We check the upper part of the opening and the floor for parallelism to each other (tolerance of not more than 5 mm) and for horizontalness. Using a plumb line, we check the sides of the opening, here a deviation of no more than 5 mm by 2000 mm is allowed. The more evenness of the walls you can achieve, the more tightly the door leaf will fit to them.
Box installation – responsible work
If the old box is dismantled, then install a new one. It’s very difficult to cope here alone, so it’s better to invite a partner. We install the box in the doorway and align it with small wedges. Adjust the angle of the structure relative to the floor and walls, moving or recessing wedges.

Install the door frame, aligning it with wedges
We fix the box in the wall with screws. We work with a screwdriver very carefully, since any, even minor, damage can lead to sad consequences.
We fix the upper guides
After the door frame is ready, we put the door leaf to the opening and mark its upper level on the wall with a pencil. Now we perform the same procedure, but already installing the canvas directly in the doorway. This must be done in case the floor plane is not smooth enough.
If the resulting line is horizontal, measure from it 70 mm upwards and draw another line. Here the guide rail will be installed. We put a pre-prepared wooden beam to the marked line and fix it with screws as tightly as possible, regardless of the evenness of the wall. To do this, use as many self-tapping screws as you need.

Attach the rail to the bottom of the beam
Now we attach the rail to the lower end of the wooden beam. First, screw the guide on one side loosely. To accurately determine the location of the self-tapping screw, it is necessary to divide the thickness of the door in half and add 3-5 mm, necessary to ensure the free movement of the sash (distance from the wall). We carry out the same operation on the other side of the bar. Before final fastening of the rail, be sure to ensure that there is sufficient distance between the door leaf and the wall..
Important: the guide rail must be strictly straight, not the slightest bending is allowed, regardless of the curvature of the wall and timber.
Now you can finally fix the guide.
Carriage assembly and limiter installation
Then we screw the bolts into the carriages with rollers, while their ends should look slightly out of the hole. We start each carriage in a prepared rail and make sure of their free movement.

Before final assembly of carriages it is necessary to make sure that they are free to move.
Tip: do not lubricate the inside of the rail with anything.
At the edges of the guide rail, we set the stroke limiters, making sure that the rubber shock absorbers look inward.
Groove at the bottom of the door leaf
We proceed to the design of the groove of the lower end of the door. To do this, we retreat 15 mm from the edge of the sash and drill two holes on each side with a diameter of 7 mm and a depth of 20 mm, between which we strictly cut a groove in the middle for the lower guide.

A perfectly even groove is difficult to make even with a milling cutter. Beginners can be advised to install rails or a U-shaped profile.
The depth of the groove should be at least 18 mm, and the width 2-3 mm greater than the width of the lower guide, usually a flag or knife. Since it is very problematic to make a perfectly even cut on your own even with an electric drill or router, it is preferable to install a U-shaped profile or two rails.
Carriage Mounts – An Important Part
Attachments to the carriages should be attached exactly in the middle at a distance of at least two millimeters from the side faces of the sash. In this case, the semicircular cuts on the brackets should be turned towards the wall.
Door leaf installation
Two people are required to install the door leaf. After attaching the blade to the rail, we combine the bolt of the right carriage with a cutout on the bracket located on the same side. To do this, you need to slightly raise the door. We put the end of the bolt into the mounting hole of the adjusting nut with washer, which should remain outside the bracket. We fix the brackets on the carriage bolts, but not completely.
Now set the lower guide to the bottom end cutout. This is easy to do by slightly shifting the bottom of the wall. Return the canvas to a horizontal position and move it to the open state. With a pencil, mark the longest opening length. To adjust the gap between the wall and the leaves, you need to reject the lower part of the door leaf until it is reached and mark the position of the knife on the floor.
Important: the gap between the wall and the door leaf should not exceed 5 mm.
Having removed the carriage nuts, we remove the canvas and attach the lower guide to the floor using two screws.
We align the groove with the guide and hang the door leaf again, also not fully tightening the nuts. After setting the necessary clearance between the floor and the door leaf by tightening or loosening the adjustment bolts on the carriages, we fix the nuts, while holding the adjustment bolts from turning.
Sliding system decoration
We install a decorative hinged platband over the upper guide and mask it in accordance with the general style of the room (you can paste over with the same wallpaper or paint with which the walls of the room are painted). We attach handles and a lock.