Do it yourself with drywall partitions
The long history of building the same type of block houses has led to the fact that in recent years each of us has strived to make our apartment as unlike the others and original. For the sake of the consumer, developers are increasingly using projects in their work, where the apartment comes to the buyer in the form of one large room, not separated by partitions. Such an apartment can be safely used as a studio apartment, or can be divided into the required number of rooms. To do this, it is enough to build partitions from drywall with your own hands or with the help of a hired team.
Content
- Why is it better from drywall
- Do-it-yourself installation of a drywall partition
- Drawing – a smart start for a great result
- Mounting the frame from profiles
- Installation of elements cut out of drywall
Why is it better from drywall
Drywall appeared in construction stores relatively recently, only 10-15 years ago, all piers and partitions were built of brick or foam blocks. What is the advantage of this material, and why it has gained such popularity?
- A variety of profiles and the ability to give a sheet of drywall virtually any shape, allows you to realize even the most daring designs of designers.
- Ease of installation – even a beginner can cope with the installation of a drywall partition.
- Due to the porous structure of gypsum, this material transmits steam, and, therefore, regulates the humidity in the room.
- Special impregnation allows the use of HA in rooms with high humidity, such as a kitchen or bathroom.
- Due to its light weight, the drywall partition does not create an excessive load on the building structure, which is important for the overhaul of old wooden houses. And in the construction of the “new building” the use of this technology allows to reduce costs for concrete and reinforcement by 25-30%.
- The composition of drywall includes only natural materials, which makes it absolutely harmless to human health.
For the installation of the partition, a profile with a width of 50, 75 and 100 mm is used. Which one to choose depends on its purpose – a narrow profile saves space, and a wide one withstands a large load.
Do-it-yourself installation of a drywall partition
Drawing – a smart start for a great result
You need to start with the drawing. Fortunately, for the construction of such a partition does not need to make complex calculations.
Therefore, with the manufacture of the drawing you can easily cope on their own.
- Scale your room settings onto paper..
- Mark the place where the partition should be on the drawing. If several walls are planned, start with the one to which the rest will be attached..
- Make a frontal sketch of the wall, on which put the drawing of the supporting structure and the sheets of drywall staggered (the horizontal joints between the sheets should be at different levels). At the joints, it is necessary to provide for the installation of horizontal jumpers. Such a sketch is needed in order to prevent errors in the calculation of the material.
Important! Try to plan ahead what decor and furniture items will hang on your partition, and equip their mounting points with additional jumpers.
Before you make a partition from drywall, you need to decide what kind of load it will bear. The number of required rack profiles and their location depends on this..
Sheathing different sides of your wall is necessary so that the edges of the sheets fall on different profiles. That is, if on the right side of the wall the joints of the sheets fall on the third, fifth and seventh pillar, then on the left they should fall on the second, fourth and sixth (with a distance between the profiles of 60 cm). This is necessary to evenly distribute the load within the structure. Keep this in mind when charting and calculating material..
Necessary tools and materials: tape measure, cutter, scissors for metal, dowels, self-tapping screws for gypsum board (25mm), a knife for cutting drywall, marker, level, plumb and a screwdriver.
Mounting the frame from profiles
When the drawing is ready, you can proceed with the construction of the supporting structure from profiles.
- From the nearest wall in several places, measure the required distance and draw lines along the floor and ceiling.
- Attach self-adhesive sealing tape to the guide profiles, and the profiles, in turn, fix on the floor and ceiling. To do this, pre-drill holes for the dowels. The step of fastening the guide profiles should not exceed 1m. The size of the dowels directly depends on the material of the floor and ceiling. For fastening to a concrete slab, “quick installation” is used with a length of 75 mm, and on the wooden floor – ordinary self-tapping screws with a length of 45-50 mm.
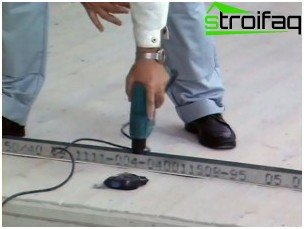
Guide profile mount
It is most convenient to cut profiles with scissors for metal, if they are not there, you can use a grinder.
- The first rack profile is mounted close to the wall and is attached to the rails on both sides using a notch. To improve noise and heat insulation, it is also advisable to cover this profile with sealing tape. Be sure to check the position of the profile with a level or metrostat – it should be strictly vertical. Then it must be attached to the supporting wall with dowels, the choice of their size depends on the material of the walls: for concrete – 75 mm, and for marl walls in a private house – 120-140 mm.
- Now you should install the remaining rack profiles. Their number depends on the planned load on the wall. If your design has only a decorative character, the racks can be at a distance of 120cm from each other. If you plan to hang a heavy cabinet on the wall – 40cm. Most often, the racks are mounted under the edges and under the middle of the sheet, that is, at a distance of 60 cm from each other. And only the second rack profile should be installed at a distance of 20 to 50 cm from the first. This is due to the fact that thinning will be cut from the drywall sheet, and, therefore, it will already become.
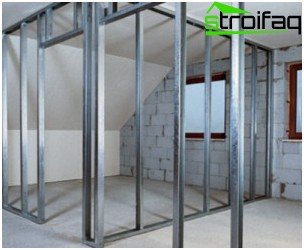
Correct location of rack profiles
Important! Whatever distance you choose between the rack profiles, the edges of the drywall sheets must always fall exactly on the center of the rack.
- Each rack should be attached to the guide profiles with a notch on both sides..
- If the length of your partition is not a multiple of the width of the sheet, make sure that in one m of the corners you do not have to fasten a too narrow piece of drywall (less than 30 cm). This will complicate the work and may further contribute to cracking..
- In places where horizontal joints of sheets will be located, it is necessary to install jumpers. This is done like this: with metal scissors we cut off pieces of a profile 10 cm long and fasten them to the posts at the required height. Then we insert a horizontal profile inside and fix it with a notch.
The frame is ready, you can safely proceed to the installation of the Civil Code.
Installation of elements cut out of drywall
- As you already know, thinning must be cut off from the edge of the first sheet of drywall that will form an angle.
Important! On the long edges of each sheet of HA there is a thinning, about 10 cm wide, it is necessary so that after laying and filling, the joints become invisible.
- We attach the first sheet of HA so that its uncircumcised edge exactly coincides with the center of the profile, and fix it with self-tapping screws for HA, 25 mm long. The mounting step along the edge of the sheet should be no more than 20cm, and in the middle of the sheet no more than 30cm.
Important! Do not screw the screw into the corner of the sheet – it will break. Step away from the corner at least 5-10cm.
- We fix the remaining sheets in accordance with the developed scheme.
Organization of a doorway in a plasterboard partition
If a drywall partition is provided doorway, it is with his organization that you need to start work. More precisely, after installing the guide profiles, install the reinforced rack-mount profiles of the doorway.
The easiest way is to take a beam of the required length and thickness slightly less than the width of the profile and insert it into the profiles forming the doorway. That is, if the partition is mounted from a profile 100 mm wide, take a beam 95 mm wide, insert it into the profile and fix it with wood screws in increments of 15-20 cm.
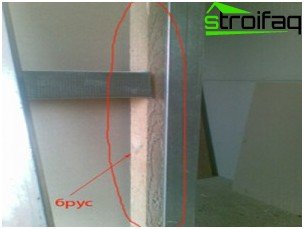
The doorway can be strengthened with a wooden beam
If there is no beam, you can strengthen the racks with a guide profile. To do this, it must be connected to the rack profile using metal screws.
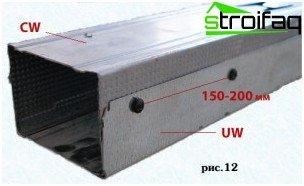
The method of connecting the rack and guide profiles to strengthen the doorway
Then the remaining racks are mounted as described above.
A door jumper is installed between the reinforced posts as follows:
- Measure the distance between the racks.
- Add 20 cm to the obtained value and cut a piece of the profile of the obtained length.
- Mark 10 cm from each end of the profile and cut its parallel sides without cutting the wide part.
- Then bend the profile at the incision 90 degrees (as if inward).
The jumper is ready. We fasten it over the doorway, measuring the necessary distance from the floor. If you intend to install a heavy door, the crossbar must also be strengthened. By the same principle, it is possible to make the remaining transverse jumpers used in the installation of the frame.
Installation of pipes and wiring inside a plasterboard partition
And one more significant advantage is the plasterboard interior partitions – with your own hands you can not only build a wall, but also hide water pipes and electrical wires. This is done at the stage of mounting the frame. It is necessary to put insulation on the water pipes, this will help to avoid the formation of condensate. Wiring inside the partition should be laid only horizontally and always in a special corrugation. It not only helps to protect the wires from damage, but also in the event of a fire emits gas that prevents burning.
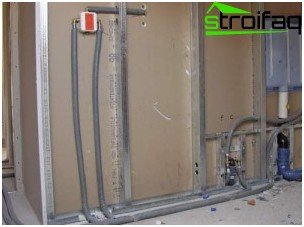
Water pipes can be easily hidden in the partition
Drywall insulation and soundproofing
If necessary, you can insulate the partition, as well as improve sound insulation between rooms. After you have finished lining the ledger one side of the partition, it is necessary to lay insulating material between the racks. As a rule, this is a mineral wool plate or expanded polystyrene.
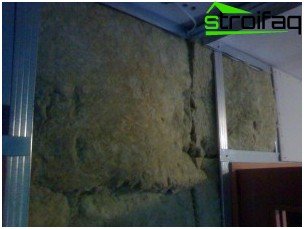
Warming and soundproofing of the partition with mineral wool plates
Important! If you chose polystyrene foam boards for the insulation of the partition, remember that this is a combustible material. In recent years, manufacturers are trying to get rid of this shortcoming and treat their products with flame retardant. Expanded polystyrene treated with flame retardant is marked PSB-S.
Now you know how to do partition in the room. Agree, this is quite simple. By the same principle, you can turn a studio apartment into a cozy home for a young family – to organize a separate nursery, separate the kitchen, etc. And most importantly – in this apartment everything will be exactly the way you want. Your home will be original not only in decoration, but also in layout. And in a standard apartment with the help of drywall partitions, you can bring some zest. And a private house gives unlimited scope for a flight of fantasy.


