Installation of interior doors
Interior doors – an indispensable element of the integrity of the interior in any room. Their competent choice (taking into account the nuances of style) will make them one of the main decorations of the room. But do not forget that in addition to aesthetics, doors are designed, first of all, to fulfill purely practical functions. Choosing this attribute of comfort, we mean its long and successful operation: about ten years, or even more. Do you want them to maintain their original specifications and not lose their original appeal? So the installation of interior doors should be at the highest level.
Content
- Instructions for those who want to install doors
- Dismantling the old structure
- Door frame assembly
- Stitching – responsible work
- Installing the box in the opening
- Landing the web without distortions
- Proper foaming of gaps
- Installation of additional elements
- Installation of platband according to the rules
- We crash the castle – finish
Even the most standard, at first glance, design with improper installation will not bring anything but disappointments. If the technology for installing interior doors is made clearly, without an absolutely inappropriate creative approach in this case, then you can be absolutely sure that:
- the door will hang straight;
- close easily, but reliably;
- there will be no excessive gaps;
- you don’t have to listen to “sound accompaniment” from squeaks and rustles.

Interior doors – a must-have interior element
So how to install interior doors? Is it possible to carry out this process independently, or rather – no worse than a professional?
The questions are certainly exciting, but the ability to clearly follow the plan and not break its sequence will help to cope with this event “perfectly”.
Instructions for those who want to install doors
The first step is to prepare all the necessary auxiliary equipment – so as not to make a “run” in the neighbors at the last moment, frantically looking for a hacksaw or screwdriver. What do you need?
Instruments:
- building level;
- saw;
- drill;
- screwdriver;
- pencil;
- roulette;
- chisel.
Materials:
- foam balloon;
- spacers, bars, wedges;
- screws.
Stages of installing an interior door:
- dismantling of the old structure (if necessary);
- box assembly;
- buttonhole;
- box installation;
- landing of a cloth;
- foaming of a new design;
- installation of an extension (if necessary);
- casing installation;
- lock installation.
Dismantling the old structure
Remember, it should be done very carefully so as not to damage doorway. File cuts are made at several points, and a box that has served its age is removed in parts. Do not overdo it – because you simply damage the wall. There will be a lot of garbage – much more than it might seem at first glance.
Door frame assembly
One of the most difficult and crucial moments. Why? The total amount of time that it takes to install the interior doors with your own hands depends on how competently you complete this stage..
The box comes in the form of three bars with allowances – two vertical and horizontal. The size of the latter in the porch should be equal to the width of the door plus 6-7 mm. As for the vertical ones, their required size on the narthex is the height of the canvas plus 10-15 mm. It is necessary to file elements at an angle of 45 degrees. And you need to do this with a high-quality circular saw.
Then the short and long bars should be laid as shown in the figure..

Box Docking Docking Scheme
Clamp the assembly and drill through holes of 2.5 mm diameter at the above angle. Unclench the knot. In a long element, the diameter of the holes should be increased to 4.5 mm. Perform similar actions on the other side. Pull off the items; make sure that there is no displacement.
Stitching – responsible work
First of all, the loops cut into the canvas. Prepare a pencil and tape measure and position the door in a convenient angle for you. Measure 30 cm from the top edge, draw a transverse line – this will be the middle of the first loop. Now take the “top card” (mom), attach it to the canvas, carefully align and circle with a thin pencil.
Important: do not forget to attach a loop and an end to mark its thickness.
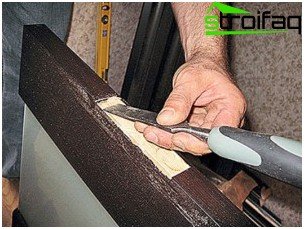
Now you can proceed directly to the sidebar. Once again, make sure that everything is marked correctly, take a sharpened chisel and hammer and punch, for starters, the contours, including the part that is designed for thickness. To cut a niche, use the hedgehog method. Lightly chop the area inside the contour with a chisel (strips about 5 mm), but strictly to the depth of the inset, then remove these strips. Voila – the niche is ready.

Niche for loops
Place it in the loop and secure it with screws. Exactly the same manipulations should be carried out for the second loop..
Having finished “wielding” with the canvas, you can start embedding loops in the box. To do this, attach the canvas correctly and, taking into account the necessary clearance, make appropriate notes. All your other actions will be similar to those described above..
Important: Do not try to measure the distance to the hinges in the box without the “participation” of the canvas – the design “will not converge”.
Installing the box in the opening
Put door frame in the opening, make sure the unit is in the wall correctly. Fix it with spacers and wedges so that some mobility still remains. The box must be installed strictly vertically in level.
Important: even if the wall has deviations, the block is still installed strictly vertically. When you try to “fit” the structure under the wall, you will only get spontaneously opening or closing doors.
After the exact installation, fix the box more firmly, evenly knocking out the wedges. Successfully get to this stage? So, you can already say with confidence that the installation of interior doors yourself is a completely feasible and solvable task. Now it’s up to the small.
Landing the web without distortions
Hang the canvas on the box. Open and close the doors several times. Observe how it fits on all sides, whether there are any distortions, even slight ones. If “defects” are detected, the design should be adjusted again. If everything is in absolute (!) Order, you can continue.
Proper foaming of gaps
How to install interior doors? Still wondering? You simply did not read the article. Otherwise, you would be interested in a completely different question – how to fix the newly made element of the interior in the opening? For final fixation, use foam, namely, fill the gap between the box and the wall with it.
Important: Foam during curing increases in volume by about 5 times! If there are no struts in the box’s lumen, this material will simply “mutilate” it.
Installation of additional elements
If the width of the box is less than the width of the wall, installation of additional strips is required. Wait until the foam has completely dried. Making doors to order will help you get rid of this need..
Installation of platband according to the rules
Platbands, having made all the necessary measurements, sawed off at an angle of 45 degrees. The junction mark of the fake and ceiling beam is the beginning of the corner. Fasten them with finishing nails..

Platband installation requires attention and accuracy
We crash the castle – finish
And, finally, the apogee of door mounting is an insert of the lock. It is produced in accordance with the instructions attached to the hardware. The optimal location of the door handle – meter from the floor.
In fact, if you go deeper and understand the intricacies of the process, almost any repair event can be carried out independently.


