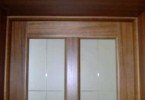
Installation and installation of drywall partitions
Increasingly, when starting repairs, the owners of an apartment, office or premises for other purposes are resorting to redevelopment. This is done in order to more ergonomically use the existing space in which the old walls are dismantled and new partitions made of modern building materials are erected. Particularly popular at the moment is the installation of drywall partitions, which requires a minimum amount of time, effort and money. This lightweight building material is an excellent alternative to conventional bricks and foam blocks, given the optimal combination of price and quality. Plasterboard sheets are also attracted by the simplicity of the arrangement of interior partitions, requiring a minimum of tools and additional materials.
Content
- Types of drywall for the construction of partitions
- A set of necessary tools for work
- Plasterboard partition: workflow technology
- Markup – the starting stage
- Installation of guide profiles
- Installation of vertical (rack) profiles
- Fixing drywall sheets to the frame
Types of drywall for the construction of partitions
- Drywall – a three-layer sheet consisting of building gypsum (grade G4), which is glued on both sides with thick paper. The width of the sheets is 1200 mm, the length varies from 2000 to 3000 mm, and the thickness is from 6 to 12.5 mm. Depending on the purpose of the room, you can choose a suitable version of drywall, divided into types:
1) ordinary drywall sheet (GCR);
2) moisture resistant (GKLV);
3) refractory (GKLO)
4) drywall with combined properties of moisture resistance and fire resistance.
- Guiding profiles PN (UW).Marking is different, so experts recommend focusing on the size of metal profiles. For the manufacture of partitions, guide profiles with sizes of 50×40, 100×40 and 75×40 are suitable. The length is a constant value equal to 3 m. To determine the desired number of profiles, the perimeter of the partition is divided into three and rounded to the nearest whole value. If the partition implies the presence of a double frame, then the number obtained in the calculation doubles.

Types of metal profiles for the construction of partitions
- Rack profiles PS (CW) differ from guide profiles by the presence of shelves on top, creating additional rigidity. The amount of these elements depends on which installation of plasterboard partitions is chosen. There are many options, so the calculation is carried out individually in each case.
- Corner profiles.
- Dowels for quick installation. They are used for fastening guide profiles. These fasteners can be replaced with simple black screws when working in a wooden house.
- Screws, whose length is 25 mm. They are used for fastening plasterboard sheets to a metal frame, and sometimes they fasten guides and wall profiles.
- Wooden blocks, which reinforce the construction of wall profiles in places involving the installation of doors.

A set of necessary tools for work
- Hammer drill. Without this tool, you cannot count on quick work. Its presence is mandatory if the room has reinforced concrete walls and ceilings. If the installation of drywall partitions is planned in a panel house or a house made of monolithic reinforced concrete, then you need to choose a reliable and powerful hammer drill for domestic use.
- The drill can replace the puncher if the installation of the partition is carried out in a wooden house.
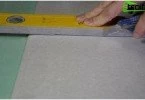
- Plumb line. In no case can you ignore the use of this tool, since it is precisely the plumb line that allows you to achieve high-quality work. In addition to devices known in the construction industry, laser plumb lines can be used, the modifications of which differ in the number of rays (two or four rays).

A plumb line will ensure installation quality

Laser device guarantees accuracy
- Level. Some experts replace the plumb line with two good long levels. However, accuracy indicators are deteriorating. In one case, the level is more effective than a plumb line: it is more convenient for them to check the accuracy of vertical profiles in the area of the doorway.
- Screwdriver. Makes the process of screwing drywall sheets to the profile frame quick and enjoyable. Those who have not yet acquired this tool necessary in everyday life and construction can use a drill, having bought the necessary nozzles in a set or piece by piece to it.
- Nozzle for screws. Available for screwdrivers, but they are great for drills..
Screwdriver bits
- Scissors for metal will be required for cutting metal frames in accordance with the size of the partition. You can replace this tool with a grinder or a machine, if they are already available. It’s not profitable to buy such tools for one-time use.
- A hammer. What else can you hammer dowels designed for quick installation.
- A wallpaper knife will be needed to cut drywall sheets.
- Roulette and pencil will help you mark up wherever you need it..


Plasterboard partition: workflow technology
From the point of view of the technological process, the installation of drywall partitions is divided into four stages, except for the mandatory implementation of putty and finishing finishing works. Work begins with marking, then the installation of guide profiles is carried out. Next, proceed to the installation of rack profiles.
At the fourth stage, strips of drywall sheets are erected on the erected frame. This is what a schematic work plan looks like. It is necessary to dwell in more detail at each stage.
Markup – the starting stage
They begin to make markings for the future partition from the floor, on which the front and back faces of the structure being constructed are applied with a pencil (marker). Then they deviate from the planned lines into the space of the partition by the thickness of the drywall sheet, that is, 1.2 cm (provided that the casing will consist of one layer). New lines are being drawn along which the guide profile will be laid out. Marks are transferred to the ceiling surface using a plumb line, drawing a straight line along them, along which a guide profile will also be set.
Installation of guide profiles

Mounting the frame from the profile
The profile is cut in accordance with the size of the future partition. Begin fastening the profile from the floor, then go to the ceiling. At the same time, experts advise not to forget about the use of self-adhesive sealing tape. It is glued at the junction of the metal profile to the mating surfaces, providing increased sound insulation of the structure. The profile is fastened to the main surface with dowels in increments of one meter, but not less than three for each individual frame element.
Installation of vertical (rack) profiles
These works are not very difficult, since vertical profiles are inserted into structures already fixed to the floor and ceiling. This ensures the presence of a metal profile in places of doorways and at the joints of sheets. It is also necessary to fix one profile in the middle between the docking elements. They are from each other on the width of the drywall sheet, equal to 1.2 meters. Thus, it turns out that the grill is performed with a step equal to a maximum of 0.6 m. Professionals recommend reducing the distance between vertical profiles to 0.4 m for greater frame strength. However, it must be understood that this is associated with additional costs, because the number of required profiles increases one and a half times. To strengthen the profiles, wooden bars having a section of 40×50 or 40×40 are used. This is especially important to perform at the location of the doorways. In the future, this will avoid difficulties during installation of the door. If the door is not implied by the project, then reinforcement can be omitted.
Fixing drywall sheets to the frame

Installation of drywall partitions
For the convenience of attaching drywall sheets to vertical profiles, their midpoints are marked on the floor and on the ceiling. Installation of interior partitions is completed by attaching drywall sheets to the erected frame, while first working with solid material. Then they begin to cut pieces of drywall, armed with a tape measure, a knife and the remainder of the profile, which will be convenient to cut a cardboard “shirt”. Having performed this operation, the sheet is taken “to break”, cutting cardboard and from the second side. If the resulting incision is uneven, then it is calibrated with a knife or a planer. Plasterboard sheets are attached to the metal profile with gypsum-metal screws, withstanding a pitch of 200-250 mm.
On this, the installation of the gypsum board partition is completed and the finishing work begins, within which the seams and the places for the screws to be putty are first putty. Then, if necessary, processing is carried out by puttying the entire surface of the partition. Finishing work finishes. The flexibility of the material opens up great opportunities for interior design of rooms in which all kinds of partitions play an important role.