How to plaster the ceiling
The ceiling is striking – this is a fact. Not always, of course, in the first place, but it rushes. When it is executed as evenly as possible, the room looks neat and presentable – even if you do not purposefully look up. Let’s talk about how to plaster the ceiling – after all, this is one of the most important stages in creating beauty and comfort in the house. Proper execution of work will allow you to forget about repairing surfaces above your head for more than one year.
Content
- Thorough preparatory process
- Flush or not flush?
- The primer will provide adhesion
- Ceiling beacons
Thorough preparatory process
For the best adhesion of the solution to the base, it is necessary to properly prepare the surface. First of all – to “remove” the old coating to the concrete. The base – the “bare” concrete ceiling – should remain completely clean after all manipulations.
Flush or not flush?
Do not “think” to wash off whitewash or putty! Thus, you will only spread white hard-to-remove dirt on the surface. Subsequently, the primer of the “concrete contact” type will stick to it either very poorly or not at all.
“Flushing” can be called a logical solution for the ceiling only if you plan only a slight redecoration – its simple “trimming” and updating; without thick layers of finishing materials. Otherwise, the plaster will have nothing left but to soak and pull off the rest of the putty. Moving away from the base, the plaster “zakuhtit”.
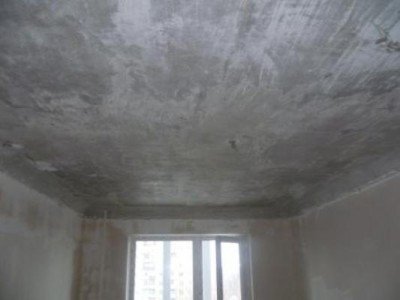
Type of ceiling prepared for plastering
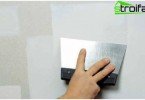
The primer will provide adhesion
After thorough cleaning of the ceiling, you can proceed to priming. The primer of the Betokontakt type incorporates special grains that form a surface roughness when dried – due to this, the plaster adheres to the surface much better. We leave the primed ceiling alone until the next day – the entire area should thoroughly dry.
Try not to overdo it with opening windows and drafts – the whole process should proceed as naturally as possible.
Ceiling beacons
Algorithm of actions:
- Use a hammer drill to drill holes in the ceiling. They should be centered and along the edges of the ceiling. Self-tapping screws will be screwed in according to the level of the rule – the distance between the holes will depend on its length;
- Drill the first hole, retreating from the wall about 30 cm, each subsequent one at a distance a little less than the length of the rule;
When using a two-meter device in the “standard” room, no more than three holes will be required – at the opposite walls and in the center.
- Hammer the dowel into each of the holes and tighten the screws, check each position using the level;
The check should be carried out not only along the length and width, but also along the diagonal;
- The next item is the formation of paths between beacons (from solution).
Attention! For the tracks, use the same plaster that will be subsequently plastered on the ceiling..
- The path should hide the caps of the screws;
- Take the perforated strip of the lighthouse profile and attach to the track. Using, again, the rule, push it into the solution until it stops with self-tapping screws, repeat the procedure with all the elements;
- Carefully coat the resulting beacons with a solution, especially carefully fill the voids along the rail;
- Now you can arrange a short break for yourself – it is necessary for the “setting” of the solution.
Important! According to some sources, all work after the installation of beacons should be stopped for 24 hours or more – in order to achieve absolute polymerization of the stucco mortar. This step is really justified – the risk of displacement and / or damage to the beacons is reduced. But on the other hand, the joints of fresh and hardened putties will be doomed to insufficient adhesion. This will adversely affect the strength of the entire ceiling area. The most reasonable solution in this situation is to plaster on relatively fresh lighthouses, while being as careful as possible.

Plastered ceiling in the kitchen
Stucco ceiling in steps
Do I need a reinforcement mesh?
It all depends on the thickness of the plaster layer. If it is 10-15 mm, then you can do without a mesh, limiting it to gluing it in places of seams between plates (rusts).
If the thickness of the plaster exceeds 20-25 mm, it is better not to rely on “maybe”.
Mixture preparation
Experts unanimously say that gypsum mixture is the most rational option for solving such a difficult task as plastering the ceiling with your own hands. Consider the solution preparation algorithm using the example of a Knauf gypsum Rotband mix:
- A plastic container must be filled with 18 clean water;
- Using a spatula, “attach” 1 kg of the dry mixture to water, mix thoroughly;
- Add the remaining mixture;
- Knead the solution with a drill with a nozzle;
- Ensure product uniformity;
- Leave the product for 5 minutes, then mix again.

Plastering
How to plaster the ceiling – the finish line
Apply the solution with a metal spatula or a grater previously moistened with water: the plaster will not stick to the tools. The layer thickness should slightly exceed the distance “beacons – the base of the ceiling”. Press the grater firmly to the ceiling so that there are no sinks or voids. So, the first layer is applied.
Now take a roll of mesh, unwind it a little and place it over your head. Using a grater or a spatula, press the mesh to the applied layer; at the same time, continue to unwind (along the beacons) the roll. Note! Using galvanized metal mesh for reinforcement, make significant efforts – “push” the composition through the cells.
After fixing the mesh, apply a second coat. Remove excess plaster as a rule (drag it along the beacons). The final stage is the removal of the beacon plates (aluminum can be left without touching). Seal the furrows with the remaining solution. The subsequent finishing work should begin after the plaster has completely dried (3-14 days).
Accuracy and strict adherence to instructions is an absolute key to success. It is worth noting that plastering the ceiling is not an easy task. If you still have doubts about your own competence, don’t take risks: contact experienced specialists.