We create garden decorations with our own hands
It is impossible to make the garden original with the help of trees and shrubs alone, because similar plants can be found among neighbors. Garden decor brings individuality: benches, small sculptural forms, bridges and, of course, unusual decorations. The assortment in the stores is quite large, but any little thing costs money, which is not always abundant. Therefore, gardeners who have plenty of free time, try to create a garden decoration with their own hands, using the simplest materials.
Content
- Jewelry made of stones: durable and can withstand any temperature
- Stone figures for lovers of bright decor
- Use of natural stones in garden decor
Jewelry made of stones: durable and can withstand any temperature
The cheapest material that can decorate the garden is stones. They literally lie under our feet: on the side of the road, in the fields, near the forest and even in their own garden. It remains only to assemble a batch of the right size and shape.
Stone figures for lovers of bright decor
Most often, stone is used to create decorative figures of animals, birds and mushrooms. Pebbles of a certain shape are found, as a rule, flat on one side, so that they lie stably on the ground. The convex side is painted with acrylics, which are not washed off by rains and do not fade under the sun..

Ladybugs look good on large boulders, at the foot of trees and shrubs
The simplest images:
- Ladybug. The stone is covered in red, allowed to dry, and then black dots and a small head with antennae are finished.
- Mushroom. 2 stones are found, one of which is elongated (for the leg), and the second is reminiscent of a hat. They are painted in two colors: the leg is white or cream, the top is brown or red with dots. Allow to dry. The leg is lightly dug into the ground for stability and covered with a hat. Stone mushrooms look more beautiful in heaps, several pieces of different sizes.
- Leaves. Stone leaves spread the original path. To create them, you need flat stones on both sides, with shapeless edges and black paint. It is necessary to brush veins on stones using natural surface recesses..
Use of natural stones in garden decor
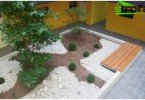
If you prefer a landscape where everything looks like in nature, then colored stones will not suit you. In this case, you can decorate the territory with real boulders. They look spectacular near the alpine hills, under old trees.

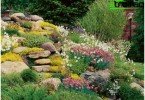
A scattering of large stones combined with sprouted decorative cereals looks like a picture from a natural landscape
Often flat boulders become original legs for a garden bench, and some owners manage to build a stone garden set with chairs and a table out of stone.

Since the stone furniture is quite cold, cushions, travel mats, etc. are laid out on the seat..
In Japanese gardens, stones dominate the rest of the decor. They are used in the design of fountains, create a rock garden, a dry stream and various sculptural compositions.

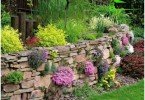
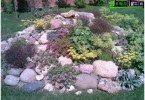
Pebbles can create all kinds of compositions on the ground, decorating the area where conifers grow
An excellent material for the natural landscape is river pebbles. It spreads paths, creates decorative panels between paving tiles, decorates arbors and patios..
A tree in a garden decor: ideas and necessary tools
In the process of building a house and preparing firewood for barbecue, there always remains wood waste: pieces of boards, lumps, crooked sticks, etc. All this is an excellent base from which it is easy to create decorations for the garden and kitchen garden. For example, chocks often lay the edge of the rabatka, track and painted in a bright color, in harmony with the colors.

To create a tall flowerbed, an old driftwood can serve as a support, the space between the branches of which is filled with earth and plants are planted there
Decoration by snags and stumps
There is also enough dry wood in the forest, where many summer residents periodically go for berries and mushrooms. The original driftwood can turn into a fairy-tale creature on the plot, a flower pot stand and even part of the flowerbed enclosure.

Thanks to the imagination of summer residents, ordinary driftwood can become a vivid image among garden trees
If the garden has an old dried tree, then it is not necessary to saw it under the root. It is enough to slightly shorten the branches, hoist the wheel from the car to the top, scribble brushwood and plant a sculpture of a stork. By the way, some owners simply create a nest in order to bring a real tile to their garden. You can’t imagine a better decoration.

The root system of a dried tree can become a nest for a stork, if it is turned upside down and washed from the ground
From stumps you can create garden furniture, if you have experience with a saw and hatchet. The dried tree is cut down to the level of the back of the chair, cut through the center through the line to the height of the future seat. One half of the stump is cut down or cut out, and the second remains a support for the back.

Wooden furniture will last longer if it is covered with antiseptic impregnation or varnish
A single stump can be turned into a forest guard by cutting through his eye sockets, attaching a beard from tow and jamming a makeshift cap from an old bag.

Figures of foresters are usually placed at the entrance to the garden so that the guard is visible to everyone around
Trio of musicians: a workshop on creating a wooden figure
To revitalize the garden, you can put wooden men in the most viewed place. It is very simple to create several figures from dried birch. In our case, it will be musicians.

The basis for the creation of the musician became birch logs.
You will need:
- thick and thin birch logs to create body parts;
- buttons
- old clothes;
- bow;
- attributes of musicians (children’s tambourine, 2 iron plates, etc.);
- a hammer;
- small and large nails.

Attributes in the hands of a wooden man can be easily replaced, turning the violinist into a fisherman, a hunter, etc..
Work sequence:
- We select 3 thick logs for the trunk, head and neck. The body should be of medium thickness, but long, the head should be wide and short, and the neck should be narrow..
- We decorate the head: we nail smaller buttons in place of the eyes, and for the mouth – big red ones. Pull on a cap, hat, bandana, etc..
- We beat a bow or butterfly to the neck.
- Decorate the body with buttons, imitating the fastener of a jacket.
- We create hands from 4 thin logs. 2 logs should be with an even cut, and 2 more should end with a fork or branches (to simulate fingers). First, we fasten 2 logs together, driving a large nail so that it passes through both components. It is most convenient to drive in when you fold the logs in an angle. Then the nail will pass along the side of one chock and will yell into the slice of another.
- We put the finished hands to the body and nail.
- Similarly, create legs using thin long logs. Nail them to the lower torso side.
- We put on pants, and from the bottom to the cut of logs and legs we nail shoes.
- We sit the musician on a stump or a flower bed so that the legs are stretched forward.
- We put the neck on top and the head on it.
- We give in hands (we attach or nail) musical instruments.

The microphone for the wooden soloist was an ordinary chock, on one end of which a cap from a deodorant was planted

Such a fun trio will become a bright accent in your garden.
Crafts from improvised materials: we use everything that we were going to throw away
Resourceful owners often come up with a garden decoration from improvised material, which is most correctly called household waste. This includes unnecessary plastic bottles, leaky shoes, leaky watering cans and buckets, broken children’s toys, etc. All this can be used to create an unusual decor, limited only by the imagination of the owner of the site.
Plastic bottles: turn into candles
If you want to create a garden decoration from plastic bottles, which have accumulated darkness and darkness in the house, huge candles can become a very original decor element. You will light them in the evenings, when the whole family is going to drink tea on the porch, and on New Year’s holidays they will become the very same Christmas candle that brings happiness and peace to the house.

The burning candle flame inside the plastic construction enlivens the evening garden, creating an aura of calm and coziness
You will need:
- plastic bottles with the same bottom (the number depends on the size of the future candle);
- old barrel or thick pipe (for frame);
- acrylic paint (choose the color you like);
- fishing line;
- decorative candle lamp;
- hammer and small cloves.
Work order:
- Cut bottoms at the bottles, leaving about 8-10 cm of height.
- We rinse them, dry them and in each side we pierce 2 holes through each side.
- We paint all the blanks in the desired color and set to dry.
- Paint the frame (barrel or pipe) with the same color..
- We put fishing line in the holes of colored bottles, connecting them in a row. The total length of the row should be equal to the diameter of the frame. We leave the ends of the fishing line long so that they can be easily tied together.
- We dig a pipe into the right place or turn the barrel upside down and also push it into the soil for stability.
- If you took the pipe as a basis, then you must close the hole on top. A plastic bucket lid matching the diameter of the pipe will do. If there is no lid, cut out a circle of the desired diameter from any plastic container and cover the hole in the frame with it. At worst – just wrap it with a film and pull it so that it does not sag.
- We start wrapping the frame with prepared chains of bottles from the bottom. The first row should be in contact with the soil.
- We tie the ends of the fishing line so that there is no free space between the bottles. Each row should snug against the frame..
- In this way we wrap the frame to the very top..
- The last row of bottles should not encircle the frame, but lie on it like on a roof, and be smaller in diameter than the others. In the center there should be space only for installing one riser bottle.
- To create a candle flame, take a transparent bottle with a neck cut off. Hold a little over the fire to give an uneven shape. Color red.
- Place a candle-lamp on top of the frame and cover it with “flame”. If plastic is loose, tighten the last row of bottles.
- It remains to wait for the evening and light the finished candle.
We hope that the presented decorative decorations for the garden aroused your imagination, and based on these ideas you will come up with your own version of the original decor.