Do-it-yourself foam bath
Choosing material for the construction of the bath, in the case of an extremely limited budget and the inability to use wood, it is worth paying attention to foam blocks. The foam block bath can significantly save on building material and construction time. Foam concrete blocks are a cellular material made of a mixture of cement, water and sand, therefore they are relatively environmentally friendly and harmless to health.
Content
- Advantages and disadvantages of foam block baths
- Stages of the construction of the foam block bath
- Tile foundation filling
- Prompt walling
- Installation of a roof structure
Advantages and disadvantages of foam block baths
Building saunas from foam concrete blocks is a rather risky undertaking. This material not only has a porous structure, its pore cells have an inhomogeneous structure and volume and are randomly distributed inside the block. Therefore, the thermophysical and mechanical properties of foam blocks are heterogeneous throughout the product.

The random distribution of the cells in the foam determines the unevenness of the technical characteristics of the material
In conditions of high humidity, paired foam gets wet, absorbing moisture like a sponge. In winter, after bathing procedures, the absorbed water freezes. In the future, this can lead to cracking of the foam blocks and the appearance of shells..
Experts assure that this problem is solved by special hydro and thermal insulation inside and outside the building. To trust this statement or not, everyone decides independently.
The construction of a foam block bath is also undeniable advantages:
- Foam concrete structures do not shrink, such as a wooden house.
- The room can be operated almost immediately after construction and finishing.
- Very fast to build.
- You can build it yourself without outside help.
- Low cost, almost two times lower than a wooden bath.
- The naturalness of the material.
- Foam blocks are more fireproof.
- Low weight construction.
- Convenience of transportation, storage and laying of foam blocks.
disadvantages foam block baths:
- Foam concrete absorbs moisture.
- The occurrence and accumulation of condensation inside the walls.
- The possibility of the appearance and propagation of fungi inside the foam concrete structure.
- After condensation freezes, the walls may collapse from the inside..
- Fragility of design.
- Less natural and environmentally friendly compared to wood.
Nevertheless, a bath from foam blocks with one’s own hands is quite an acceptable option, if there are no means to spare, it is not possible to hire workers, and there are no assistants either.
The steps and nuances of building foam concrete baths are described below..
Stages of the construction of the foam block bath
Tile foundation filling

For a “light” bath building from foam blocks, it is quite enough to fill in a shallow strip foundation
Before you build a bath from foam blocks, you need to build a foundation. Most often, these saunas are built on a light strip foundation, because foam concrete walls are quite light. This can significantly save money..
- First of all, we dig a pit in the form of tapes around the perimeter of the structure with a depth of 600 mm. Widths of 300 mm will be enough.
- Using the level, we precisely mark and place the pins in the corners and perimeter at a distance of 1900 mm from each other. For greater accuracy, pull the cord and check the alignment of the pins.
- We make a frame of reinforcement with a diameter of 12 mm.

Base frame made of reinforcement with a diameter of 12 mm
- We assemble the formwork from boards with a width of 250 mm.
- Pour concrete.
- Inside the flushing foundation, we lay a sewer and a receiver with a diameter of 100 mm. Lay the grid on top.
- We mark the upper level of the screed and pour 1 m3 of concrete. If the height of the foundation is about 700-750 mm, this is quite enough for a light foam concrete bath. We continue further work only after the concrete has completely dried.
- We waterproof the foundation with a two-layer roofing material.
Prompt walling

The erection of the walls of the bath from foam blocks takes two to three weeks, the masonry technology is similar to bricklaying, but the large dimensions of the elements allow the walls to be folded much faster
We build a bath from foam blocks of the M25 brand having a density of D700.
The technology of erecting walls made of foam concrete is not too different from the construction of brick.
1. First, determine the highest angle of construction using the level. It is from him that we will begin to lay blocks.
2. We lay the first row of foam blocks and fasten them with cement-sand mortar.
Important! Foam blocks must be laid on the edge. We try to make the seams as small as possible. This is necessary so that the heat from the bath is not lost through the cracks.
3. The surface of the first row is carefully aligned, we put the blocks in place, tapping with a rubber mallet. Here we can compensate for all the differences in the foundation and ledges. The quality of the entire structure depends on the quality of this stage..
4. All subsequent rows are constructed only using special glue. We buy a dry adhesive mixture in bags, pour it into a container, dilute it with water and knead with a drill with a whisk. The kneading process takes no more than 5-10 minutes.
5. Foam blocks are smeared with glue with a thickness of not more than 5 mm and laid in the second row. There is no need to wait for the glue to dry..
6. All subsequent rows are constructed according to the algorithm. Check the horizontal and vertical levels through each layer..
Important! The use of glue is necessary not only in order to strengthen the structure, but also in order to minimize the gaps between the blocks and the “transition bridges”. It is through them that heat is lost from the room.
7. Through each three rows of foam blocks we lay a reinforcing metal mesh.
Do not forget to leave space for door and window openings.
Do-it-yourself foam baths are built in about two to three weeks.
Installation of a roof structure

Installation of the rafters for the bath is carried out in accordance with the general building standards
The roof of the bath is most often performed by a gable roof.

Scheme rafters for the roof
1. On the longitudinal walls we lay Mauerlat, a bar of at least 180 mm thick. We fix it with anchor bolts.
2. We make a rafter template. To do this, take two boards, connect from the edge so that the scissors turn out, fasten with a nail. The free edges of these boards are installed on the base of the rafters. We select the necessary slope of the roof and fix the angle with the crossbar. We fasten it with screws so as not to break the corner.
3. We take beams with dimensions of 150×500 mm. We attach a template to them and mark with a pencil how to correctly cut the corner.
4. Cut out all the rafters according to the prepared template. We fasten them with screws, and in the place of crossing we screw in three screws, just in case.
5. Raise the frame of the rafters on the roof, install it on the edge of the building, on its base. Mark the junction of the rafters with the Mauerlat.
6. We make cuts at the joints of the rafters with the Mauerlat, we use linings, metal staples.
7. We make the following frame of rafters. And set at the edges of the structure. Between the frames we stretch the cord. We fix the truss trusses with supports, setting them at an angle to the rafters.
8. We cut out all the other truss trusses and install them, making a step of 500 mm, we position them clearly along the cord.
9. For the crate, we take 100×400 mm boards. We fix them on the rafters with self-tapping screws with a step convenient for laying insulation.
Important! The distance between the rafter leg and the chimney must be at least 400 mm.
10. The rough ceiling is made of 25 mm boards, fixing them between the rafters. We lay on top a foam plastic 190 mm thick. From the top we lay the final floor of the attic from the board 25 mm.
Important! For equipment ventilation in the ceiling of the bath of foam blocks it is imperative to make two holes.
11. We cover the roof with roofing material.
12. Nail the ridge detail and make a galvanized steel collar around the chimney.
The roof is ready. Attic space can be insulated with modern materials..
Finishing a foam block bath
It is mandatory to carry out internal and external wall cladding from foam blocks. Otherwise, the structure will not last long. It was written above why. It is in order to protect foam from moisture, and bath decoration.
To begin with, we impregnate the foam blocks with hydrophobic compounds. Then we lay an insulating film.
We make vapor barrier using vapor-tight membranes, fixing them between the wall and the cladding.
After carrying out waterproofing procedures, we carry out an aesthetic lining inside the bath.
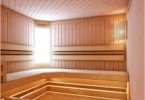
Most often, the inside is lined with wood so that the pleasant smell of essential oils fills the room, and in order to somehow compensate for the fact that the bathhouse is not made of wood. Use pine or spruce.
Sometimes baths are plastered inside, and painted with polymer paints on top or tiled.
Foam bath: photo examples of interior decoration

Inside the bath, foam blocks are finished with clapboard – like other types of baths

The portal of the furnace is tiled

Canopies and aspen interiors are healthy and do not emit tar.

Canopies and linden interior – beautiful, durable and useful
In the photo, the baths of foam blocks in the steam room are sheathed with aspen and linden. These types of wood are excellent thermal insulation material. In addition, aspen and linden do not heat up under the influence of high temperatures. Aspen self-preserves under the influence of moisture.

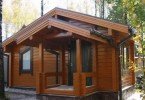
Finishing the bath of foam blocks with a hinged facade
For external decoration, it is better to use curtain-type facades that are well ventilated and allow excess moisture to escape into the atmosphere from the walls. Outside they protect against environmental influences..
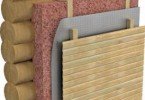
Thermal insulation of the bathhouse

Warming of the walls of the bath from mineral blocks of mineral wool
Bath insulation of foam blocks is categorically necessary to reduce the cost of heating the room and retaining heat.
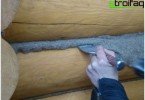
- First you need to insulate the foundation and the subfloor. Pour a layer of expanded clay and slag under the floor. We warm the foundation with mineral wool mats. To prevent moisture accumulation, we make a ventilation hole from the inside of the foundation.
- We isolate the walls with foil.
- Slots in the window openings caulk. We seal any joints.
- Doing the doorway as small as possible.
The construction of the foam block bath is completed. Now you can relax and do its internal equipment and selection of furniture and accessories.