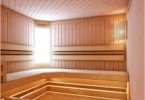
Glued or profiled beam bath
Those who want to build a house from a bar, but are not confident in their abilities, can start with a simpler structure – for example, a bath. From ancient times, the bath was considered a place where a person could relax, restore their health, and not just cleanse the body. Materials for its construction were chosen exclusively natural. To this day, a tree is considered traditional. But not everyone will be able to cut down walls from a round log, like an old one, and it will not be required. Nowadays, there are simpler, beautiful, durable and practical materials. A great solution would be a glued beam bath.
Content
- The advantages of glued beams
- The main stages of the construction of the bath
- The foundation device under the bath
- The erection of walls from timber
- Roof construction, options
The advantages of glued beams
In the market of construction technologies, an ordinary beam has long been popular, however, it has several disadvantages. In order to eliminate them, the specialists have developed and introduced the production of glued beams, which, while retaining all the advantages of wood, is free from its shortcomings. In addition to the usual form, glued profiled beam is widely used. Its feature is the presence of grooves and ridges, which during construction provide a reliable connection of the bars and their tight fit. Various technologies for the production of glued beams make it possible to obtain building materials of different quality and cost. The beam can be glued from solid boards, or from individual pieces. There are options when only face lamellas are solid, or a bar made of different types of wood.

Glued beams – a great alternative to logs
There are several reasons why it is better to choose glued beam. The main ones are:
• buildings from it are being built very quickly;
• structures from glued beams do not shrink;
• it does not rot, is not affected by fungi and insects;
• this material does not crack, does not dry out and does not change its geometric shape;
• the beam has an aesthetic appearance, which will save on finishing materials.
The main stages of the construction of the bath
The construction of a bath from a profiled timber is even under the strength of a not very experienced builder, if he is patient and has elementary skills.
After an important stage of planning, which will clearly determine the size of the building and its “filling”, you can get down to business.
The foundation device under the bath
Like every building, a bath of profiled timber begins with the foundation. Some advise to pour the foundation after the log house is built, but most are inclined to think that it is much more convenient to first fill the strip foundation, and only after that proceed to the construction of the bath. It is necessary to ensure that its surface is even and strictly horizontal, and the angles are even. Metal pins are embedded in the foundation, which will subsequently hold the beam. When constructing the foundation, pay attention to the following:
– its width should be greater than the thickness of the beam by about 10 cm;
– the total height of the foundation depends on many factors, but on average about 500 mm;
– the aboveground part protrudes no less than 150 mm above the blind line;
– waterproofing is carried out along the entire perimeter of the foundation without a gap.

The strip foundation is the best option for a beam bath
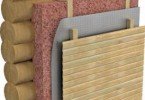
To perform waterproofing, more often they use roofing felt, roofing felt or other moisture-proof material, cut previously into strips whose width is at least 50 mm wider than the foundation. They are laid end to end, without passes, preferably in two layers. The joints of the paintings of the first and second layer should not coincide. The insulation is neatly laid on top of the insulation. Then the salary is laid, which is the basis of the log house.
The erection of walls from timber
Walls made of timber are much easier to fold than logs. As an option, many companies offer to buy a bath from a bar in the form of a ready-made set, like a large designer. Details are marked and prepared, it remains only to assemble them, according to the instructions. If this option does not suit you, then it’s quite possible to do everything yourself. It is important to remember that laying the lower crown (as the finished row of the beam is called) is the most crucial stage, because the beam of which it consists is in the most adverse conditions, and its condition determines the service life of the entire structure. The first row is continuous – this is the connecting link between the foundation and the walls.
For walls, a beam with a section of 15×150 or 150×180 is used, and for internal partitions 150×100 mm (150mm height). For the lower 2-3 crowns, it is advisable to use larch, since it is practically not subject to decay. The following rows can be made from other types of wood, but pine is more often preferred. The first crown is treated with an antiseptic from all sides..

Types of joints for bundles of angles
In accordance with the existing floor plan, the number and length of bars for each wall, including partitions, is determined. Then templates for all angular and longitudinal joints are made. Using a template, the same size blanks are made for several crowns. It is important to choose for yourself 2-3 of the most simple and convenient joints for splicing beams and bundles of corners. The principle is ease of implementation and reliability. When performing a salary, it is recommended that the corner connection (regardless of the method of connecting the subsequent rows of the box) be made with a half-tree cut. For greater reliability, the corners of the two upper corners of the log house are also formed.
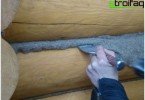
Next, the assembly process itself begins. The procedure is simple: the beam is laid on the foundation tape, close to the pins and mark the points where there will be holes. After that, through holes are made through the beam to the middle of the underlying one, and the corresponding grooves or spikes are cut at the ends of the bars, depending on what type of connection is selected. A nail is hammered into the lower one, the length of which is two heights of the beam, a heater is laid along the entire length of the workpiece, then the beam is put in place. Axes are cut down approximately 2 cm to prevent gaps..
When joining the bars, it is necessary to ensure that the joints do not coincide on adjacent rows. If there is a whole beam on one row on the left, and a segment on the right, then on the next, vice versa. The entrance door block is set on a salary without a cut strictly vertically, this will help strengthen the entire blockhouse. The window is better to choose a small triple-pane window. Above the door and windows it is recommended to leave a free space, which is subsequently closed up.

Glued timber walls do not require additional finishing
If the acquired profiled beam turned out to be of not too high quality, then you will have to resort to small tricks that will help give it a more presentable look. Before installation, after trying on the beam, the inner side is planed and the upper rib is slightly mowed, which will allow moisture and condensation to drain more easily on the walls.
In this way a neat wall surface is obtained indoors. Outside, you can finish almost any decorative materials. The bathhouse will only win, because it will become much warmer. Complete the construction of the walls with the upper crown (Mauerlat), which serves as a support for the ceiling and roof.
Roof construction, options
You can choose the roof option with or without an attic. In the first option, it is necessary to first install the ceiling, and then the roof is installed, either single-pitch or gable. Uncoated covering is a roof combined with a ceiling; it is most often made shed and used for very small bathhouses.

The construction of the roof of the bath is carried out according to the standard technology for all wooden buildings
For a larger bath, it is also suitable, but in this case it is better to choose the gable option. Enterprising owners can choose the original option, in which a solarium is arranged on the roof of the bath. Of course, he makes high demands on the strength and insulation of the roof, but on the site there will be another recreation area.
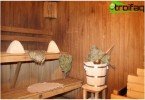
Bathhouse is a great place to relax with friends and family. And a wooden bathhouse – all the more since it has a beneficial effect on the body and promotes relaxation. Having carefully and accurately completed the construction work, each owner of a suburban area can also become the owner of a beautiful bathhouse, which can be built from glued profiled timber with your own hands.