Garage from cinder blocks
Block construction is deservedly considered one of the most popular technologies for the construction of buildings for various purposes. A cinder block garage is an excellent way to equip a “motor home”, which is equal in quality to a favorite of all time – brick. The technique, which appeared in the 70s of the last century, is more relevant today than ever, because it allows you to get reliable housing for a faithful companion – a car in a short time and at minimal financial cost..
Content
- Cinder block – material characteristic
- Where to start construction?
- The project is an important component
- How much cinder block is needed for the garage?
Cinder block – material characteristic
Cinder block is obtained by concrete pressing, the main components in the manufacture are blast furnace slag and ash. Although sometimes there are cheaper fillers – brick fight, gravel screening, sand, shell rock. Among other things, to increase thermal conductivity, manufacturers add expanded clay, polystyrene, perlite.

Cinder blocks have a porous structure, light weight and large dimensions – the combination of the most attractive qualities for builders
The density of the cinder block depends on the composition, most often this indicator varies in the region of 500-2000 kg / sq.m. Blocks are produced in two variations: hollow (weight 15-21 kg) and solid (up to 27 kg). Some, focusing on affordable cost, mistakenly believe that a cinder block garage is an unreliable thing, but it is not. Cinder block structures are durable, resistant to fire, their service life is at least 50 years.
Inside, the cinder block is porous, in shape resembles a brick, but with hollow holes. Blast-furnace cinder block (it is suitable for construction) consists of granular particles from 2.0 to 8 mm in size. The larger the particles, the lighter and lower the thermal conductivity.
Where to start construction?
So, if you decide to build a garage of cinder blocks with your own hands, you must do the following before starting work:
- to analyze the terrain, determine the type of soil, the level of groundwater and soil freezing;
- assess the distance from communication lines (water and light);
- create a project for the future garage;
- determine the type of masonry and calculate the necessary materials.
The project is an important component
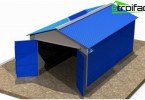
The project is the initial step to assess the scale of the event. Many beginner builders are scared by this word, inevitably causing associations with a heap of drawings. Not at all. It is enough to describe everything that you plan to create on one piece of paper. This will help organize data and speed up the process significantly..

Construction begins with a project
It is important to determine the purpose of the building: will this place be only for storing a car or for repair, too? Do I need a cellar, manhole? What sizes do you want a garage and how much for all this do you need consumables?
It is important!
A well-thought-out project will help you foresee a lot of significant details and nuances of construction that cannot be missed.
How much cinder block is needed for the garage?
This question, perhaps, concerns first of all everyone who plans to erect a garage building.
Calculation of cinder blocks for the garage is done like this: let’s say the structure will have dimensions 4x6x3 meters. The standard dimensions of the cinder block are 390x190x190 mm. The width of the wall we get 190 mm. 1 m2 will fit 13 blocks. We calculate the area. Multiply the perimeter by height (20×2.5 m = 50 sq.m.). Let there be a standard gate size – 3×3.2 meters. The remaining 43 sq.m. multiply by 13 and get 599 (the number of cinder blocks for the garage).
We build from cinder block with our own hands
After obtaining a building permit and purchasing the necessary materials, you can proceed to the main part of the work.
Territory breakdown and excavation
At this stage, the plan that you sketched on paper should be transferred to the real area. To do this, you need wooden pegs 40 cm long, a sledgehammer or heavy hammer, tape measure, a nylon cord (40 meters).

Territory breakdown
For precise reference to the territory, you need to know the location of the corners of the garage, if you are guided by the line of walls of existing buildings, this will be easy.
The trench under the strip foundation should be 40 cm wide, the depth is selected based on the level of freezing of the earth (60 cm-1.2 m). The bottom of the trench should not be loose, i.e. soil must be removed to layers with natural density.
It is important!
The walls of the trench should also be given close attention: they should be level..
We equip the foundation for the garage
Foundation construction can be carried out in various ways. The simplest in execution is but concrete. A quarry stone is laid in layers dug in a trench, the layers are poured with cement. Cement use at least 150 marks. For this, Portland cement (PC) 400 is mixed with sand at the rate of 2.5 buckets of sand per bucket of cement. Water is added to obtain the mobility of the mixture..
Building a basement, walls and garage doors
For the construction of the plinth, a wooden formwork should be installed around the perimeter of the trench. The optimal width of the boards is 10 cm. If the platform is not very even, the highest point is taken as the basis, add 10 cm and mark the horizon from this distance. The basement is horizontally waterproofed from two layers of roofing material. This stage is necessary so that the walls do not absorb moisture from the ground.
The gates are best installed before the walls are erected, so they will be fixed in the masonry as they are erected. For strength, embedded elements are welded to the gate frame – round rods with a diameter of 12 mm, which are then sealed with masonry seams.

Gate setting
It is important!
Before installation, the doors are painted in two layers.
They need to be installed strictly vertically, which is checked by a plumb or level, and fixed by braces of wood.
We lay the walls with the traditional “brick”, i.e. when the next row overlaps the seams of the previous one. You need to start laying from the corners, then we pull the cord between them and continue working.

Masonry walls made of cinder blocks are similar to brickwork, but due to the size of the material, it is much easier and faster.
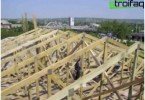
We build floors and roof
For overlapping, it is worth stocking up with I-beams 120 mm high. Please note that the length of the beams should be 25 cm greater than the width of the room. Beams should be laid across the garage in increments of 80 cm so that they repeat the slope of a long wall.
After laying the beams, we proceed to suturing the resulting overlap. From the bottom, we lay as tightly as possible the boards with a thickness of 40 mm. We lay the roofing material on top of the boards, and on the roofing material we lay slag, expanded clay or semi-rigid miniplate.
It is important!
The roof should protrude 20 cm from the back and front – such peaks will protect the wall in the rain.
On top of roofing material and slag, it is necessary to make a screed with a thickness of at least 20 mm. The roof is almost ready, it only remains to protect it from moisture with the help of aquaizole or rubemast. The screed is pre-coated with a primer, otherwise the waterproofing will not stick.
We make a blind area and floors
Garage floor Equipped at the basement level. The thickness of the concrete screed should be at least 10 cm. The earth is cleaned, leveled, if necessary, covered with sand or small gravel. It is better to fill the finished concrete M200.

Concrete floor screed
The concrete mixture must be poured in layers, continuously. If there are beacons, then the concrete is neatly laid between them. Ready floor after setting overwrite.
The blind area 50 cm wide is performed in a similar way. A layer of concrete 5 cm thick is allowed here. The blind area should have a slope for the removal of melt and rainwater.
Finishing and insulation
As for the finish, the garage of cinder blocks does not require anything supernatural. You can wipe the walls with cement, plaster and whitewash.

The garage does not require special finishing, but if desired, it can be plastered or sheathed with a clapboard
Warming is carried out at will. As a heater, fiberglass or polystyrene is suitable. The next layer is a plastic film, which will not only protect against moisture, but also improve the properties of the heat-insulating sandwich. Final touch – GKL patch.
You finally decided to build a cinder block garage. Do not forget that masonry of bulky material with technological voids has its own nuances.
The work is completed. Now you know how to build a garage from cinder block, which means that your car will have a reliable house where it will always be comfortable and warm.