Observation pit in the garage
It just so happened that motorists in our country prefer to “poke around” in their “iron horses” on their own, not always trusting the car with service center specialists. Indeed, the truth is that most of the work on small and medium repairs, as well as periodic maintenance can be done independently. If you have certain skills and desire, do not apply the same every time you change the oil to the service station. It can be completely drained by yourself, for this you just need a viewing hole.
Content
- The specifics of the construction and arrangement
- We plan, we consider the sizes
- Do-it-yourself inspection pit
- Standards – guidelines for the builder
The specifics of the construction and arrangement
The inspection hole in the garage has several advantages, it will help to solve many issues on its own, but it has one significant drawback – it is a source of high humidity. Even a well-insulated pit contributes to the formation of condensate. The bottom of the car, constantly standing above the inspection hole, is highly susceptible to corrosion. And not only the bottom, but also such important load-bearing structures as spars can rot “once” from constant exposure to moisture. Therefore, experts recommend constructing a garage in such a way that it has at least two zones for a car: one with a pit for repair work, the other without a pit for parking the car. If this is not possible, then you will have to build a pit under the machine, but very well waterproof it.
Before you build a viewing hole, without fail, find out what is the level of groundwater occurrence in the area. If the groundwater level is higher than 2.5 m, the construction of a viewing hole in the constructed garage will have to be abandoned. If the construction of the garage has not yet begun, but is only planned, then it is necessary to equip the drainage system, which will divert water to the collector or a special well. When the groundwater level is below 2.5 m, there are no contraindications for construction.

The inspection hole must be kept closed so as not to damage the underbody of the vehicle with moisture emanating from it.
Important! Always keep the inspection hole closed when not in use. No matter how thoroughly it is waterproofed, it is still a source of high humidity. In hot summers, the pit can be drained. To do this, leaving for several tens of hours, and preferably days, leave it open. And if it is possible to leave the garage in the country house open for several days, it will be even better.
We plan, we consider the sizes
The optimal dimensions of the inspection pit depend on the size of the car, the height and dimensions of the owner. You can adjust the width of the pit for the current car owner, but this is not always advisable. After all, cars change, over time you will want to have a new one, a different one, and the dimensions of the inspection hole are adjusted to the old one. What to do? Immediately make the width more or less standard.
The width of the inspection pit should be such as to take into account the size of the vehicle’s wheelbase and the dimensions of its owner. If the “base” is more or less standardized, and the owner has no more than average sizes, then it is advisable to make a pit of standard sizes. For most vehicles, the universal inspection hole has a width of 75-80 cm.
The depth of the inspection pit is calculated depending on the growth of the host. It should be such that, standing at full height, it was convenient to “get” to any unit. At the same time, without bending over or crouching. It is considered optimal that the depth of the pit must be made 10-15 cm more than the growth of the host.
Important! It is advisable to dig a hole deep enough. Even if the depth is too large, at any time you can raise the floor or put something on the bottom of the pit.

The inspection pit must be located in the middle relative to the entrance to the garage for the convenience of maneuvering a car
The length of the inspection hole may vary depending on the length of the vehicle or the preferences of the owner. The pit is considered 1 m longer than the car, so that it is easy to go down and rise from it..
Important! The pit can be short if it is planned to carry out repairs together. And it can be long if the dimensions of the garage are designed for two cars in a line located by a “train”.
Total we receive, a universal viewing hole – the sizes: 5 / 0,8 / 2. Where 5 m – length, 0.8 m – width, 2 m – depth.
Do-it-yourself inspection pit

Scheme of arrangement of a viewing hole in a garage
Before starting construction, it is imperative to check the groundwater level. If it is higher than 2.5 m, then we will make a drainage system. If below 2.5 m, no drainage is needed. We will consider the option of constructing a viewing pit requiring groundwater drainage. As we already said, this is possible only at the stage of construction of the garage itself.
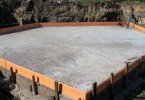
The device of the inspection hole in the garage begins with digging a pit:
- We calculate the depth of the pit, taking into account the depth of the inspection pit + floor thickness + thickness of the waterproofing layer + thickness of the “pillow”. For the width of the pit, add 40-50 cm to the width of the pit. We dig a ditch with all allowances.
- We fall asleep 10 cm layer of gravel, ram. Top up with a 5 cm layer of sand, also tamp.
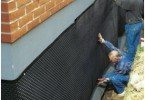
- On the perimeter we dig out drainage trenches 30-50 cm deep.
- At the bottom of the trenches we spread the geotextile canvas, wrapping its edges 80 cm beyond the walls of the trench.
- We fall asleep 5 cm layer of gravel. We lay special drainage pipes on top.
Important! Perforated ceramic, plastic and asbestos-cement pipes are used as drainage pipes. For their functionality when laying, a slope of 1 cm per 1 meter is made.
6. Pour a 20 cm layer of gravel and wrap the resulting structure with the edges of geotextiles.
7. The future floor of the pit is covered with a small layer of clay, rammed.
8. We spread roll waterproofing. Both a plastic film and a roofing material are suitable.
9. We make the formwork for the floor, install the reinforcing frame or mesh and fill it with concrete. It is advisable to use waterproof concrete.
10. When the floor is completely dry, waterproof it again.
Important! For the construction of walls, you can perform brickwork, or you can fill in monolithic concrete. In the case of a high groundwater level, it would be more expedient to make the walls monolithic..
11. Therefore, on the walls of the ramming a layer of clay, which will serve us as a clay castle.
12. We spread the waterproofing, combine it with the waterproofing of the floor, carefully treating cracks, joints and edges.
13. We prepare the formwork for the walls, reinforce it and fill it with concrete.
14. After complete drying, proceed to the finishing of the walls and floor. You can plaster the walls, you can finish them with tiles, fiberglass plates, etc..
15. From above we install the so-called safety rail so that the car does not run into the pit. A 60 mm metal corner can be used for this. From it we weld the frame along the length and width of the pit. We lay it on the pit and concreted.

The frame from the metal corner will be the support for the boards closing the pit
16. The frame from the corner will serve us not only as insurance, but also as a convenient support for the boards closing the pit. We buy boards at least 40 mm thick. Trim them to the required size and lay them in the frame.
Important! If you use boards of smaller thickness, then in case of accidental collision of a car on them, they will crack. And the board “forty” or even “fifty” can easily withstand the collision of 2 tons of transport.
For better waterproofing of the inspection pit, you can stretch a thick plastic film over it and crush it with boards, installing them in the frame. This trick will help to avoid condensation on the bottom of the car..

The painted metal ladder is easy to operate: it can be mounted on any wall and can be easily removed if necessary
For the convenience of descent into the pit, steps can be provided in it from the side convenient for the owner. And you can make a ladder that will not take up much space and can be easily removed if necessary. It is undesirable to make a staircase wooden due to the increased humidity in the pit. An optimal painted iron staircase.
Standards – guidelines for the builder
If you are interested in whether there are any documents regulating the construction of the inspection hole in the garage, then the answer is yes. There are such documents, their list can be found in table No. 1.

Normative documents regulating the construction and operation of inspection pits
Remember, decide whether to equip a viewing hole in the garage or not, preferably before the construction of the garage. This will allow you to fulfill all the necessary recommendations for arranging waterproofing and drainage work. Completely built inspection pit to save the car from unwanted moisture.