How to tile in the bathroom
An ordinary person who wants to transform the look of the bathroom has minimal construction skills or does not have them at all. And the repair in this room is quite complicated, therefore, requires detailed consideration. After all, even expensive tiles, laid unprofessionally, look ugly, and in the worst case, you will need to redo all the work. To prevent this from happening, this article will address the issue of how to lay tiles in the bathroom.
Content
- Start: projects, calculations
- Ceramic tile advantage
- Tips for those wishing to choose wisely
- Surface preparation is a tradition
- Leveling before laying
- Priming is an important process
- Glue preparation rules
- Correct tile cutting
- Secrets of good styling
- Tile Laying Technology
- How to clad the floor
- Laying tiles around obstacles
- Video help for beginners
Start: projects, calculations
Firstly, if the redevelopment of the room is planned, then first you need to take up the project, which indicates the dimensions of the new partitions, walls, doors. It is also necessary to analyze whether the water supply and sewage pipelines will be closed in some way, think over the ventilation system and enter all the data into the project.
Important: access to water valves must be convenient and easy..
Secondly, a plan for future cladding is being drawn up. This includes the following points:
- options for adjacency to electrical and plumbing fixtures;
- cutting and joining tiles in the corners;
- joint width;
- the color of the grout;
- styling design: the height of the various levels, the order of decoration with different types of tiles, borders, friezes, inserts, decor. The choice of color, size, layout options;
- counting the number of ceramic tiles in m2 and pieces. Then you need to add 5-10% in reserve to this figure: the percentage depends on the number of corners and places of cutting;
- calculation of the amount of consumable material: tile adhesive, fugue, primer. Basically, 1 glue bag, 1 kg of grout is consumed on 4 m2 of surface.
Ceramic tile advantage
Tile decoration in the bathroom is the most common type of decoration. Why is this material so popular? The answer to this question is the advantages of ceramic tiles:
- high strength – the surface serves a long period;
- the tile does not burn, does not emit toxic substances;
- moisture resistance – in rooms with high humidity indicators this is the most ideal material;
- wear resistance – this parameter is more relevant to floor tiles, the best confirmation of this is underground passages, trading places, because there such a coating resists a huge flow of people;
- slip resistance – additives of abrasive sand to the glaze cause the fact of anti-slip;
- easy maintenance – just wash the tiles with water and wipe with a damp sponge;
- chemical stability – this coating is not afraid of exposure to alkalis, acids;
- does not fade.
Tips for those wishing to choose wisely
All necessary information is on the packaging:
- if the material is intended for walls, then a hand is depicted;
- black foot on a white background – floor tiles;
- a high level is indicated by repeating the same icon;
- increased wear resistance – foot on a shaded background.
Important: in addition, you should pay attention to the evenness of the edges, the absence of cracks.
Surface preparation is a tradition
Not everything is so complicated here. First you need to get rid of the old plumbing, then a chisel, a hammer is taken into your hands and the beating of the old tile begins.
At this stage, it is important to observe safety measures: wear gloves on your hands, and glasses on your eyes (they protect against dust and small pieces). After the tile is broken, you need to remove the glue with a chisel.
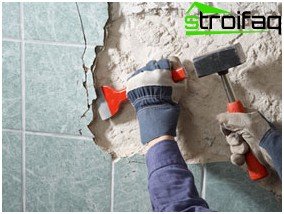
Beating off old tiles with a chisel and hammer
If the walls have been painted, the surface should be thoroughly cleaned, not paying attention to the availability of special modern adhesive mixtures intended for laying on painted walls. The experience of professionals says that high-quality adhesion of the paint to the base is a rare occurrence.
Important: ignoring this process leads to the fact that after a certain period of time the tile begins to move away from the wall (with a cement base), it rises with a “fur coat” and completely falls off.
It is very convenient to bring down paint from a strong surface with a puncher with a spatula: high speed, but a lot of noise. You can also peel off the paint using a cutting machine with a card brush. When it is not possible to mechanize the work, then you can use an hatchet, and layers of paint that are weakly held off are cleaned off with a spatula, cycles.
Leveling before laying
Before you put the tiles in the bathroom, you need to properly prepare the surface, because high-quality laying is impossible in the presence of irregularities.
Important: 80% of the successful result is exactly a flat surface..
The first step is to inspect the quality of the plaster. If she swollen in some places and is ready to collapse, she will have to clean the surface to masonry. And if the wall is solid, you can start measuring geometric parameters.

Alignment of the surface – the key to high-quality cladding
This is done using a plumb line, which checks the verticality of the walls. It’s simple: the cord is unwound to the height of the room, fixed to the wall under the ceiling, and then it becomes clear how far the wall goes to the side. Any deviations need to be adjusted, you can’t count on “it will work out”, because the tile is not a wallpaper, that is, the obstructed corner cannot be pulled in any direction.
Leveling applies to the floor, if the surface is concrete, then special mixtures or a mixture of sand and cement will be needed.
Priming is an important process
Also, before laying the tiles in the bathroom, the walls should be primed, this is done for better adhesion of the tile adhesive. Be sure the primer is selected taking into account the specificity of the room, because there is high humidity.
Glue preparation rules
This is done in the following way: the mixture is poured into the water in small portions, and then stirred with a mixer, which is attached to the drill. It is advisable not to pour the entire mixture immediately, because when using a drill with a small power, this process will be quite problematic. The result should be a mixture of not very liquid consistency (it will float off the walls), but not thick (it is difficult to stretch along the wall).
Correct tile cutting
First, the tile needs to be soaked for 40-50 minutes. in water. Then a line is marked and an incision is made on it with a roller glass cutter.

Tile cutting with a tile cutter
The incision is aligned with the edge of the table, pressed and broken. You can also put a match and simultaneously press on both sides, as a result, the tile will disintegrate exactly by an incision.
Important: the incision must be made in one motion towards you.
For better convenience, a special tile cutter is used, it differs from a glass cutter by the presence of a breaking mechanism and a large wheel size. This thing is very practical, so if the amount of work is impressive, it is better to purchase such a device.
Secrets of good styling
Laying tiles in the bathroom will be good only when the level is constantly applied. But so that the seams are the same between the tiles, you should use special plastic crosses (sold at a hardware store). These crosses can have different sizes, the size of the seam directly depends on them.
Important: for an even installation, the main thing is to lay out the first row correctly, for this the level is marked in advance.
For better adhesion of the tiles to the solution, some experts recommend soaking them whole in water for 10 minutes. If you get a tile out of the water and bring it to your ear, you can hear a characteristic hiss, which means that the water has not yet completely replaced the air from the tile. Then soaking must be continued.
You also need to know that under the enamel of some types of tiles with such wetting, watery spots remain. It is impossible to soak such a tile, you just need to wet it from the inside with a wet brush. Better yet, apply a small amount of cement mortar to the tile, and then immediately clean it off with a trowel. This is done so that there is no sudden redistribution of moisture.
Tile Laying Technology
After making sure that the surface of the walls is even, primed, cleaned of dust, debris, you can proceed with direct installation. Work is carried out from the bottom up, that is, first the first row is laid out above the floor, then the next, etc. To make the rows strictly straight, you need to put the rail on the floor and level it. The first row is laid on this rail, and for horizontal evenness of the next rows at the corners of the walls, vertical rails are beaten.
Then, at the level of the second and subsequent rows, nails are hammered into the slats, a thread is pulled between them and it is necessary to monitor strictly horizontal evenness of the rows along it.

Tile laying technology: first row fixing over a wall-mounted rail
With a notched trowel, glue is applied to the bottom surface of the tile, to the wall, then the tile is applied to the base. Press the tile slightly so that the glue is evenly distributed. A similar procedure is carried out with adjacent tiles, crosses are inserted between them.
Important: recommended seam thickness is 3-4 mm.
As for the gap, it carries not only a decorative meaning. If you do not leave it, during thermal expansion, the tile will crack or peel off. The laying of each individual tile is controlled horizontally and vertically.
Only a whole tile is not always placed on the wall, so excess in the corners is cut off by a tile cutter (it has already been said that this tool is more practical). It is necessary to take into account one important aspect: if there is no experience in such work, it is extremely difficult to cut off a part with a width of less than a few centimeters. Then it is better to use a grinder. If there is no such device, an incision is made with a tile cutter, and an unnecessary piece is carefully broken off with pliers.
Important: it is advisable to lay out the cut tiles in the corners, which will then be closed with all kinds of cabinets, a shower.
How to clad the floor
How to lay tiles in the bathroom on the floor? In principle, it fits on the principle described above. The direction of work is laying out from the far corner to the door. To keep the laying straight, the thread is pulled, then there will be no displacement, and the rows will turn out straight. To check the laid out rows for horizontalness, you need to use the level.
Important: if the room is large, a rule is applied, and, accordingly, the level.
The glue is applied to the surface of the tile, tapped with a trowel or wooden mallet until the tile is at the level of a stretched nylon cord. If the tile falls below, tear it off and add more mortar..

The color of the grout allows you to highlight or mask the horizontal and vertical lines of the joints
The tiles are cleaned after the adhesive has dried. The next step is filling the joints with a fugue using a rubber spatula. The fugue is selected in such a way that harmony with the tile can be traced. The remains of the fugue are wiped with a damp cloth. When choosing it, you should not buy the cheapest sample, but you also don’t need to use products of an unknown manufacturer: seams can crack later.
Laying tiles around obstacles
It just so happens that there are no perfect surfaces. During installation, you have to deal with outlets, sills, door frames, sewer pipes. Some tips on this:
- installation of tiles around the switch – the tile is applied to the switch, with a felt-tip pen, excess calls are marked. The tile is trimmed along the marked lines, then the space for the switch is cut further. The accuracy of the work done is checked by applying to the switch;
- laying around a large pipe – if the tile rests on such a pipe with only one angle, curvilinear cutting must be done. A sheet of thick paper is taken, lies on the intended place of laying. Then it is necessary to bend all unnecessary, excess and cut the paper along the lines formed. It will be a cutting template;
- difficult obstacle – this means that the hole falls on several tiles. In this case, each sector is marked in a certain place. Similarly, you should do with all the tiles that fall on this hole..

Laying tiles around obstacles: holes are cut with a special drill

After processing the seams, the volume of work on laying ceramic tiles can be considered completed. If you want to bring everything to a more ideal state, you can process the tile with a special composition. It will give the coating not only additional shine, but also protective properties..
Video help for beginners
To make the process under consideration even more understandable, we offer the instruction “laying tiles in the bathroom” – the video will help to understand the essence of the work.
Following all the tips, you can conduct high-quality laying of tiles in the bathroom and for many years enjoy its magnificent view.