DIY homemade air humidifier
Consider the most popular options for making a humidifying device for the home and try to give detailed instructions for each of the proposed methods.
Content
- How does the humidifier work??
- Bottle optionHow to make a humidifier out of an old bucket and expanded clay?
- Bottle and cooler humidifier
How does the humidifier work??
First you need to understand how a humidifier works. Any such device evaporates the water poured inside it, and after that it delivers the generated steam along with air into the room. You can even “draw” the following picture: a basin with water and a towel lowered into it. This simple humidifier can also be used in everyday life, however, it is ineffective, since it humidifies the air only in the immediate vicinity.
Modern units work a little differently. So, humidifiers on cold steam spray moisture with a fan and a fine mesh, steam devices use the principle of iron operation to humidify the air (a heating element immersed in water evaporates it and “pushes” the formed steam out), ultrasonic converts water into a water cloud using a piezoelectric element generating high-frequency oscillations.
Using this simple knowledge, it is possible to make such an assembly that will not be inferior to “store” humidifiers in almost anything, unless it looks different.
Bottle option
To make a “bottle” air humidifier, you will need the following materials and tools:
- central heating battery (not walled into the wall)
- one and a half or two-liter plastic water bottle (naturally empty)
- wide tape
- durable long piece of cloth or rope
- gauze about a meter long
This home-made air humidifier does not consume electricity at all, is easy to assemble and does not leave salt deposits on objects in the room, as is usually the case with ultrasonic devices now popular. But the most important thing is that it does not require any financial investments, well, unless you have to buy scotch tape, gauze and drink a half a cup of mineral water.

The cheapest humidifier is made from a regular bottle and a piece of gauze. You can’t imagine cheaper!
Manufacturing instruction
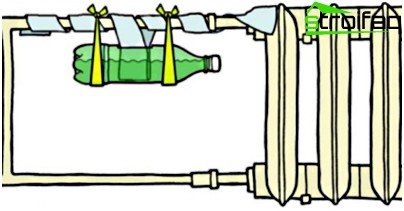
- Using scissors, cut a hole in a plastic bottle with a length of 10-12 cm and a width of 5-7 cm. The slot should be located in the side of the future humidifier.
- We take a piece of fabric and cut off from it two long strips of the same size. We hang the bottle for these ribbons to the pipe extending from the “accordion” so that the cut hole is at the top
- For greater strength and reliability of the structure, we fix the joints of the bottle and ribbons with tape
- We take gauze and fold it several times. You should get a rectangle 1 meter long and about 10 cm wide.
- We lower one end of the gauze into the opening of the bottle, and wrap the other around the pipe. You can even enhance the moisturizing effect by taking two pieces of gauze and building two wicks.
- Using the second bottle, fill the hole with water and voila, the humidifier is ready!
How to make a humidifier from an old bucket and expanded clay?
Expanded clay is an excellent material for the manufacture of an air humidifier, because it can absorb moisture and release it.

Expanded clay humidifier consists of trash cans, a bucket of water, a pump and a cooler. Simple and efficient.
You will need:
- four trash cans (two smaller, two larger)
- a bucket of twelve liters
- aquarium pump
- computer cooler with a diameter of 140 mm
- household hair dryer
- plastic ties
Manufacturing instructions
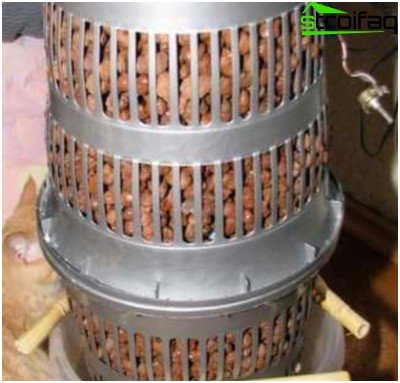
- First you need to connect two small rubbish bins to each other. They are connected along the rims with a household hair dryer, but if suddenly it is not there, you can get by with plastic fasteners. You should get the body of the future humidifier, hollow inside.
- Two large baskets are connected in the same way, only you need to first place inside your existing case of small baskets. As a result, you have on hand a two-layer unit, in its shape and purpose resembling a thermos, consisting of four plastic buckets.
- The bottom of the upper large basket must be cut with a knife or just cut a hole in it for filling expanded clay. Expanded clay needs to be taken such size that it could not “leak” through openings of baskets.
- At the bottom of the twelve-liter bucket, an aquarium pump is laid, and the tubes from it are carried to the very top of the structure. A plastic ring with holes is located “on the top” of the future humidifier – from these holes moisture will drain down the expanded clay back into the bucket.
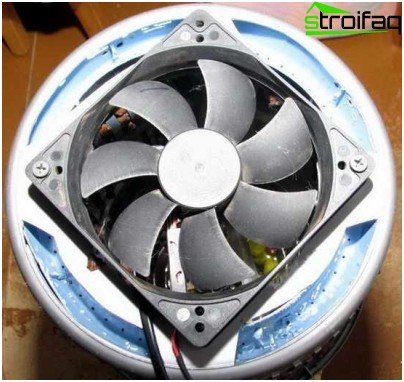
- At the top of the humidifier, you need to install a computer cooler that will pump air into the expanded clay walls saturated with moisture, and then through the holes in the trash baskets it will be “kicked out”.
A computer cooler is installed on top of the design. It will draw air to moist expanded clay.
The principle of operation of an air humidifier from trash baskets is based on the “work” of expanded clay, so it is worth paying more attention to this “ingredient”. Select granules carefully, and before filling them into the device, be sure to rinse all expanded clay with warm water.
Bottle and cooler humidifier
A cold steam humidifier costs $ 20-50 in a store. But its price can drop a hundred times right before your eyes. To watch this incredible sight, you will need one bottle of water (preferably a ten-liter), one computer cooler and adhesive tape.
Manufacturing instruction
- Cut off the top of the bottle with the neck so that the cooler can be installed in the hole.
- Fix the cooler on the bottle with tape. You can take some thick cardboard, make a cut in it a little smaller than the cooler body and attach it all to the bottle with the same adhesive tape – it will be more reliable.
- Plug in the cooler. Your humidifier is ready! True, do not expect superpowers from him..
These simple home-made humidifier manufacturing options are sure to come in handy. Even if not in a city apartment, but in the country. Air everywhere and always has to be comfortable.


