Do-it-yourself air conditioning installation
The question of whether it is possible to install the air conditioner with your own hands worries the minds, first of all, the owners of brand new split systems, who have already managed to familiarize themselves with the prices for installing climate control equipment. Indeed, numerous air conditioning installation companies highly value their services, citing the complexity of installation, the need to use expensive highly specialized equipment and the mandatory high qualification of specialists. You can’t argue with the last statement. Only newly made owners of air conditioners are still interested in the possibility of self-installation, firstly, as the prospect of real savings on payment for installation services (we are talking about a rather big amount), and secondly, as a convenient opportunity to consolidate our own skills and learn something new. Is it possible to condemn our person’s desire to get to the bottom of the issue in order to understand how to install the air conditioner yourself and do the installation yourself, no worse than a real master? If the desire is accompanied by the ability to really assess the level of their skills and abilities, then there is no price for it! The information provided by us on how to install the air conditioner correctly will help you to really assess the amount of installation work and compare your skill level with the required.
Content
- The necessary tools and equipment
- Choose a place for installation
- Detailed installation plan
- Correctly install the indoor unit
- Mount the outdoor unit
- Inter-unit communications – how to do?
Before you begin to study the detailed installation instructions, read the list of necessary equipment.
The necessary tools and equipment
- Drill with a drill.
- Electric drill.
- Vacuum pump.
- Pipe cutter.
- Rolling.
- Riemer (chamfer).
- Level.
- Torque wrench.
- Manifold Manifold

Using a vacuum pump to remove moisture and air from the system
Hand tools for installing air conditioners will also not be amiss (pliers, screwdrivers, a hammer, etc.)
Choose a place for installation
When choosing an installation location for both indoor and outdoor units, consider the following points: it is important to consider the possibility of free access to the device (for carrying out continuous work on cleaning and replacing filters).
Consider also the appropriateness of the shortest communication between the indoor and outdoor units (the point is not so much the economic benefit of using fewer consumables, but how to reduce the overall system performance while increasing the length of inter-unit communications). Do not place the indoor unit above a cabinet or tall furniture (obstruction of the flow of chilled air will cause a decrease in the efficiency of the device). For the same reason, keep the minimum distance from the ceiling and walls (15 cm). Coordination of the installation of the air conditioner with its neighbors is also very desirable, in order to avoid misunderstandings in the future. The installation of an outdoor unit does not create special problems for residents of neighboring apartments, but it is very likely that someone may not like the noise of a working fan or dripping condensate. And the last point, the most obvious one – the flow of cold air should not create discomfort for people in the room, so consider the direction of the air flow during installation. After the locations of the blocks are determined, proceed to installation work.
Detailed installation plan
- installation of the indoor unit;
- mount the outdoor unit;
- drilling a channel in a wall;
- laying and connection of connecting communications;
- circuit evacuation;
- connecting the air conditioner to the mains;
- starting the system. Correctly install the indoor unit
The indoor unit of the split system is mounted on a special plate supplied with the device. To ensure reliable operation of the unit and prevent condensate from flowing out of it, subsequently it is very important to fix the plate evenly. Therefore, to determine the strict horizontal line when marking, you must use the level. In marked areas, dowels are driven into holes pre-drilled by a punch. Then, using screws, screwed into the dowels, we fasten the mounting plate and install the internal block on it.

A mounting plate is mounted at the installation location of the indoor unit
Mount the outdoor unit
The outdoor unit is placed on pre-installed brackets outside the building, usually under a window or on the side of it for ease of maintenance. For effective blowing, the distance from the block to the wall should be at least 10 cm. If it is not possible to fix the brackets from the window, then for the work you will need to rent aerial platform or use the services of climbers.
Inter-unit communications – how to do?
A hole in the wall for the passage of communications is drilled using a perforator with a drill with a diameter of 4-5 cm. If the inter-block path will include a drainage pipe to drain condensate, the channel must be made with a slope (5-10 degrees towards the street). It is advisable to hide the section of the route from the indoor unit to the place of entry into the wall in the wall. When gating, a lot of dust is generated, so if repairs are already made in the room, it is better to lay the track outside, subsequently closing it with a decorative box.

Inter-unit communications can be hidden in a decorative plastic case
The interblock communication route includes copper pipes of the Freon line, power supply and equipment control wires, as well as a drainage pipeline (according to the rules, condensate from the indoor unit must be discharged into the sewer, but many simply take it out). The required length of wiring and pipelines is determined by measuring the total length of the route (plus a small margin of 30-50 cm).
For cutting copper tubes, it is necessary to use a pipe cutter, not a grinder or a hacksaw, in order to avoid the formation of sawdust, which can subsequently lead to breakdown of the air conditioner. Before installation, the pipelines are placed in a heat-insulating sheath, to prevent the ingress of debris into the debris, the pipeline openings are closed with plastic plugs. All components of the route are stacked together, rewound with vinyl tape, after which the track is installed in place.
After laying inter-unit communications, they begin to connect the wires and the freon highway. The installation instructions for the air conditioner must contain a wiring diagram, which must be followed in the work.
The length of the tubes is adjusted (cut the desired size), then it is necessary to remove the burrs (chamfer using a reamer). After threading the nut, each edge of the tubes is expanded by rolling. Then the edges are connected to the fittings of the indoor and outdoor units, tightening the nuts with a torque wrench (the connections must be absolutely tight).

After checking the tightness, air is removed from the line using a vacuum pump, a manometric manifold makes it possible to control the pressure
Having finished connecting the route, they check the tightness of the line and “vacuum” it (remove moisture and air) using a vacuum pump. To do this, a vacuum pump is connected to the service port of the outdoor unit through a manometric manifold, which, evacuating the air from the system, creates a vacuum in it. This process lasts about 20 minutes (depending on the volume of the circuit). After turning off the pump for half an hour, observe the change in pressure, if the needle of the pressure gauge does not deviate, then the system is tight. Only after a thorough tightness check is it possible to open the taps of the outdoor unit and fill the circuit with freon. Caution, freon leakage can cause compressor failure, but more importantly, the extremely harmful effect of freon on the human body.
So, the system is assembled and filled with refrigerant, it remains to connect the air conditioner to the mains and check its operation. The connection diagram of the air conditioner is simple, for most household split systems, the power supply is connected to the indoor unit, for this you only need to bring a power outlet to it.
Now you have a general idea of how to install the air conditioner with your own hands. It was about installing a split system as the most efficient variety of domestic air conditioners.
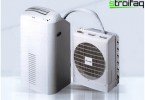
Installation of a mobile air conditioner does not require the intervention of highly qualified specialists: you only need to place the device within 2m from the window (to remove hot air), and then connect it to the network.