A cozy garden with a gazebo, a green lawn with a pool and a beach, flowering flower beds, a garden that pleases with a plentiful harvest – you can become the owner of all this if you buy a piece of land. However, natural possessions require care and attention. If at first you will enjoy running across a bucket and irrigating plantings, then in time you will get bored with such a duty. This is normal. Sooner or later, any landowner comes up with the idea that an automatic irrigation system would do just fine with such a mission.
Content
- Step 1 – Plan
- Step 2 – procurement of materials
- Step 3 – preparing and installing the system
- The subtleties of organizing watering and operating the system
Step 1 – Plan
The plan is the beginning of the beginning, because in order to ensure automatic irrigation of the site, a lot of work remains to be done. However, a “base” is required, from which you will “dance”. After all, you need, firstly, to purchase equipment (and before that to calculate what and how much to purchase), and secondly, to compile a list of works in order to understand how much time and effort the process will take, if you can handle it yourself.
This is important to know! Experienced landowners recommend drawing an irrigation scheme as soon as you have acquired a plot, so that later you do not spoil the plantings and do not violate the harmony of the landscape.
Where to begin? Take ordinary drawing paper (or, as it is often called, graph paper), put on a sheet a house and other buildings on the territory (gazebo, porch, playground, pool, well, and so on), paths, grill zone – all this you can’t already move to another place. It is also necessary to apply the plan and planting zones, however, if you have not planted anything yet, it will be possible to place the plantings taking into account the future location of the irrigation system.

Nature will not fail to thank you for installing an irrigation system with lush vegetation, abundant harvest and its beauty
First mark the location of the water intake and home pumping station. Ideally, if the water flows from the center of the plot, then the sprinkler lines are the same length, which means that the water pressure inside the system will be uniform, therefore, your vegetation will be watered uniformly. From the place of the water source along the perimeter, a highway and its branches are drawn, on which the marking of the location of sprinklers (sprinklers) is made. The number of the latter depends on the radius of their action. If you plan to purchase sprinklers with a radius of, for example, 25 m, then on the plan diagram you need to draw a compass to outline the coverage area of each of the sprinklers. All groups of watering heads need to install solenoid valves. You can see an example of the plan in the photo below..

The scheme of the automatic irrigation system
As you understand, all buildings and areas where water is not desirable should not fall within the range of sprinklers. Then the automatic irrigation scheme is transferred directly to the territory. To do this, make markings with pegs and a cord. As pegs, you can use convenient materials at hand (planks, welding electrodes, and so on). It is better to purchase a cord polypropylene, color or white – such “beacons” are reliable and visible from afar. Set the marking at a certain distance from the intended location of the system and make sure that there are no rocky areas on the path, otherwise you will have to adjust the layout plan later. As you can see, a do-it-yourself automatic watering system is not a prohibitively complex project, as you might have previously thought, although it is a laborious unit of work requiring attention.

This is how a project developed by a professional looks like. You can also contact the profile company for similar help.
Step 2 – procurement of materials
When you planned the automatic irrigation device and marked out the territory, you need to carefully compare everything with the plan scheme and calculate how many materials you should buy. To make automatic watering with your own hands, as a rule, the following components are required:
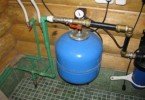
- pumping station;
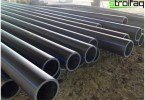
- pipes;
- connecting elements;
- sprinklers;
- pressure regulators;
- Filters
- solenoid valves;
- tools for digging ditches and works;
- controllers.

When calculating the territory, consider the radius of action of each sprinkler to avoid irrigation of buildings
The productivity of the pumping station directly depends on the area of the irrigated area. You can correctly calculate the power with the help of expert recommendations (in the Network or in the store). “Why buy filters?” – you ask. As a rule, a home-made well serves as a source of water, which means that grains of sand and other particles can enter the system, which can damage sprinklers or even clog pipes. So it’s better to play it safe and install filters. Pressure regulators are needed for a system that involves installing sprinklers with different pressures or when you are doing automatic drip irrigation. Controllers and electromechanical valves take on the function of the sequence of irrigation zones of the site. The controllers are responsible for the closing and opening of the solenoid valves, and the latter – for the supply of water to the sprinklers. Experts advise to buy pipes from polyethylene of low pressure. Their cross section depends on the area of accommodation. At the base – more, and closer to the sprinklers – less. Dozhdevateli, as you already understood, have a different radius of impact, you should have thought of it in advance. As for the types of sprinklers, they are:
- rotary (rotating);
- statistical.

There are sprinklers that can be hidden in the ground, then nothing will disturb the harmony of the landscape of the site
Step 3 – preparing and installing the system
The plan is ready, the markup is done, the materials are purchased, which means it’s time to install automatic watering of the garden. Get ready for the next steps..
- Installation of a pumping station.
- Digging ditches.
- Pipe laying.
- Connection of components to the pump.
- Sprinkler Installation.
- Installation of controllers, motion controllers, filter and solenoid valves.
- System setup and startup.
In general, the described work procedure briefly but clearly describes how to make automatic watering, however, some stages of the process still need a more detailed description. What depth do trenches need? Professionals say that the ideal depth of the trunk and its branches is 1 meter. Then the pipes will be below the freezing area of the soil. Of course, such work is time-consuming, so you can do, like many amateur gardeners, and dig ditches about 30 cm deep, roughly speaking, a little more than a shovel bayonet. But you need to make such recesses with a certain bias and installation of drainage valves at points located below the rest. Why is this needed? To drain all water from pipes before preserving the system for the winter. It is recommended to connect pipes, valves and other components of the line to the surface, then the finished pipeline is laid in a ditch. Next, you need to make sure the system is tight, then you can wind the sprinklers and fill the trenches with soil. It remains to adjust the direction of irrigation of the sprinklers and turn on the water.

Collect the pipeline before diving into the trenches. The subtleties of organizing watering and operating the system
When all the work is done, the main thing is to provide proper care for the system, then it will serve you long and faithfully. So, the basic rules for the operation of irrigation equipment:
- inspect filters twice a month, change them if necessary;
- keep the system parts clean;
- periodically check the heads of the sprinklers and, if dirty, clean the holes with a soft brush;
- monitor the soil at the equipment locations, eliminating soil subsidence;
- Before the start of the season, change the batteries and certainly remove them for the winter;
- thoroughly drain the water before preserving the system;
- at the end of the season, dismantle the solenoid valves or purge the system with compressed air;
- humidity and precipitation sensors for the winter for storage in a warm room.
And now a little about the intricacies of organizing irrigation:
- watering plantings is recommended in the morning or evening hours (experts say that evening is the ideal time);
- saturation of the earth with water can be considered sufficient if the soil is moistened by 30-50 centimeters;
- an excess of moisture is no less dangerous than a lack, since it leads to rotting of the roots;
- watering the plantings with an open stream is not recommended;
- the frequency of use of the system, of course, depends on many circumstances (both weather and the type of plantings), but adhere to established standards, for example, the lawn should be watered every few days and at least once every 7 days.

Treat the irrigation equipment with care, watch for its cleanliness, then the system will serve you for many years
Now you know how to do automatic watering with your own hands, therefore, make an unmistakable decision whether to do this block of work yourself or contact professionals.