Step-by-step instructions for laying laminate flooring
Contrary to popular belief that laying laminate is a simple process and does not require special skills, it will never be superfluous to study the theoretical side of the issue. With all the apparent simplicity, there are some difficulties. We offer you detailed instructions for laying laminate flooring..
Content
- Laminate Laying Tips
- Tools and materials
- Methods Based on Material Type
- The procedure for working with locks such as “Click”
- The procedure for working with locks such as “Lock”
- Laying laminate with adhesive
Laminate Laying Tips
So, the first advice – the laminate can only be laid on a properly prepared base. A dry screed will cause a short service of a beautiful floor covering – excess moisture will lead to deformation of even a very high-quality laminate.
The surface of the base under the laminate should be solid, perfectly even and dry. You can lay the laminate on the plank floor, linoleum, use as a basis sheets of fiberboard, OSB boards or chipboard. If the floor surface is uneven, use a special leveling mixture.
The process of laying the laminate directly will take a little time, because the main structural feature of the material in the assembly resembles a designer. Implemented the ability of each element of the flooring to be attached to the previous one, without being fixed at the level of the base of the floor.
In order to avoid gaps and inconsistencies, it is extremely important that the surface on which the laminate is laid is flat. Then the laminate will lie monolithically, in a single plane. The permissible height difference according to the technology of laying the laminate per 1 m of coating should not exceed 2 mm. The most common option for leveling the floor is filling a special self-leveling mixture (liquid floor) or pouring a concrete screed. The backing is a must! In addition to its soundproofing, heat-holding and vapor-insulating properties, a polystyrene or foam-backed substrate has another useful property – it will help smooth out small irregularities in the floor.

Laying laminate flooring
The technique of laying the laminate is based on the principle of “floating floor”, which provides for the ability of the floor to move. Do not be alarmed, we are talking about the properties of any body to resize when temperature changes. Remember from the lessons of physics – when heated, the body expands, and when cooled, it narrows accordingly. So that the flooring does not once become mounds from the fact that the heating was turned on, it is necessary to allow the material to expand. In other words, the technological gap to the wall (about 10mm on average) is another indispensable condition for the durability of the laminate flooring..
Before laying, leave the laminate in the room for several days. Pay attention to the air humidity indicators – not more than 70%, in order to avoid deformation of the material. To make the seams from the coating elements less visible, it is better to lay the laminate parallel to the light stream.

Direct laminate flooring
Tools and materials
- Laminate.
- Substrate.
- Building tape.
- A hammer.
- Jigsaw.
- Hacksaw.
- Lining block.
- Spacing wedges.
- Pencil and ruler.
Methods Based on Material Type
- Depending on the laying direction (direct laying, diagonal laying, as well as laying with “herringbone or square”).
- From windows.
- According to the method of joining panels (adhesive and lock method).
If the laminate panels are laid parallel to the walls, then this method of laying is called direct. This is the most economical way of laying – cutting costs of no more than 7%. Diagonal laying is more complicated and more expensive in terms of material consumption – cutting costs are approximately 15%. For laying the herringbone laminate, a special laminate is used (panels of a smaller size and a special lock design that allows fastening of elements at an angle of 90 degrees). This installation method is the most difficult in technical execution..
You can lay the laminate in the line of light and against it. If you lay the laminate in the line of light, you can achieve a visual effect of a continuous continuous surface. If the laminate is to be laid in a narrow room, then laying the panels across can visually “expand” the space, but if the panels are stacked across the line of light, the seams between the panels can cast a shadow, an illusion of perfect smoothness of the floor in this case is impossible.
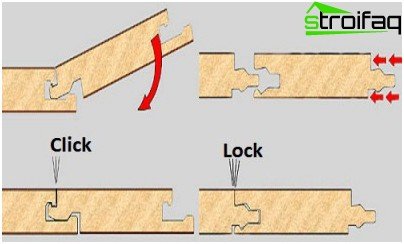
According to the method of connecting the panels to each other, there is a laminate with a lock and adhesive connection. There are two types of locks: “Click” and “Lock”, depending on the type of lock, the styling technique is different.

The difference scheme of locks of type “Click” and “Lock”
The procedure for working with locks such as “Click”
On a clean, even base you need to spread the substrate. Laying the laminate begins from the wall: the first row of panels is assembled, wedges are inserted between the wall and the extreme row of laminate panels (using them a technological gap of 10-12 mm is formed). Panels of the first row should face the ledge to the wall. Make sure that the locks on the panels fit tightly, there should not be any gaps between the panels. In order for the locks to close properly, you need to insert the panel into the groove at an angle of 45 degrees, lower it to a distinctive click. The last panel in the row is cut with a jigsaw to the desired size (mark the distance with a pencil, do not forget about the technical clearance).
When laying the following rows, make sure that the panels are laid “apart”. In other words, avoid overlapping joints; they should not be cruciform. The second row is laid as follows: first, the panels are connected in the end lock, forming a strip of the required length, then the strip is moved and inserted into the groove at an angle, then lowered until it clicks. Thus, we stack the subsequent rows. If the width of the panels corresponds to the required width of the room and the last row ideally completes the flooring – you are incredibly lucky. But most often, the panels of the last row must be cut along. To do this, mark the desired dimensions, draw a strip with a pencil and cut it off with a jigsaw.
The procedure for working with locks such as “Lock”
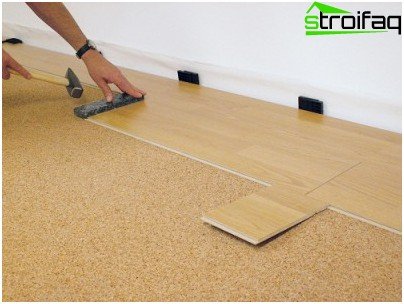
In this case, the laying of the laminate is somewhat different from the previous one in that before the connection of the panel is installed horizontally, combining the spike of one with the groove of the other. Then, using a wooden extension and a hammer, the panels are tightly adjusted so that there is no gap between them. For laying the second row, you do not need to immediately collect the entire strip, the first panel is driven into the groove of the previous row, before installing the second panel, 1cm is backed from the end of the first and connected to the previous row, after which they knock the second panel up to connect to the end of the first panel. The last row is lined with a special assembly crowbar.
Laying laminate with adhesive
Of course, the castle compound of the laminate is the simplest and fastest than the adhesive. So why complicate your work? The thing is that the adhesive joint is used to protect joints from moisture, this method significantly extends the life of the laminate. The disadvantages of the adhesive method of joining is the inability to replace damaged panels, as well as the inappropriateness of use on warm floors. With the adhesive method of joining, only waterproof glue should be used. The operating procedure is the same as with “Lock” type locks, but glue is applied to the ends of the panels before joining. The amount of glue is determined empirically during operation, excess glue immediately carefully removed.
As you can see, everything is not as simple as it seemed at first glance. But there are also no reasons for panic. You now know about the possible difficulties when laying laminate flooring, and you will undoubtedly be careful.
Perhaps for many readers the question “how to lay a laminate” remained open – an instruction, no matter how detailed it is, does not replace the clarity of a real example.


