The idea to transform the loggia into another room comes to the minds of many, but only a few actually decide to bring it to life. The imposed myth about the high cost and complexity of the process repels someone, some are not able to pay for the work of specialists, and they don’t know how to insulate the loggia on their own. In this article, we will try to convey to the former the economics of transforming the loggia, and the latter to describe in detail the entire process from beginning to end.
Content
- Is it necessary to insulate the loggia?
- Meticulously preparing for warming
- Glazing – a must
- What is necessary for thermal insulation
- How to insulate a loggia yourself
- Construction of a thermal insulation system on the ceiling
- Floor insulation on the loggia
- Wall insulation: rules of implementation
- Finishing work: creating design
- Conducting heat to the loggia
Is it necessary to insulate the loggia?
Of course, it all depends on individual preferences. If you are determined to use the loggia only as a warehouse, then you do not need to insulate it. But in order to realize one of the most interesting design projects, of which there are a huge number, warming is a necessity. In addition, this will reduce heat loss and significantly reduce the penetration of dust, noise and harmful gases into the room, which is especially important for people living in apartments with windows facing the main streets and avenues with heavy traffic.
Installation of double-glazed windows will reduce the level of noise and dust penetrating from the street
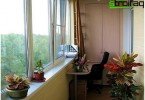
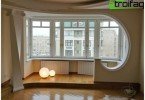
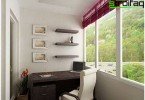
On the loggia you can place a small greenhouse, set up a coffee table and chairs, arrange a sports corner with exercise equipment and much more. In this case, warming again can not be avoided.
It is also necessary to insulate the surfaces of the loggia if you decide to combine it with the adjoining room, because otherwise the external wall will become damp and moldy in the cold season, and the room will have a very low temperature.

Combining a loggia with a living room will increase the usable space of the apartment
Meticulously preparing for warming
The parapet, or external fencing of the loggia, is the weakest link in warming. After all, it is in contact with the street, designed to pass light with the simultaneous exclusion of the penetration of noise, moisture, dust and cold. The most often parapet is a reinforced concrete slab, in which case, before insulating the loggia with your own hands, you need to carefully lay wide slots (for example, with a brick) and concrete narrow.
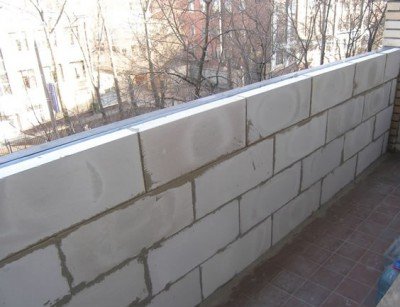
For the parapet of the loggia, laying in half a brick is enough to not overload the structure with excessive weight
If the parapet is metal or it does not match the level with the upper floors, before warming the loggia, it is necessary to lay the parapet and side walls. For this purpose, it is better to use foam blocks or ceramic bricks. The outer surface of the fence can be trimmed with plastic siding or decorative panels, this also insulates the area of the loggia.
Tip: all wooden parts should be treated with any antiseptic composition in order to prevent the emergence of bacteria that lead to destruction and rot..
Glazing – a must
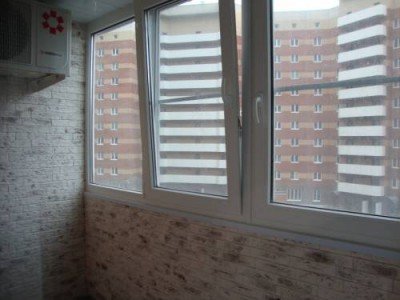
Before starting insulation, the loggia must be glazed. To do this, you need warm plastic structures, the installation of which should be entrusted to specially trained people. For loggia glazing, two-chamber packages with glasses of at least 32 mm thick are best suited. With proper insulation, their installation should be accompanied by the installation of expansion additional profiles to the left, above and to the right of the double-glazed windows.
After installation, the joints and joints should be thoroughly foamed with mounting foam, which should lie flat, without defects and cracks. Then the foam is closed with special fillers on the outside – this will help protect it from the harmful effects of sunlight.
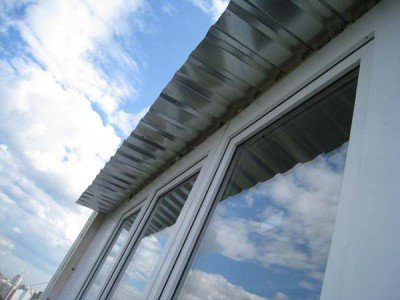
After installing double-glazed windows, all cracks must be carefully foamed.
In some cases, the apartment owners stop at this stage and install a heating device. As a rule, this does not make any sense, since without proper insulation of the parapet, walls, ceiling and floor, the temperature on the loggia will be only a few degrees higher than the outside.
What is necessary for thermal insulation
To carry out work on warming the loggia you will need:
- Thermal insulation material, usually foam, extrol or technoplex.
- Foam and cleaner for it.
- Vapor barrier material (penofol or isolon).
- Dish type plastic dowels, dowels in the form of a plastic stopper, nail dowels, self-tapping screws for attaching linings to logs and to a concrete slab, for suspensions, nails.
- Metallic Tape.
- Antiseptic for coating lag.
- Bar on logs and on linings under them for raising the level of the floor surface (chamber drying 45×60 or antiseptic 50×70).
- Guides for fixing finishing materials inside the loggia.
- Galvanized profile and crabs for installation.
- Galvanized suspensions for mounting rails and profile.
- Wooden bars 50×20, 50×30, 45×20 or 45×30.
- Tool (hammer drill, screwdriver, pliers, metal scissors, tape measure, level, pencil, level with a tripod, jigsaw and foam gun).
How to insulate a loggia yourself
Construction of a thermal insulation system on the ceiling
Go to ceiling insulation loggias. To do this, the suspensions are attached to the ceiling for subsequent installation of the rails. Now the polystyrene foam plate is attached to the ceiling surface with mounting foam or mounted on plastic plate dowels, after making small slots for suspensions in the insulation.
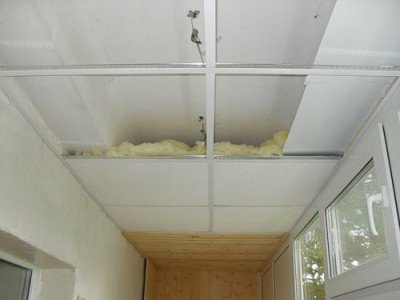
Loggia ceiling insulation with a suspended frame structure
Tip: the core of the dowel (plastic or metal) should be selected based on the weight of the extender.
Holes must be sealed with pieces of insulation or foam.
Floor insulation on the loggia
So, how to insulate the floor on the loggia? First, gaskets made of an antiseptic-treated timber, which serve as supports, are attached to the base plate.
Important: support gaskets should be level.
During installation, it should be ensured that the height of the beam, together with the thickness of the log, is such that they rise above all layers of insulation by at least 5 mm. The lags are attached to the supports using self-tapping screws, and between them are plates of insulation material. Next, a vapor barrier layer is laid out with foil out. This must be done so that the joints of the vapor barrier layers are not in the outer corners, only in this case the occurrence of “cold bridges” can be avoided.
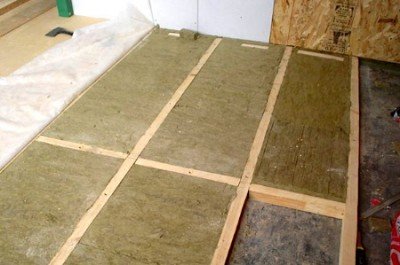
Laying insulation on the floor of the loggia: laying the beam and the location between the lags of mineral wool
Important: the formation of cold bridges is also caused by the installation of wooden logs in the thickness of polystyrene foam plates, and the use of a metal frame installed in the body of the plates.
All connections of the foil layer must be glued with tape to achieve the effect of a thermos. If the result is a loggia combined with a living room, then insulation and flooring carried out to a height of the inner plane of the wall. At the same time, the floor level becomes higher due to the insulation located between the lags.
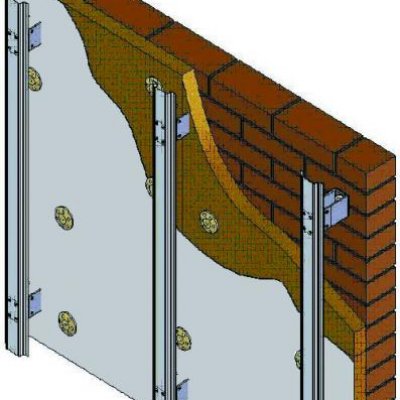
Wall insulation: rules of implementation
At the first stage, it is necessary to determine the need for insulation of the walls of the loggia. The walls that border the street, as well as the adjacent corners of the walls bordering the room, must be carefully insulated. Next, we determine the height of the additional expanders. For insulation, it is better to use polystyrene boards having the selected quarter. This allows you to get rid of through holes in the places of their connection. If such plates were not available, then ordinary plates should be laid in two layers with offset joint seams so that through holes are not formed. The first layer of insulation material is attached to the floor slab using plate-shaped dowels, and the second can be attached to the first mounting foam.

Insulation of the walls of the loggia from the inside
So, we insulate the outer walls under glass; side walls bordering the street, as well as neighboring cold loggias; vertical angles of walls adjacent to residential premises.
Along the plastic structures and under them, to the warm side wall and along the parapet, it is necessary to attach a vertical strip of insulation material with a height equal to the height of the side wall and the width:
- for a panel house – more than 300 mm;
- for brick – more than 500 mm.
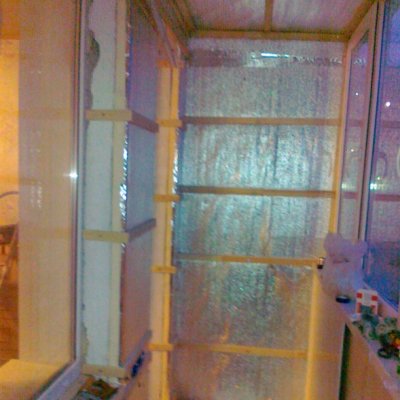
This can be done with foam. The corners are insulated with a layer of insulation of 20-30 mm, and on top of it is a foil vapor barrier with foil inside the loggia.

On top of the insulation, a foil vapor barrier should be attached
Tip: to achieve the best result, vapor barrier is installed on the warm side of the insulation materials.
On top of the vapor barrier, suspensions pre-attached to the walls and ceiling are installed at the level of the guides so that an air gap forms between the insulating layer and the finishing material.
Installation of guides on the walls of the loggia
Tip: at this stage, it is necessary to install guides for fixtures, curtains, drying for linen and other equipment.
Important: Before installing the rails on the external wall of the house, it is necessary to carry out electrical work.
Guides can be installed from a wooden bar or from a galvanized profile.
Finishing work: creating design
The question of how to properly insulate the loggia has already been almost resolved, it remains to give the room a cozy finished look. On all surfaces, a crate of dry timber 40×20 mm treated with an antiseptic is applied. The crate is set by levels, fastened to dowels and self-tapping screws directly to concrete.
Drawing a lathing on the insulated walls of the loggia
Finishing materials are attached to the crate. Most often, plastic panels or drywall with high moisture resistance are used for interior decoration of loggias. The disadvantage of using drywall panels is the need for large-scale follow-up work. Drywall requires a primer, putty and paint or wallpaper sticker.
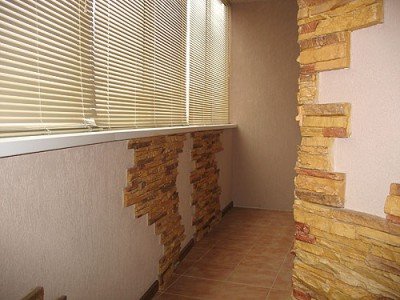
Loggia after decoration: a cozy resting place with a unique decor
We install plastic window sills under the windows leading from the room to the loggia, and a PVC threshold under the door, under which you must first install an additional wooden log processed with a special antiseptic solution.
Conducting heat to the loggia
In order for the loggia to not be cold, the installation of additional heat sources is necessary. It is strictly forbidden by state standards to conduct water heating on the loggia, so heat convectors would be the best option. If the area of the room is more than 6 squares, then you need to install two fan heaters at opposite ends. Can use oil mobile heaters and electric fireplaces.
Possible errors and some tips when warming the loggia
Incorrectly performed insulation work can lead to condensation on the walls (the “crying” wall effect) between the insulation and the wall. There is a very simple explanation for this phenomenon: the warm air of the room condenses upon contact with a cold wall that faces the street. A large accumulation of moisture in the insulation layer is fraught with a significant decrease in the thermal insulation properties of the material and the appearance of fungus on the walls, destroying the building.
If leaks appear on the loggia from time to time, all interpanel seams must be sealed.
It is better to entrust all the work on warming the loggia to true professionals, this will avoid unnecessary costs, both financial and time.